Friday, May 26, 2023

Blood Angels Contemptor - Part IV (Showcase)


He'll be charging through the rubble when he comes...

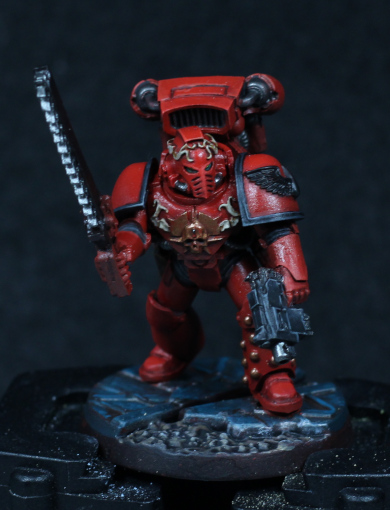
The third monopose Contemptors is now "done". This is the second part of a duel with the original Sons of Horus Contemptor painted earlier in the year, and I have certainly learned a lot in that time, even if this is perhaps the dreadnought I'm least happy with so far.

The pose was never quite right. I should have pivoted the pelvis slightly to better give a sense of movement, and perhaps strengthened contact points so that one foot could be in the air. That is a definite problem with models: giving them a sense of movement despite being a static object. Credit where it's due, Games Workshop has been getting a whole lot better at this recently.

The head I'm not a fan of here either. I perhaps should have tried to keep the original, and just tilted it up rather than swapping out for a spare tactical marine helmet. The size isn't quite right, and it messes up the proportions of the whole model.

If I were to make more of these, I would also very much consider finding a way to sort out proper "upper legs". I'm sure there are 3d printed pieces available, and it's small enough that the difference in finish wouldn't be noticeable. Or I could just improve my sculpting skills, which is definitely a cheaper option. In any case, that's been a weak point of these models - they're otherwise just as flexible as the new plastic kits, with a bit of planning.

There's not much point dwelling on the painting of the dreadnought itself as it's no different to a normal Marine, and I just followed that forumla. The golds didn't quite turn out as bright as I wanted however, but I could have mixed more Auric Armour Gold in for highlights, and edged with something else - perhaps a mix of Auric Armour Gold and Stormhost Silver. The reds are fine, but I really need to push the contrast between shadow and highlights more, particularly on the larger models. Edge highlights being done both before and after the matt varnish definitely worked well. It takes more time, but the result is worth it - and actually I can probably move faster on the pre-matt-varnish stage knowing that it will be faded out a lot by the varnish. I didn't really like how the scratches were turning out though, and weathering for Blood Angels is going to take a bit more practice before get the hang of it (mostly because I don't weather them, but also because I find it challenging to do make it properly visible against a deep red).

I like the black detailing, and it very much fits with a pre-Heresy look. It's artistic, but not extravagant. The visual interest is subtle but helps to break up large panels. Ultimately, however, I think I prefer some old school checkers and bright colours that have been dirtied in battle. Personal heraldry, bright wing motifs, patterning around the power fists, that kind of thing. The sculpted Blood Angels models don't lend naturally to that, however the monopose ones do. It would also have taken me a really long time - perhaps I can practice that style with future Titanicus models, or better yet the Imperial Knights currently sitting in a box.

What I think I did manage to salvage was the base. I could have put another "slab" towards the back, but it's still ok. There are some skulls for a nice finish, but what really did the job was the marbling. Exactly the same colours as used on Horus' base were used here, but I borrowed some of the heavy drybrushing from Rylanor's base and used that to help bring out the texture. The end result was an excellent foundation to build up the marbling effect from. Close up, marbling is often multiple thin striations of different rocks, which when cut give the well known pattern. A little further out and the thin lines blur into a kind of darkened line - and at the scale here, that means thin glazes to build up a kind of blurred and soft shadow in main colours, then later going back in with a darker colour for bolder lines where the shadow is heaviest. Thin, shaky lines are not enough - the blurred area outline is also critical to giving the marbling look. When in doubt, look at marble statues, but not just up close; observe marble patterns from multiple distances, from short range to several metres away.

Your fight is with me, traitor!

-- silly painter.


Tuesday, May 23, 2023

Ancient Rylanor - Part IV (Showcase)


Purple Flame

Another Contemptor joins the "calling it done" group. There is a whole lot more that I could do: more highlights, more panel lining, subtle oil and grime colours, etc. I have more models to do however, and I'm happy enough knowing that it's not lack of skill stopping me - it's just wanting to do something else. Also I'm not going to proof-read this, so excuse any mistakes; this is not a professional blog, just notes on what I did and why.

Lack of weathering kind of worked in this case I think, and I'm glad I kept everything more clean just to show it off. The purple highlighting works quite well, and the airbrush grain isn't really visible beyond a few centimetres.

The trim metallics is simply continued with Liberator Gold for edges, and some glazing to restore shine, and then Canoptek Alloy for the higher edges and eagle. I wanted the eagle to stand out slightly, and it just seemed that extra highlight attention would do that. Canoptek is also starting to be a favourite colour to edge highlight with because it's very desaturated without being silver.

Some of the metal areas I kept dulled from the matt varnish as a style choice. The best example of this is the assault cannon: I didn't want it to be bright, I wanted dark without being black. Using metallics for colour, and then varnish to remove the shine and dull it slightly, works for weapon barrels.

The shield designs I didn't know what to do with. Too bright and it would draw too much attention, but it needed something artistic. I also couldn't decide what to write across the scroll, and for that I ended up showing the Legion number (III) - so I leaned into that to write a stylised version of III on the shields. A black shield background, with gold lettering - and that was done using an artificer brush, a good amount of concentration, and a magnifying headset. Simple, stylised, and without clashing against the rest of the model.

The left leg design I wanted as (probably) laurel wreath I painted up as a green just because I didn't want it to be metallic, and it shouldn't draw too much attention away from the face (helmet) area, especially with the teal around the latter. Viewed from the side however, and then it starts to be a bit distracting, so the shoulders have white decals (eagle heads from some Aeronautica kits). These decals are far too bright, as I suspected might happen, but I'm not going to try change that now. A slightly more grey would have been better perhaps, but I won't be doing that now. I'll need to plan how to do such things in future as I'm not sure just painting over the decal would work.

The base was another case of just playing around. Celstra Grey I think, but then thinned Basilicanum Grey over it, some Black Templar to outline some areas better, and then just drybrushing up with off-white and slightly blue paints. Somehow the drybrushing worked really well and makes the designs on the base really stand out and show more depth than is actually sculpted. The value contrast against the dreadnought body helps, the details are clearly visible, and how everything ties together makes this one of the better bases I've done recently. Agrax Earthshade was also used to surround some of the rubble to separate it from the surface it's sitting on, making it look like...rubble.

Not looking forward to more resin models, but I am getting better at dealing with them. Now I wonder if perhaps Rylanor is looking for ordnance.

The count now stands at 9.

-- silly painter.


Sunday, May 21, 2023

Imperial Fist Contemptor - Part IV (Showcase)


12 barrels of Imperial Fi..repower

The Imperial Fist Contemptor rolls off the painting desk and into the photo area, as I'm now labelling it as finished. I'm sure some kind of markings on the front facing surfaces of the "shoulders" would be appropriate, but I actually don't know what to put there, so I'm leaving it alone. I can't continue to spend the rest of the year on this model.

Starting with the trim, that's ultimately:

  • Warplock Bronze
  • Balthasar Gold (mixed with Warplock Bronze, see the previous post for more details)
  • Castellax Bronze glazed in areas, highlighted on more prominent edges. The glazing was simply to give back some shine after the matt varnish.
  • Sycorax Bronze as a final edge highlight.

I'm of the opinion that the colour worked well for the trim. It's basically a darker brown, but it doesn't clash with the yellow; the trim frames and outlines the panels, helping give shape to the dreadnought.

The metallics elsewhere are also dark. Light silvers would again only clash with the yellow, so keeping them closer to black seemed appropriate. Looking at real gun barrels (or at least photos of them) gave inspiration for this, and I didn't highlight them after the matt varnish - I kind of liked the more functional aesthetic it gives, which suits the Imperial Fist character.

I tried some writing with a very fine brush tip and a good deal of patience. The VII (7th Legion) was first, and quite easy - just some straight lines. I don't recall which colours I mixed for the lettering, but black would have been too stark, so a kind of lighter brown was used. If I really wanted to go for it I might have added highlights to create a kind of engraved 3d look, but I was concerned about ruining the look and so left it as is.

The other writing was Terra across the scroll. My first attempt was actually far too small and looked out of place, so I went with a more stylised look that spread across the centre. It's not perfect, but I'm quite happy with the result. The semi-cheating secret on the second attempt was also to use a sharp pencil point to sketch the locations first, painting over it later. The was certainly advantageous because I did need to correct it a couple of times.

The base I'm not entirely happy with, but think I managed to rescue something out of it. The original intention was to a show the dreadnought walking across a road, up to a curb and onto some walkway pavement. It doesn't really work that way, but I basically just didn't want to spend time doing more. I wanted to try get something out of a basic base. The etched brass designs are supposed to be drain covers, and it's these that help the most - I painted some rust on them, added dirty looking colours around, generally made it look like dirty water was running through on a regular basis. This really helped to break up the lines and colour monotony without me having to give more attention to the "road" (which was painted the same as on the Titanicus models).

I'm not sure what I would do for future Imperial Fists model bases. I'm not really that good at urban bases unless it's just rubble everywhere - and that gets a little boring.

Otherwise I think it's an acceptable model for one of the mono-pose Contemptors. The battle damage works exceptionally well against the yellow, the helmet colours make that the centre of attention, and there's plenty of room to do a lot more if I wanted.

The count is now at 8.5, with the other dreadnoughts not far behind.

-- silly painter.


Sunday, May 14, 2023

MkIV Assault Squad - Part II

"I'll just cut myself a slice."

The MkIV assault squad has been sitting in the background for quite a while, but I've managed to get some more of them done while working on the dreadnoughts. They're still a long way from being finished, but the most difficult parts are done and they're mostly "filled in" - just a few details left (details that will nevertheless take ages to get done!).

There's nothing too surprising on the Marines themselves. Edge highlights have been applied, but a second pass will be done after the varnishing stage. Each model is somewhat unique from the Forgeworld parts, making batch painting less effective, but some areas can still be done all at once. Shoulder pads in general still need some work, particularly the Legion symbols, and that can all be painted up at the same time. It's the bases and particular nature of the resin production process that have been the most troublesome.

I find older resin parts from Forgeworld to be hit & miss. The detail with resin is incredible, but when there are mistakes, there are _really_ mistakes and they're next to impossible to clean up properly. Lines where the moulds join can shift, causing pieces to not just have obnoxious mould lines, but for each half to not be aligned at all. I really do like the detail, but I'm glad that the plastic process technology has improved so much that Forgeworld is reducing its contributions. This should in theory help Forgeworld concentrate on quality over quantity. The multitude of little mistakes are making these some challenging models to paint - not in a technical sense, just in terms of motivation. No small wonder that as a bit of a break I focused on the bases recently.

I've not been sure about the bases for quite a while, but ultimately it was inspiration from Trovarion's Grimdark Blood Angels video that set me on the current path. Green is normally a great colour for eye lenses because it contrasts against red, however on these models the eye slits on the helmets is very small: the lenses are painted, but are so tiny that visually they're simply lost at more than 20cm away. For this reason I didn't want a green base - it would draw far too much attention. Blue is a complementary colour, or pick a neutral of brown or grey. I had trouble visualising any sort of blue until I saw the video. With a bit of looking over colours on the palette (incidentally from lenses on one of the Contemptors) I've come up with the following:

  • Iron Warriors across the metal plating.
  • Dawnstone on any raised ridges. This will help them show through the next step.
  • Incubi Darkness across the metal plating, and any artificial decking. This can be slightly patchy, and I find better if it is.
  • Sotek Green dabbed onto metal plating in any area that seemed more opaque with the Incubi Darkness. Leaving edges mostly alone will allow the metallic undercoat to show through better.
  • Mixing a little Temple Guard Blue into the Sotek Green on the palette can also be used to brighten some areas just a little more if desired.
  • Rhinox Hide thinned down and dabbed into recessed areas, or anywhere that dirt would naturally gather.

I intend to add a little more Iron Warriors on select raised edges after the varnishing stage just to represent the wear and tear that many boots passing over any metal walkway would result in. The more artificial decking (perhaps some kind of bitumen surface) is far more haphazard:

  • Incubi Darkness as mentioned previously. This is just to tie it together with the metal plating.
  • Random mix of greys and light colours drybrushed, dabbed, and generally randomly applied across the surface to give it some texture.
  • Basilicanum Grey over the surface.
  • Agrax Earthshade in places to add variety.

While not done on the model shown, depending on the sculpted texture I'll also drybrush across the top just to picked out the surface more. I've yet to decide on an appropriate colour for this step, but white or light grey will almost certainly be too bright. Perhaps something with more of a blue tint.

I've also been a little random with Thondium Brown and various off-white drybrushes and Agrax Earthshade washes, which is intended to represent whatever ground the plating is put over. There's no particular formula here - just be random, it will look better.

Pouches, chainswords, some pauldron highlights, and the squad will be ready for varnishing. It doesn't sound like much, but I want to focus on the dreadnoughts over the next week. Maybe I can finish the squad after that.

-- silly painter.


Monday, May 8, 2023

Blood Angels Contemptor - Part III


When 40k meets Chariots of Fire.

Time for an update with the Blood Angels Contemptor now that all of the main colours are blocked in. The photo is a little out of proper focus unfortunately because I need to swap out the camera lens, but no matter - the basic impression is still visible.

While most of the details are actually fairly well complete by now, some of the weathering needs some work. The chipping I'm finding quite difficult to pull off actually - originally it was a brown (Rhinox Hide) and black mix, with normal highlighting along lower edges, but this wasn't very visible and just looked out of place. Some metal showing underneath for the most chipped edges works much nicer I find. Still, I find it actually not enough - chipping alone just means some banging around, and I really want to add scorch marks later - just that I'm not sure yet how to go about that. Perhaps if I pick the proper black and just kind of "drybrush smudge" it in places then that might work. I also have an idea to use a sponge to add chipping across the power fists, pushing each "finger" into the sponge for that random used look.

The metallic trim, which is just Balthasar Gold and Seraphim Sepia so far, is very dark and dull currently. Experience shows that after later highlight steps it will stand out some more, but that will have to wait until after varnishing.

I'm also trying to decide if more details should be added - decals, insignia, decorative trim, etc. It would definitely fit for Blood Angels, however it would also add a lot of extra time and effort onto a model that's already taken longer than I wanted.

The lettering across the torso is a small cheat in that I used a transfer. I did paint over it, but mostly it was another test to see how well decal lettering would turn out. I think it turned out well enough, and will probably need to print out a full sheet with a whole range of words one day. It's semi-cheating really - the print dots are visible, so painting over the top is still desirable, but it does lay out a guide to follow. I'll take it.

The base and gemstone on the helmet (which will be red - I had briefly considered purple, but decided that wouldn't be as harmonious with the rest of the model) then I can probably start to think about varnishing. Not much to go now - but I am painting the MkIV assault squad in the background, and the other dreadnoughts need bringing to the same level too.

-- silly painter.


Saturday, May 6, 2023

Ancient Rylanor - Part III


Colours are great for hide & seek. You hide, he seeks.

The Year of the Dreadnought continues, and today there's enough of Ancient Rylanor to justify another post. All of the recessed shading has been done, some ambient occlusion, but the edge highlights are still not complete. I'm not sure if I'll do them before, or after the final matt varnish - perhaps before, as I can always add a little more after if the varnish knocks them back too much.

All of the grey metal is Iron Warriors and a Nuln Oil (Gloss). That's all so far - the gloss paint really does work well over the metallics, but creates very shiny recesses - however the varnish stage will fix that nicely. There are still a few details that I haven't picked out for this treatment, but I might end up switching to Leadbelcher for them anyway. The most obvious are....whatever they are above the head (searchlights maybe, shield projectors, something), and as that's a much brighter area in general then Leadbelcher might be a better base coat (or 5 coats to get coverage!).

Scrollwork across the torso uses the normal formula that I've detailed a while ago. but there is one slight problem: it's very difficult to write Rylanor across that! There's not much space to work with, so I might cheat slightly and just III in the centre to signify the 3rd Legion. I also need to raid my stash of transfers to find anything appropriate to put on shields and shoulders.

The golden trim associated with Emperor's Children is so far just a couple of colours: Retributor Armour and Reikland Fleshshade (Gloss). I'm intending to layer that up to a fairly desaturated gold, but still keep the hint of red in there as a complementary colour to the base purple. Trying to go too far into yellow will contrast too much and break the harmony of the model, and I want the the helmet lenses to be a more proper contrast colour (a sort of teal) to draw the eye there later.

The flamer is so far Warplock Bronze and some Balthasar Gold, though I might leave further work until after the fist has been glued into place. I will very likely paint the flamer fully before varnishing, as I don't intend for it to be too shiny; any soot from the flame would keep the shine away. The under-slung fuel tank I entirely forgot about and will need attending to later as well.

I've been trying to think during all of this how I might paint the base. I find snow and muddied bases fit well with the colours, but that won't fit the feel of what's there. I might go with marbled stone perhaps, or just a light standstone. It's going to take a while I think. As for battle damage, while the base has indications of battle I think I want to keep the dreadnought looking more parade-ready. There's no storyline reason behind this, it's just that I'm not sure how I would make battle damage that adds rather than detracts to the model.

An awful lot of detail remains (purity seals, shields, etc) and a fair amount of higlighting (e.g the head) but I'm pleased with the progress. I'm still painting three dreadnoughts at the same time, and while I could have finished any one of them by now, I figured that finishing three close together would bypass thinking about "still another two to go" (which is highly demotivating). That being said, given the extra details on this model then it's likely to be the last finished.

-- silly painter.


Tuesday, May 2, 2023

Imperial Fist Contemptor - Part III


Guess he doesn't blink much.

Some progress on the Imperial Fist Contemptor; though I'm still not far enough along yet to glue the arms in place, I am starting to get a proper feel of how it will turn out. The base colours are filled in, the large surfaces mostly done, and the colours basically sorted out - all that remains are to fill in the details and then add any finishing touches (such as the base).

Being a larger model, I made the conscious decision to keep lower areas darker and adjust shading and highlighting with this in mind. Generally that will be mean darker shades in lower areas, and less intense shades in upper areas, but still keeping the same principles of where to apply them: shades on downwards or recessed surfaces, keep highlights on upwards facing ones.

For shades I tried the following:

  • Casandora Yellow, for kind of ambient occlusion across all the model.
  • Fuegan Orange for panel lining in general.
  • Seraphim Sepia on lower areas to add more of an earthen tone.

It came out a little heavy along the front of the legs unfortunately, but I'll continue to roll with it. I've actually missed a couple of places, including the "abs", so need to go back in to fix that up soon.

The head proved extremely problematic. The paints just didn't cooperate, particularly the reds from the palette. I am trying out a larger palette, which could be something to do with it - but same reds worked just fine on other models. In any case there's not much tone variation in the end, but that's semi-intentional because I wanted a brighter red to really help the head stand out and make it the focal point. The white stripe and aqua lenses just give a little more contrast to really make it pop. The lenses were a simple Grey Seer, White Scar, and two thin coats of Aethermatic Blue (for some reason one barely did anything, so two were needed). The large surface without any normal reflective effects is intended to give an impression of a constant stare, evaluation, and focus on duties being carried out - a very Imperial Fist response.

Grey Seer was also used to try and remove some of the pink tint showing through a couple of decals. More layers required, but it does work.

The armour trim took me a while to decide upon. I didn't want gold, silver, brass, or anything too bright. Copper is too pink, and I wanted something darker - so I don't know what metal this might represent, but I'm going with it:

  • Warplock Bronze
  • Balthasar Gold / Warplock Bronze (1:1) as a highlight.
  • Balthasar Gold on more prominent edges.

I've not used any shades because Warplock Bronze is such a dark colour already that I just needed to keep that in recessed areas. When highlighting I also find myself using more of a "drybrush" motion to build up metallics these days, though the paint consistency is closer to a thin layer. It really depends on the level of detail - it saves an awful lot of time and actually looks better using a flicking brush motion for small areas or sharp edges, and then thinned blending for larger surfaces that should appear far smoother. This was something I picked up when painting the Titanicus models and I'm definitely carrying this across on the dreadnoughts.

The darker grey metal will receive the same treatment, but I really wanted a darker look that none of the metallics was giving me. I wanted an almost black, yet still metal, look. With a little experimentation I ended up on Iron Warriors (the irony of using a paint named that on an Imperial Fist model) then coated liberally with Black Templar. This is a very dark metal, perhaps too dark for some areas so I might need to thin the Contrast with some medium and see how that looks. In any case, the same drybrushing motion as explained above will later be used to add an initial highlight of Iron Warriors again, after which I'll probably leave it alone until after the matt varnish stage.

The other dreadnoughts in progress have also started to have armour trim filled in, hopefully more of that soon, and background models are also progressing alongside their Legion Contemptor.

The count is back down to 7, because I bought some terminators while they were back in stock. The spare pieces from that box will most likely be used to kitbash future terminators, but I do have plans to get the count back up again after I'm done with these dreadnoughts.

-- silly painter