Saturday, April 24, 2021

The Sanguinor, Exemplar of the Host - Part IV (Showcase)


Battle plan? Just wing it.

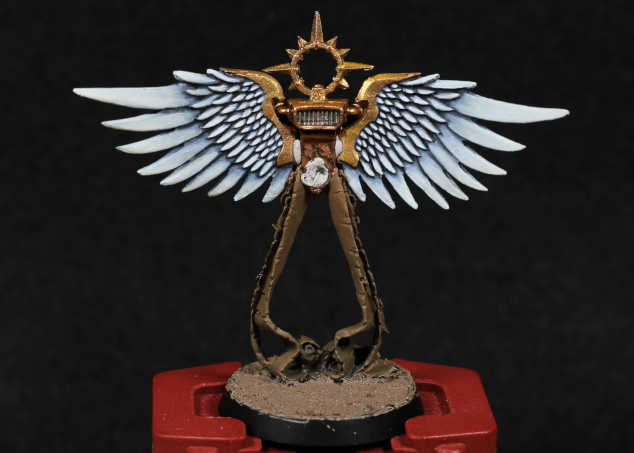
Technically the model isn't finished yet, but enough is done to showcase the Sanguinor, Exemplar of the Host. The backpack exhaust glow is yet to be done, but that's nothing visible in the photo.

Taking a lot longer than expected, there are numerous little problems with this particular sculpt. Most of that is down to finecast being finecast: rounded surfaces aren't round, little holes here and here, pieces that don't quite fit together properly. The sculpt itself is a little disproportionate in places too (pauldrons are too large for the arms, the backpack itself is at least twice the depth of the model, if not more) and honestly I didn't have the best time painting it. I do appreciate going for something different however, and the Sanguinor has certainly become an iconic character.

Strangely I don't want a plastic updated version of this. Not yet. The current styles just aren't a good fit, and some kind of horrendous to assemble model on a flimsy base would result.

As far as painting goes, I'm happy with the wings. The armour icons were highlighted up to White Scar, where as the wings never had that step. It helps to separate the two - the wings aren't actually wings, but aren't quite the same as the shoulder pad adornments either.

The halo does a fair job of framing the model without taking too much attention, the gemstone colours mix it up a bit to keep it from being boring. The chalice in particular works nicely with silver-blue edged in gold, purple gemstone around the cup and red on the base.

The sword I did a small experiment on. It was first given a type of shading with metallics to show dark/light contrast in areas, all then given a very thinned coat of Aethermatic Blue. It didn't quite work out, but I'm convinced it's worth exploring further. The "power glow" highlighting wasn't quite right, and the Aethermatic Blue was thinned a little too much, but with a bit more practice it holds some promise. I won't do the "power glow" with this method, but I'll balance somewhere between here and what was done for Mephiston.

The base could use something else, but I'm not sure what and so I'll just leave it. It's not bad, just uninteresting.

Fineliner pen on the scrolls was incredibly useful. Can't recommend that enough. I use a 0.03mm tip, and don't really want anything larger personally. Not for scrolls and purity seals at any rate. Just be sure to let it dry for about two days before covering it with a varnish; it must completely dry or it will just smear at the slightest brush pressure.

-- silly painter.


Sunday, April 11, 2021

The Sanguinor, Exemplar of the Host - Part III


An excellent jump, or very, very stiff scrolls.

Before I get started on this post proper, a couple notes regarding the coming weeks and likely months. I've encountered some difficulty in time scheduling of sorts, and will have much less time to paint. This is undesirable, but I do want to continue and find a way to keep up the pace. I'm rather committed to writing something every week as motivation, but normally I would have finished this entire model by now. Only very little has been done.

Not to worry though. I see this as simply another opportunity to improve my painting skills. Traditionally I would spend a long time painting by being very careful with each stroke of the brush, or contemplating the next colour to use, how it would all match together. This means I can paint a standard Blood Angel in a few days - the contemplation is done, the method is known. Next I need to work on finding a way to actually put paint to model quicker: cut down on any time spent just staring at the work and instead just "do". This should allow me to be far more efficient in using the painting time I will have, and keep up the painting pace.

Anyway. A little progress. I've decided to glue the backpack on. Painting was rubbing off when trying to handle the main body, and just enough was painted to not get in the way later on. Everything is being done as normal (and I really should do a summary of all that in one place soon), which means the parchment isn't far from being done.

The wing icons are so far Celestra Grey, Apothecary White Contrast, and some finely placed Guilliman Blue. There are a couple steps left, probably Ulthuan Grey and some White Scar as edge highlighting.

I still need to add a little more shading in a few key areas of the golden armour, a few dots of highlight, and need to repair the halo before getting to more metallics.

Guess I'll see how much I can get done by this time next week.

-- silly painter.


Monday, April 5, 2021

The Sanguinor, Exemplar of the Host - Part II


Spread your wings and fly.

Another shorter, not much progress post. This is more of self-reflection on how a lot of time spent on something can give diminishing returns, and might not be required in the end at all.

The wings for the Sanguinor are actually ideal for Contrast paints. An appropriate base coat, a coverage of some Contrast, perhaps a directed shade or separate contrast, and then a highlight. The only part that would take any real amount of time in that approach would be the final highlight - quick, effective, additional highlights if really demands a little more.

Of course, that's not what I did. Mostly because I don't have suitable Contrast paints.

Instead, I used the traditional base, layer, wash, layer layer layer approach. It was incredibly tedious and took a week to get done. I'm still not finished - I might add some pure white highlights later on down the line, if the wings look darker than they should.

The most time consuming part was painting each individual "feather" one at a time. The smaller ones are ok, but getting the blending right on the larger ones takes multiple very thin layers of each paint. Recipe in the end:

  • The Fang as a base layer over all feathers.
  • Nuln Oil liberally covering the entire area next.
  • The Fang to neaten up from the previous step.
  • Russ Grey over most of each feather next. Only really the base of each feather, and the immediate "outline" of each was left from the base coat.
  • Fenrisian Grey next, same approach but leaving a little of the Russ Grey showing. For the smaller feathers this was barely anything at all.
  • Ulthuan Grey follows, and this step really took a long time. Being very bright, very desaturated, it needs applying in multiple thin coats - four or five for the larger feathers, only a couple for the smaller ones.

If the above ends up not being quite bright enough, then White Scar will be added later on. I don't intend to fully blend that into the larger feathers, instead applying it in thin lines to make them look more organic.

I'm happy with the colours. Nuln Oil over a white just never quite sits right - it ends up being too grey, and is far too unnatural for feathers. A hint of blue, or blue-grey is far more suitable, and the "Space Wolf" paints works nicely enough for this purpose. Just took far too long, and if I had to do this more often I would definitely look into more Contrast paints instead.

-- silly painter.