Sunday, June 27, 2021

Imperial Thunderbolt - Part III


Now with wings on the wings.
 

Painting these fighters is proving to be painfully slow. No real reason other than lack of time, but perhaps there is an element of them being something so different that I'm having trouble getting into the feel of it. I am still painting all four simultaneously, which will naturally take longer, but even so they should really be much further along.

I used some busy time to think which transfers to apply. Obviously the leader has wings on the wings, and with a black tail there will need to be a white transfer. I've glazed a little Russ Grey over the white transfer as well, but it needs some more. The other planes have a number on each wing, and the black variant on the tail. On the note of transfers, I used airbrush cleaner to help soften and match the transfers to the surface, but it appears to have reacted slightly with the prior varnish step and smudged some paint. It's visible on the left wing, so I might have to add some scratches there to cover it up slightly. A good point to remember however: only varnish after transfers, never before.

I've outlined all the panels and shaded all the rivets on the blue-grey areas. That took some time. I ended up batch painting areas, e.g all tops of the wings, then all tops of tails, then all sides, then stages along the undercarriage. This helped quite a lot - batch painting doesn't mean only one colour at a time, but it can equally apply to one area instead.

There is still some of the time shading to be done, then trim highlighting, metallics, the canopy, weapons, and weathering. Still a lot to go. Somehow it feels like I've turned a corner though, as if the hard part is now over, and so I'm hoping the rest will go much more quickly. Still, with the little time each week I have right now, it will probably take another couple of weeks to get these models done.

I've been using the new STC paintbrushes from Games Workshop on these models too. I haven't used enough to get a full feel of them, but they are so far handling better than the last ones. They still form a hook on the end, which just seems to be a part of using synthetic brushes - but at least harming animals isn't required. Definitely superior to before, but don't come close to sable brushes. I may write more about them after finishing the Thunderbolts.

-- silly painter.


Tuesday, June 22, 2021

Imperial Thunderbolt - Part II


Colours of war.

A little late with this post thanks to being constantly busy with work and other tasks, and for the same reason not really that much done for the past week and a bit. I did try to come up with the basic colours for the Thunderbolts however, and have managed to block in some base paints to give an idea on one of them.

Stegadon Scale Green for the trim, Corvus Black on the tail and cockpit, and in this case some Gal Vorbak Red for the canopy. No silver applied yet to the engines or other areas, only some black because it was on the palette and I figured it would give a visual clue to the final result. The red cockpit is intended to be as hints from red cockpit lights; traditionally red was used to not ruin the night vision of pilots when looking out the window, so I'm going with that. Plus it fits the paint scheme: the Knights have red "eyes" (visual sensors or some such) and so it's fitting that the planes have a red tinted cockpit canopy. A little visual difference on the lascannons to line up targets, and to add some interest. There's not much else that fits brass colouring, but sometimes less is more.

I also used GIMP and an outline of the Thunderbolt to plan the colours, which helped decide where and what to make black. Games Workshop should release outlines for more models to allow people to more easily come up with colour schemes.

This particular model will have a black tail, though I may not do that for the others. This is the lead plane and so will have some distinguishing features.

Overall I'm happy enough with the colours and so will continue this with the other three models and then get started on some highlighting.

-- silly painter.


Monday, June 14, 2021

Imperial Thunderbolt - Part I


To the skies!
 

A very quick post today because not much time the past week. The next models up are a set of Imperial Thunderbolts from Aeronautica Imperialis. One, show here, is a Thunderbolt Fury and is the designated squadron leader. They have an assortment of loadouts, but are predominantly anti-air; I have a couple of Marauders as well which I intend to be bombers or anti-ground loadouts.

The colour scheme follows that of the Knights for Titanicus. Pretty simple airbrushing (over a black primer) only so far:

  • The Fang over the entire plane.
  • Russ Grey to highlight the centre of various panels.
  • Fenrisian Grey / Air Caste Thinner (1:1) lightly sprayed underneath. This isn't seen in the photo, but is a nod to many aircraft doing this to help camouflage against the sky.
  • Deathshroud around exhaust areas, gun barrels, engine areas, to give an impression of soot and oil.

The Imperium likely wouldn't care much for camouflage paint schemes for their aircraft. The fighting environments are too varied, and the resources applied to engagements by the Imperial Navy aren't expected to be subtle. Likewise, their fighter planes aren't going to be in pristine condition - especially the Thunderbolts. They're used for combat, not parades. The highlighting and blackening approaches help give a less uniform appearance, more of a rough and ready look without even applying scratches or battle damage. I will probably do a little more such things later as well, just to really separate the look of these models out from my usual style.

Not sure the attempt to lighten the underside worked. I tried to thin the paint somewhat and make it more glaze-like, hoping to keep some of the prior highlighting showing through. It's still good to experiment sometimes however, so I'm glad I gave it a go.

-- silly painter.


Monday, June 7, 2021

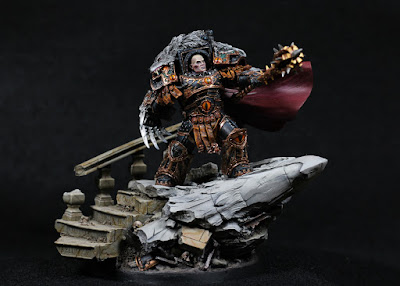
Horus Lupercal - Part XI (Showcase)


Warmaster Horus

I'm calling him done. I could do more. I could always do more. I could put more marbling on the eagle. I could put more colour into the rubble. There has to be a point though where I say the model is done, and I think I'm there.

This model has been quite a journey. I started it in January 2017. Four and a half years of painting a single model. Not constant of course, many breaks between steps, but it's still quite a long time. Most of it was only done in the last year or so, quite possibly thanks to a year off work, but also finally knowing just how everything was going to be done. I also had to wait until I deemed myself good enough give the amazing sculpt justice.

There are a couple of notes on painting items on the base. The pauldrons littering the base are black with brass trimming. I figured this was fairly Legion agnostic, and so could represent any force that Horus was facing, or even the troops belonging to his own. The trim itself is:

  • Balthasar Gold as a base.
  • Castellax Bronze painted directly into recessed areas.
  • Brass Scorpion added as highlight points.
  • Agrax Earthshade added to selected recessed areas, mostly to outline rivets, but also to dull the shine.
  • Stormshield to varnish and reduce shine a little more. Being in rubble, I didn't want any metallics to be overly bright.

Another piece of the base puzzle that I'm fond of is the iron girders. I mostly certainly didn't want them as a bright silver. Such building materials are generally worn, covered in concrete, slightly oxidised, and dull. I thought about it somewhat, did a test piece, and ended up with:

  • Dryad Bark over all the metal.
  • Iron Hands Steel thinned with water, and slightly dabbed and drybrushed over most of the metal. Recessed areas were mostly left alone.
  • Fuegan Orange painted into selected recessed areas, a glazed onto flat areas randomly. Don't overdo this step, less is definitely more, but a hint of orange rust is the idea.
  • Ironbreaker highlighted onto very select areas, typically where the metal has broken away. These pieces wouldn't be oxidised so much, not covered in building material, and so are given a cleaner look.
  • Stormshield varnish applied over all the metal area to dull it down.

I also played with various colours around the base in a mostly random manner.  Rubble was highlighted around any metal, skulls (contrast method, a little Druchii Violet for shadow colour, Screaming Skull for highlights), armour pieces, just to blend it all together. I stuck to the colours used on the balustrade, steps, and eagle statue. These were the likely source of most of the rubble anyway, so it makes sense to keep to that palette.

Somewhere along the way, I looked and thought "done". I need to play with the lighting more, do a little photo adjustments for the fun of it, and also magnetise the base. With a lot of magnets. In the meantime, enjoy Horus Lupercal, Archtraitor Primarch of the Sons of Horus.

Horus Lupercal. Warmaster. Traitor. Heretic.

 -- silly painter.