Showing posts with label primarch. Show all posts

Monday, June 7, 2021

Horus Lupercal - Part XI (Showcase)


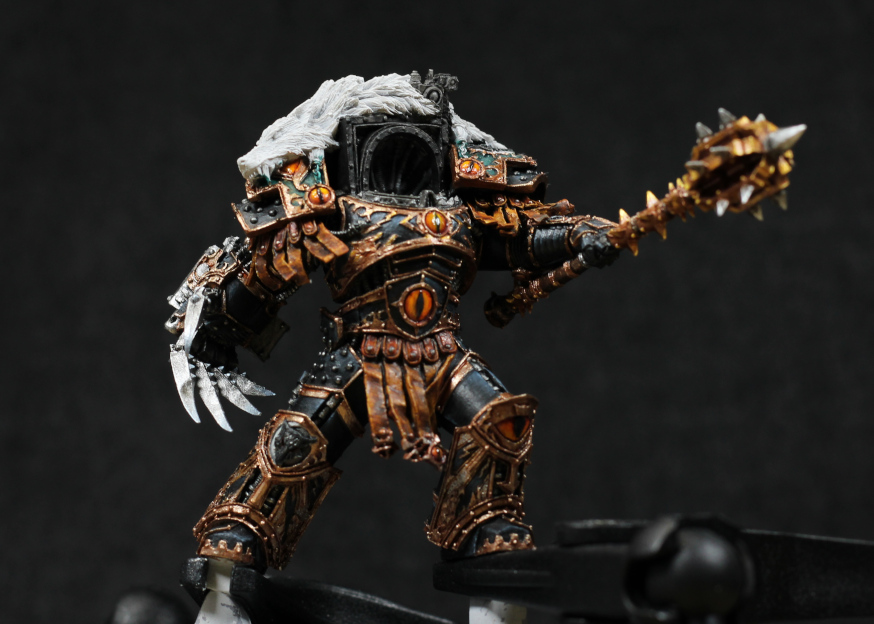
Warmaster Horus

I'm calling him done. I could do more. I could always do more. I could put more marbling on the eagle. I could put more colour into the rubble. There has to be a point though where I say the model is done, and I think I'm there.

This model has been quite a journey. I started it in January 2017. Four and a half years of painting a single model. Not constant of course, many breaks between steps, but it's still quite a long time. Most of it was only done in the last year or so, quite possibly thanks to a year off work, but also finally knowing just how everything was going to be done. I also had to wait until I deemed myself good enough give the amazing sculpt justice.

There are a couple of notes on painting items on the base. The pauldrons littering the base are black with brass trimming. I figured this was fairly Legion agnostic, and so could represent any force that Horus was facing, or even the troops belonging to his own. The trim itself is:

  • Balthasar Gold as a base.
  • Castellax Bronze painted directly into recessed areas.
  • Brass Scorpion added as highlight points.
  • Agrax Earthshade added to selected recessed areas, mostly to outline rivets, but also to dull the shine.
  • Stormshield to varnish and reduce shine a little more. Being in rubble, I didn't want any metallics to be overly bright.

Another piece of the base puzzle that I'm fond of is the iron girders. I mostly certainly didn't want them as a bright silver. Such building materials are generally worn, covered in concrete, slightly oxidised, and dull. I thought about it somewhat, did a test piece, and ended up with:

  • Dryad Bark over all the metal.
  • Iron Hands Steel thinned with water, and slightly dabbed and drybrushed over most of the metal. Recessed areas were mostly left alone.
  • Fuegan Orange painted into selected recessed areas, a glazed onto flat areas randomly. Don't overdo this step, less is definitely more, but a hint of orange rust is the idea.
  • Ironbreaker highlighted onto very select areas, typically where the metal has broken away. These pieces wouldn't be oxidised so much, not covered in building material, and so are given a cleaner look.
  • Stormshield varnish applied over all the metal area to dull it down.

I also played with various colours around the base in a mostly random manner.  Rubble was highlighted around any metal, skulls (contrast method, a little Druchii Violet for shadow colour, Screaming Skull for highlights), armour pieces, just to blend it all together. I stuck to the colours used on the balustrade, steps, and eagle statue. These were the likely source of most of the rubble anyway, so it makes sense to keep to that palette.

Somewhere along the way, I looked and thought "done". I need to play with the lighting more, do a little photo adjustments for the fun of it, and also magnetise the base. With a lot of magnets. In the meantime, enjoy Horus Lupercal, Archtraitor Primarch of the Sons of Horus.

Horus Lupercal. Warmaster. Traitor. Heretic.

 -- silly painter.


Saturday, February 6, 2021

Horus Lupercal - Part X


I see black.

I was going to post this another day, but...here he is. Spent some time on Horus' head after really wanting a bit more completion of the model before having a break. Seeing this empty suit of armour was just annoying, and so now there's more completed.

First note about the face is the eyes. I wanted them pure black, no whites, as subtle effect to show Horus turning sinister. From a distance it's not really noticeable, but closer up he takes on a different feel, which from a character perspective really suits what I was going for.

The whole face took about three hours. Very slow, very careful, on a highly detailed sculpt. I wanted to do it justice.

Someone gave him a couple of black eyes.

There wasn't really one particular method to follow, even if I will jot down the basic approach. A wet palette is essential when working on something like this, and it allows a lot of back & forth between colours, mixing paints together to get just the right tone, and fixing mistakes, and generally just working the model. A good brush helps too.

  • First step was to paint White Scar onto the highlighted areas. This is mainly to help them show up later.
  • For similar reasons, Nightlords Blue was painted into darker areas, and those that would receive some red light from the light source in the armour's collar.
  • The eyes were painted with pure Abaddon Black. While I did have to fix this up on occasion, that's all that was done for the eyes.
  • Ratskin Flesh mixed with Ionrach Skin was then glazed over the head. This step involved multiple glazes, adding a little more Ionrach Skin where I felt the Ratskin Flesh was too potent. The idea was for the skin to tend more towards the blue end of the spectrum, but a little red or brown tones are needed.
  • Deepkin Flesh added to this mix to further highlight some areas - forehead ridges, nose, upper lip, cheeks, etc.
  • Barak-Nar Burgundy mixed with previous steps and glazed underneath the cheeks, chin, nose, eyebrows, as the first step of lighting from underneath. A lot of glazing, mixing, moving colours about to get this right. Slight Nightlords Blue mixed in for a deeper purple that was applied to the lips as well.
  • Wazdakka Red then mixed in or directly glazed to give the underneath light reflection a brighter tone, and shift it slightly more into red. Glazing is key. I could have pushed this step more, but didn't want the light to dominate the face and so left it as seen in the photos.

Very tiring on the eyes to paint, but well worth the results. I may give this model a break for a little bit before turning attention to the base and finalising everything.

-- silly painter.


Tuesday, February 2, 2021

Horus Lupercal - Part IX


Horus the Headless

Not much to say about painting this time, other than a few minor details filled in while it was easier to have the model not attached to the base. Even then, the photo won't show all of it: the skulls on chains are on the rear of the miniature.

Finally, however, it's time to assemble everything on the base, with the head probably being done next. I really wanted this assembly stage to get a feel of how it would all tie together, and see the result of planning some four years ago.

Overall, I think the ideas put into the colours and how it would all balance has worked out well. The eagle might dominate a little too much at the moment, but Horus' face will fix that, and there's still much work to be done on the rubble about the base that will also change the framing slightly. Ultimately it doesn't feel like any one piece stands out and forces all else to be ignored, and I think that does justice to the incredible sculpt; it's not just a single character, it's an entire scene that can be taken in.

I've yet to decide if I'll power on with more, or take a short break and get some other models done first, but either way motivation will come easier now.

-- silly painter.


Saturday, January 30, 2021

Horus Lupercal - Part VIII


Wolf goes om nom nom.

The further this model is towards being finished, the more motivation to paint it, so it's no surprise that I was inspired to do more recently. I'm really wanting to move to the point of attaching Horus to his base, but still need to do a little more.

The focus of this next step is really the wolf pelt, but the "hood" has also received some attention.

The pelt I didn't want black. that's too close to the armour, and wouldn't really fit. Brown is also unsuitable given the pteruges, gold, brass, and reds. Grey on the other hand balances nicely against the talons of the right hand, so this is what I went with:

  • Grey Seer base over the entire pelt. This was easy enough because the spray primer was a white anyway.
  • Apothecary White (Contrast) covering the entire pelt. This is actually subtle colour shift mostly intended to give depth and help bring out the detail in the lighter areas.
  • Basilicanum Grey (Contrast) thinned down, sometimes with water, and applied to the upper areas (flanks and back of a wolf). Multiple layers were used where I felt like it, and a little more added under some of the overlapping sections (the sculpt has large sections that look to overlap, it's just something that can appear on fur).
  • Black Templar (Contrast) really thinned down, against sometimes with water, and mostly along the back and spine of the pelt. Normal (not thinned) was also applied over the nose.
  • Nuln Oil in a few key areas, just to give much greater depth.

The pelt had no highlights applied - instead it was an exercise in darkening. The Contrast range really helped with this, but anything wash consistency would equally do the trick. This is mostly because the model is a really good sculpt and is extremely easy to work with in this regard.

The eyes are a basic pick-your-red (Flesh Tearers Red was on hand at the time) around the edges, black in the middle, and a dot of 'Ard Coat. I went with the black middle to make it stand out a little less, lest it take attention away from Horus' face (when I get that done).

Lips are some Volupus Pink, carefully applied, with Morghast Bone and Screaming Skull across the teeth.

The claws of the pelt are brown covered in greys. No particular method for this - Gorthor Brown was used, Skavenblight Dinge, Stormvermin Fur. I might add an extra highlight at some point.

Back must get chilly, needs a fur to keep it warm.

The "hood" on the armour is painted much the same as the rest. It's mostly black, but I felt it needed something extra and so put a thin brass line around an inner edge. I might brighten that some more still, but I'll wait and see how it goes once the head is done.

The glow effect can't really be seen in the photo, but this was done with Flesh Tearers Red in small amounts, multiple layers, a little Blood Angels Red, and some Mephiston Red for select edges. Keeping a bit of Screaming Skull around to mix with any red doesn't hurt either, if a bit more punch is wanted. I also used a bit of Bloodletter around the inside of the collar (again, can't be seen in the photo). I haven't gone very bright with the glow effect - I've intended it to be visible, but not overpowering. Keeping it as a dark glow reinforces the idea of Horus being evil at this point, and also doesn't look like it's blinding him.

Still various small details to get done, but they'll start to be less obvious between photos - which means it's really not long until he's finished.

-- silly painter.


Monday, January 25, 2021

Horus Lupercal - Part VII


That cape must really get in the way.

Finally judged enough done to assemble more of Horus, notably his cape. There's perhaps a little more do go on it yet - some of the folds could be a bit darker, and the wolf pelt is obviously still pending. Still, the closer to completing this model, the more motivation there is.

I didn't want the cape to be a deep purple. The armour of Horus is dark enough, and the cape just wouldn't have framed that effectively as a deep purple. By the same token, a bright red would have drawn far too much attention. Ultimately I decided on a midpoint: burgundy. It's also a good midtone from which to shade and highlight.

I also didn't want the cape to be strongly highlighted. No hard lines, and no metallic effect on the edging, to help give the impression of cloth over some harder surface.

After much deliberation and a few sources of inspiration:

  • Gal Vorbak Red over the entire cape.
  • Basilicanum Grey / Contrast Medium (1:1) spread over most of the cape, staying clear of the more prominent upper edges and folds. I may do this step again at a later point, just to darken some areas a little more.
  • Gal Vorbak Red again, thinned down, to highlight some of the areas.
  • Gal Vorbak Red / Khorne Red (1:1) thinned and again used to highlight. Mixing these paints was done rather than simply layering because they're each a base paint and have a much higher pigment density; mixing helps with the blending.
  • Khorne Red, thinned, really on the "tops" of the most outwards folds.
  • A little Mephiston Red mixed with the previous step, for very select edges, just to brighten things a little bit.

The edge line and Eye design are fairly flat, and again this is intentional. It looks more like brightly coloured stitching rather than inlaid gold, and I felt this was a much better look given the actual gold metallics on the rest of the model.

  • Balor Brown, with two coats needed because of it being a layer paint.
  • Steel Legion Drab, thinned down and used to desaturate in the shaded areas.
  • Averland Sunset, thinned down of course, and used to highlight some of the edging as appropriate.
  • Yriel Yellow, just to give it a little more saturation in normally highlighted areas.

At this point I could very well glue Horus to the base, but I will still leave that step until I've finished just about all of the model. No particular reason other than it's easier to handle everything right now while attached to a painting handle.

-- silly painter.


Sunday, December 27, 2020

Horus Lupercal - Part VI


Armed and armoured.
 

Finally some more of Horus has been painted. There's not a whole lot of information to add, so the focus for this post is on the talon metallics.

The sculpt itself has some excellent designs that lend naturally to NMM approaches for the talon, so I decided to keep with that, but use metallic paints. The key behind NMM is contrast: bright points next to dark shadows, and a range of paints were mixed in to try and create the various shades. Quite a bit of back and forth, but it went something along the lines of:

  • Iron Hands Steel across all silver metal areas.
  • Leadbelcher, thinned a little, as a first stage highlight. This was mixed with some Iron Hands Steel on the palette to help smooth this out.
  • Basilicanum Grey (Contrast) mixed with some Contrast Medium to further darken some areas, or cover an area entirely (such as the bolter casing).
  • Ironbreaker, thinned a little, to further highlight areas. Mixed with some of whatever was on the the palette to try have smooth transitions in places, but also unevenly dragged along edges to create a sharp highlight.
  • Stormhost Silver along edges, tips, or corners just for bright highlight points.
  • Grey Knights Steel on selected points ("bumps" along the inner talon, and the very tips of the talons). This is yet another reflection of Horus being the opposite of what the Imperium was intended; as the Grey Knights are armoured, Horus uses such a thing for weapons instead.

The uneven highlighting adds a little more variation to the model, gives characters, mimics scratches and wear. Horus has obviously kept his equipment in excellent condition, but has used it, and this uneven edge highlighting tricks the viewer into seeing it with more realism.

Still a very long way to go before this model is finished.

Horus about to "mic drop".


-- silly painter.


Thursday, October 15, 2020

Horus Lupercal - Part V

Just flapping in the breeze.

 Time again for minor progress on Horus. Mainly I just wanted to jot down some notes on something new now, rather than wait until I've done a lot more and roll it up into a larger post.

Today it's the pteruges hanging from the waist. There's still some work to go on them, but there's enough to actually glue that part into place. I've already done those that fit on near the right shoulder, but they won't be attached until the full arm is ready as well.

I thought about the colour to use for a while and ultimately went with leathery brown, almost the same hue as the filigree edging on the the armour but with perhaps slightly more red to it. The whole idea is that they should not stand out against the upper chest, or eventually the face. I've gone with quite a bit of Contrast in the end:

  • Wraithbone base over the leather areas.
  • Snakebite Leather applied in a thin layer over the top. This is more glaze consistency - don't allow it to pool.
  • Gore Grunta Fur / Contrast Medium (1:2 mix) to again glaze over the area. A second glaze was applied if that wasn't quite enough.
  • Blood Angels Red mixed in with the leftover from the previous step, about a brush load. This was applied to the upper areas just for a little variety, and harmonises very well with the eye jewel on the torso area.
  • Agrax Earthshade applied over most areas, but again not allowed too pool heavily. This step gives greater definition and depth to individual lengths of the leather.
  • Wyldwood was lastly applied very carefully and in very small amounts to give greater depth and darken the areas a little more. Glaze consistency is again key.

I'm not yet fully done, as mentioned. The red needs some shadowing more against the belt, and a few edge highlights here and there wouldn't go astray. Just need to be very careful not to overdo it - it will be very difficult to fix mistakes from this point.

The metal ends I ended up with a more red metallic than the armour. I didn't want the bronzes of the armour, nor the golds on the weapon. Perhaps a different metal was used: gifts from allies, or trinkets made from the salvage of fallen enemies. Using a reddish metal ties it together with some colouring I've started to use on Blood Angels weapons, which again both signifies the closeness that Sanguinius once shared with Horus, and how that changed when Horus turned traitor.

  • Screaming Bell as a base.
  • Cryptek Armourshade to do what shades do.
  • Runelord Brass as a first highight.
  • Canoptek Alloy as a final edge highlight. This is a very light, desaturated metallic and so is best thinned down a little first. It ends up very close to a bright silver (just a little more brass into the mix) and was used directly on the pteruge studs.

There still a little eye jewel to be done as well, and I may end up with Contrast paints once again because this is the sort of area where they're very effective.

-- silly painter.


Saturday, May 30, 2020

Horus Lupercal - Part VI

Eye eye eye, not entirely armless.
This is only a short update with some details filled in for Horus. Almost all the eye icons have been completed, with the exception of the right pauldron (which I haven't entirely decided to paint the same yet).

All the eyes were painted the same as before, copy & pasted here for convenience:
  • Jokaero Orange (base)
  • Yriel Yellow (layer)
  • Bloodletter (glaze)
  • Carroburg Crimson (shade)
  • Corvus Black (base, iris)
  • 'Ardcoat (technical, varnish)
It's really the Bloodletter that makes it work and gives the Eye of Horus symbol that firey, forbidding appearance.

The right knee symbol of the Luna Wolves was mostly done with contrast paints:
  • Corax White as a base coat across the entire symbol.
  • Apothecary White on the sliver of background moon.
  • Basilicum Grey on the remaining background.
  • Black Templar across the wolf head.
  • Mephiston Red for the eyes of the wolf.
  • Stormhost Silver to write the XVI on the wolf's forehead.
The last step was a pain, required quite a lot of fixing, and looking at it closely isn't perfect. Normally I would have done the wolf head silver and let a wash fill in the XVI naturally, but that doesn't work when I wanted the wolf head itself as black.

Damn this model is taking me a long time.

-- silly painter.


Sunday, April 19, 2020

Horus Lupercal - Part V

A couple of legs to stand on.
There's starting to be something resembling progress on Horus at long last. The main armour is just about filled in, and actually I could attach the model to its base now if I wanted. I will wait longer for that step however, just because painting Horus is somewhat easier in the current setup anyway.

No change to how the Warmaster is being painted, however I am overly familiar with some of the manufacturing flaws. They're fortunately hidden on the inside of the right leg, and really won't be seen, but annoying to have any such flaw on a Primarch model in the first place.

Some details are yet to be completed either because I just haven't got around to it yet, or because I'm still deciding on how to paint them. The latter point applies to the legion icon on the right knee-pad. It's supposedly the symbol for the Luna Wolves, white crescent moon, black for the rest of the circle, and an outlined white wolf head, or possibly outlined black wolf head (I've seen both). I'm leaning towards a white crescent, dark grey rest of the circle, and black wolf head with red eyes and silver engraved XVI (very small detail that's actually on the wolf head itself).

I'll have to start on the upper areas of armour soon too, before moving onto pteruges that fit below the waist, and of course the right arm.

-- silly painter.

Saturday, March 28, 2020

Horus Lupercal - Part IV

No idea if this is really the 4th post of Horus, but I'm changing the heading titles to give numbering for each work in progress and so I need to use something.

You put your left leg in...
This isn't much of an update, mostly just proof of continued work on the model. The left leg is pretty much done now, although the knee pad remains to be done of course.

There's been no change to the colours normally used, this is simply extra work done. I'm not wholly convinced by how the metallics are looking in the photo. They do look different with more natural lighting, but it's not picking up the contrast as nicely as I'd like. I may have to go back in and try fix some of that; a little more shade here, a bit of highlighting there. I'll come back to it once more of the model is done, to make sure I don't unbalance things.

A fine brush, and a wet palette are making all the difference to the speed of painting too. It's much easier to switch back & forward between paints, and it really does speed up everything. Maybe it won't be months before the other leg is done.

-- silly painter.

Monday, December 2, 2019

Horus Lupercal (WIP)

Arming himself for the Heresy.


Time for a more dedicated post to continued painting of the Warmaster. There's not a whole lot to actually say - for the most part it's continued with the same as before, just more done now.

As can be seen, the left arm is actually glued into place now. If it comes off then I'll pin it in place; the superglue being used isn't the best batch ever produced.

Last time I was unsure about the studs on areas of the armour. I've ended up with a simple approach of:
  • Leadbelcher
  • Black Templar (contrast, blobbed on top of the stud)
  • Leadbelcher (mostly in the lighting direction)
  • Ironbreaker (fewer studs, in the lighting direction)
So far it seems they aren't overtaking the model in terms of focus, so I'll continue with that method. The use of a contrast paint here helps to really darken things down, and it also pools mostly about the edges, giving a kind of natural shading. Nuln Oil could easily be used as well, but might require two or more applications to get the same effect; contrast is being used as a bit of a shortcut in this case.

The mace ended up using the "Sanguinary Guard gold" approach, which was intentional for two reasons: it again ties back to Horus' closeness with Sanguinius before the Heresy, and also helps to differentiate the weapon from the armour (which is more of a brass or bronze than gold).
  • Balthasar Gold
  • Reikland Fleshshade (gloss; I'd use Seraphim Sepia instead if that came in a gloss)
  • Gehenna's Gold (first stage highlight)
  • Auric Armour Gold (edge highlight)
The silvers were similar to the usual:
  • Leadbelcher
  • Nuln Oil (gloss)
  • Ironbreaker
  • Stormhost Silver
And the rest of the mace grip:
  • Warplock Bronze
  • Castellax Bronze
  • Sycorax Bronze
No need for a shade owing to how small the areas are, but I would use Agrax if I felt the need for a larger piece.
Furthermore, the mace had a little blow dryer done to straighten it out. I wasn't sure if I was willing to risk that, given that it could crack or otherwise damage the paint, but the slight bend was annoying me too much. No damage fortunately, but I really should be more careful in future resin model preparations.

Just because it's good to do a roundup, the armour detail is:
  • Balthasar Gold
  • Reikland Fleshshade (gloss, or normal for deeper recesses)
  • Sycorax Bronze (first stage highlight)
  • Runelord Brass (edge highlight)
With the base colour:
  • Abaddon Black (several thin coats to get this really smooth)
  • Dark Reaper (built up slowly with thin coats)
  • Russ Grey (edge highlight)
The wet palette makes this very quick to do now. It will hopefully show more in future photos; the shadows and white balance easily hide it in most.

There's some small detail on the legs, with light rays being depicted that are normally a different colour to the rest of the detail (at least from most reference models I've looked at). I've been playing a bit with that, so I'll jot down some thoughts in case it goes anywhere:
  • Retributor Armour (too yellow)
  • Liberator Gold (nicer, but still too yellow)
  • Reikland Fleshshade (gloss, helps tone it back)
  • Ironbreaker (kind of drybrushed across the top)
I'll probably fill in the rest of the leg black before deciding whether to stick with that, or redo those areas completely.

Going forward, I've started to black in some of the left leg, and will continue with that until it's completely smooth. I'll likely get the thigh finished first, and then just work down from there. Once the left leg is entirely complete, the same for the right will have to be done. At that point I'm not sure about getting the right arm done, or trying to attach the model to its base. While painting on the base might be slightly trickier, it does help with motivation and would allow me to start harmonising Horus and the base. I've some time to think about it though, so I'll see what I feel like later on.

-- silly painter.

Sunday, October 6, 2019

Horus Lupercal (WIP), Sanguinary Priest (WIP)

One eye is colour blind.
Still having some trouble with getting the lighting just right, but it's late and I wanted to get something written out. So the above picture will have to do.

Small progress on Horus after a bit of a break. Mostly just filling out the belt and remaining torso armour plating. Nothing new in terms of colours, so far it's just a continuation of the same I've used before.

I've been thinking for a while about how to paint the studs, for example those seen on the pauldrons. Most variations of Horus have them as silver, however I'm slightly concerned that it will be too bright and take focus away from the rest of the model. On the other hand, the rest of the model isn't really there yet, so it could actually balance out once the model is finished. Perhaps it's worth seeing if Leadbelcher can mix well with black, or otherwise blob some contrast over the top to tone it down somewhat.

I'm also still deciding on the colours for the mace (Worldbreaker). I could strictly speaking glue one of the arms on now, but I'll wait longer until the mace is nearly finished, and perhaps more of the left leg, for reasons of ease of brush access.


Hanging pretty low there.
Purely for additional experimentation with Contrast paints, I've also started on a Sanguinary Priest. It's the white armour that I'm interested in. The above is a test on areas that are actually hidden behind robes, so they're intentionally a little darker than normal.
The armour is:
  • Corax White (primer, and then base paint for a smooth finish).
  • Apothecary White (contrast paint)
  • Basilicanum Grey / Contrast Medium (1:1)
That's really it. The recesses where shaded naturally from the paint. It's somewhat more grey than exposed armour should be, so future steps will just use Apothecary White, and then some white or light grey (perhaps Ulthuan Grey, or White Scar in a pinch) for edge highlights.
The robe seen here is:
  • Mechanicus Standard Grey
  • Blood Angels Red (Contrast)
  • Druchii Violet (Shade)
  • Mephiston Red / Dryad Bark (1:1) for edge highlights
Actually the last step is Mephiston Red with some pigment added in, but the pure pigments can't be bought anymore, so the equivalent now would be to mix in Dryad Bark (something I've done for the airbrush paints). On the outer garments I'll probably just drybrush Mephiston Red directly for the last step, both to change the texture and make it a little brighter.

Choosing the right base prior to applying Contrast does make a noticeable difference, so it's important to get that right. I may use something slightly brighter for the outer garments, and the outer garments should be done before the armour. Otherwise it's going to make fixing mistakes very difficult; white is an unforgiving colour if mistakes are made in red.

-- silly painter.


Tuesday, July 23, 2019

Horus Lupercal (WIP)

Damn it, hurry up and paint me.
Only a very short post with a better picture. Same lighting as before, but a better camera. Some of the easily spotted mistakes on the model have already been fixed.

Just to draw attention to the Luna Wolf icon on his left pauldron, that was simply Gree Seer (base), over which was laid some Black Templar (contrast). A bit of Wazdakka Red for the eye, and done. This is a really good example of where contrast paints shine. It would have taken me an awful lot longer to highlight that wolf head icon, but I don't feel the need to touch it any further now - except to fix the odd mistake, of course.

Gold trim is coming along, and should be done relatively soon. All the same as before, although it's not a good idea to paint tired. Eyes have trouble focusing.

-- silly painter.

Wednesday, July 17, 2019

Horus Lupercal (WIP)

Starting to look....jaded. Yeeeeaaaaaahh.
Slow progress on Horus. The chest plate metallics have been filled in, though I might still go back over some areas with Reikland again to really bring out the contrast some more.
I did play around with a tiny bit of Skullcrusher Brass to add some colour variation (it really can't be seen in the photo), which is something I intend to introduce some more on the legs and arms. I want to make the engravings ever so slightly different from the trim in areas, just to avoid overdoing the same exact colours. I'm not sure it will ultimately matter.
The shoulder pads are green as a hat-tip towards the Sons of Horus primary colour scheme. No Primarch would be entirely different from their army colours, so it was important to have this present on the model. I picked this up from the Forgeworld paint work, and it really does make sense. In order:
  • Lupercal Green (base)
  • Sons of Horus Green (layer)
  • Athonian Camoshade (wash)
  • Lamenter's Yellow (glaze)
The last step was perhaps a little too far. I've pulled it back with the layer, but might glaze it with Lupercal Green later if I feel that's not enough. Depends how it looks once the trim and details are filled in.

-- silly painter.

Sunday, July 7, 2019

Horus Lupercal (WIP)


Finally started to work a little more on Horus. It's about time I did so. He's been waiting patiently for me to bring my skills to the proper level, so it's time to continue with the model.
The Eye of Sauron Horus.
Of course the photos are terrible still. Really must do something about that soon. The chest piece is being done as previously detailed with the arm, but now that I can see it starting to take form, then I think the colours will work out.
The one note on the chest piece for now is the Eye of Horus in the middle. That is a combination of:
  • Jokaero Orange (base)
  • Yriel Yellow (layer)
  • Bloodletter (glaze)
  • Carroburg Crimson (shade)
  • Corvus Black (base, iris)
  • 'Ardcoat (technical, varnish)
The idea is to make the centre area more yellow, fading to orange and red at the outer edges. It's tricky to get the blending right with such a small area, and I had to go back & forward with Yriel Yellow a little, but it works ok I think. I'm happy enough with the effect that I think it will work elsewhere too. The varnish final step was learned from painting gemstones, and particularly from Blood Angel models, and really does give the eye the finishing touch.

Horus must still assemble his arm-ies.

I'm using Horus as an excuse for small amounts of contrast paint experimentation. Having decided that contrast paints are better suited to small details, that's exactly what I'm looking at doing; in this case the "dangling straps" (technical term) are some play with the following:
  • Wraitbone (base)
  • Snakebite Leather (contrast)
  • Gore-Grunta Fur (contrast)
  • Bloodletter (glaze, selected areas only)
I will very likely go back over this later with more glazing to subtly change the hue and give a different appearance between the upper and lower straps. Possibly some more layers will go on later, but it's a good start. The Snakebite Leather (which still smells like the old paint with the same name from long ago) was far too light, which is why Gore-Grunta Fur was added afterwards. While not finished entirely, I probably won't do more on the straps until later.

Small details on the arm were a simple matter of:
  • Grey Seer (base)
  • Basilicanum Grey (contrast)
Again, I'll do more later, but only to neaten up a few bits, or make some edging highlights. I wanted something other than a metallic, and this sort of thing is again where contrast paints appear to work rather well. It is similar to a shade in this case, but with better consistency and doesn't just run into recesses, but kind of glazes everything as well. I may just continue to use this for small skull icons on Space Marine helmets.

-- silly painter.