 |
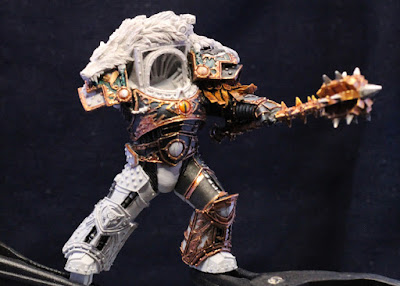
| Arming himself for the Heresy. |
Time for a more dedicated post to continued painting of the Warmaster. There's not a whole lot to actually say - for the most part it's continued with the same as before, just more done now.
As can be seen, the left arm is actually glued into place now. If it comes off then I'll pin it in place; the superglue being used isn't the best batch ever produced.
Last time I was unsure about the studs on areas of the armour. I've ended up with a simple approach of:
- Leadbelcher
- Black Templar (contrast, blobbed on top of the stud)
- Leadbelcher (mostly in the lighting direction)
- Ironbreaker (fewer studs, in the lighting direction)
The mace ended up using the "Sanguinary Guard gold" approach, which was intentional for two reasons: it again ties back to Horus' closeness with Sanguinius before the Heresy, and also helps to differentiate the weapon from the armour (which is more of a brass or bronze than gold).
- Balthasar Gold
- Reikland Fleshshade (gloss; I'd use Seraphim Sepia instead if that came in a gloss)
- Gehenna's Gold (first stage highlight)
- Auric Armour Gold (edge highlight)
- Leadbelcher
- Nuln Oil (gloss)
- Ironbreaker
- Stormhost Silver
- Warplock Bronze
- Castellax Bronze
- Sycorax Bronze
Furthermore, the mace had a little blow dryer done to straighten it out. I wasn't sure if I was willing to risk that, given that it could crack or otherwise damage the paint, but the slight bend was annoying me too much. No damage fortunately, but I really should be more careful in future resin model preparations.
Just because it's good to do a roundup, the armour detail is:
- Balthasar Gold
- Reikland Fleshshade (gloss, or normal for deeper recesses)
- Sycorax Bronze (first stage highlight)
- Runelord Brass (edge highlight)
- Abaddon Black (several thin coats to get this really smooth)
- Dark Reaper (built up slowly with thin coats)
- Russ Grey (edge highlight)
There's some small detail on the legs, with light rays being depicted that are normally a different colour to the rest of the detail (at least from most reference models I've looked at). I've been playing a bit with that, so I'll jot down some thoughts in case it goes anywhere:
- Retributor Armour (too yellow)
- Liberator Gold (nicer, but still too yellow)
- Reikland Fleshshade (gloss, helps tone it back)
- Ironbreaker (kind of drybrushed across the top)
Going forward, I've started to black in some of the left leg, and will continue with that until it's completely smooth. I'll likely get the thigh finished first, and then just work down from there. Once the left leg is entirely complete, the same for the right will have to be done. At that point I'm not sure about getting the right arm done, or trying to attach the model to its base. While painting on the base might be slightly trickier, it does help with motivation and would allow me to start harmonising Horus and the base. I've some time to think about it though, so I'll see what I feel like later on.
-- silly painter.
No comments:
Post a Comment