Tuesday, December 27, 2022

Space Marine Heroes 2 - Part VII


More hammer!

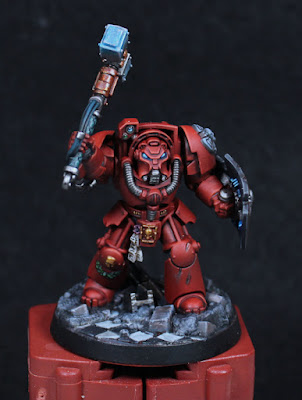
Another two Terminators finished just before the year's end, and bringing the total of models I'm allowed to buy up to 10.5! Only another two to go before the series is complete.

I finally finished the Imperial Fist, painted so just because I had a duplicate of the model and didn't want to paint it up as a Blood Angel again. It does bring some planning requirements with it, namely what colours to do? The helmet was painted up before I realised that actually Imperial Fist Terminators often come with white helmets, so I glazed it brighter with Dorn Yellow to make it trending towards white while still allowing other areas to be given a brighter treatment if need be. The storm shield is an example of this, and it admittedly took me a long while to figure out what colours to use on that, until I looked at the Imperial Fist insignia and realised white and black would be perfect. I could highlight the black details more, but at this stage didn't want to overdo it, and the white isn't given any shading because it's white and difficult to do that with.

I actually tried a little bit of oil paint on this model. There's a subtle OSL effect from the hammer, but I had such trouble with the oils that I kind of gave up on that idea. There's a slight white hint on the top of the left pauldron, and that oil worked great (possibly because it doesn't contrast with the already bright yellow), just not enough for me take it any further.

The base is predominantly blue and darker, to contrast and frame the model by mirroring the blue hint from the hammer. On the topic of thunder hammers, I've been giving a highlight to both ends up until now, however it occurred to me that the back end probably shouldn't glow - it's probably essentially a big capacitor and it's the front where a disruption field would be. So in future I might just drybrush highlight the front.

Someone call for a heavy flamer?

Another duplicate model and I decided to try my hand at a small bit of converting. I had a spare (right hand) power fist from a Death Company kit, and the heavy flamer comes from Grey Knights. The besagew is just there to cover up some really terrible gap filling. It's not perfect by any means, but just different enough to set it apart from the other one (which is still being painted). The power fist, being on the right, is not painted black like the others on purpose. And now that I look at the photo, I realise I've not written anything on the scrollwork - so that will be shortly rectified.

The heavy flamer is painted up in colours mostly borrowed from the Aggressors. That's now my go-to for flamer cowling, even if it takes quite a good deal of effort! I haven't blackened the nozzles in this case for no reason really, other than there's probably enough force behind any spray that it's unlikely to give backwash that might burn that area.

This is probably the last post for this year; I doubt I'll finish anything more over the next few days, but I will make notes if I get anything interesting done. Then it's back to work and copious amounts of travel, so I'll see how I get on with the all the pending projects throughout next year.

-- silly painter.


Monday, December 26, 2022

Sons of Horus Contemptor Dreadnought - Part I


That look of "well this is going to be fun".

A few days ago I had the brilliant idea of starting preparations on the Year of the Dreadnought, and started on converting a pre-painted model. I wasn't sure which Legion it would belong to, but I just wanted a bit of practice with the re-positioning the old Contemptor plastic kits. Their original pose isn't my favourite, but with a little effort I figured I could make something more dynamic.

I ended up purchasing a piercing saw (also called a jeweller's saw) for precision cuts that didn't remove too much of the model. It was an excellent purchase and really allowed this project to go forward. There was just one small problem: dust. A vacuum cleaner is great for cleaning all the plastic dust, but care should be taken to keep a tight grip on the pieces; much to my misfortune I lost one of the hip joints into the vacuum cleaner! Using green-stuff and a white clay mold I managed to build one from scratch, but I would have preferred to keep the original.

Oooh, my hip!

There is of course the issue of building joints up again after repositioning. The thighs I needed to almost completely reconstruct, after using spare sprue to glue pieces in the position I wanted. The sprue acts as a foundation to build upon, either with green-stuff or milliput. I'm pretty terrible at sculpting, but the results are...serviceable. The hips were somewhat interesting in that I ended up filling internal space with (rounded) sprue, and then pinning the legs into position with a paperclip. This appears to have worked nicely enough and should make the model a little more robust. The torso was a simple cut and rotate slightly, and with the head being much the same - just with a lot more cutting away to allow that to happen.

The hips I covered up with flexible ribbing by rolling green stuff into thin sausages and then carefully (and most frustratingly at times) layering each next to another on the model. I think it works well enough and I'll keep it in mind for future conversion work.

The original idea for the re-pose was to have the left leg standing on a tactical rock, with the torso turning slightly for the occupant to point the assault cannon at some target of interest. In doing this I had the model standing at some point on the desk and rotated the assault cannon arm up high - and behold he looked way better as if trying to block some attack with that arm. Having recently watched the Death of Hope trailer (awesome!) again, I then had the notion that perhaps another Contemptor was charging in and about to give this one a bit of a beating. This in turn made me think that perhaps a Blood Angels dreadnought would be on the assault (preferring that combat role in general) - which then makes sense for this to be Sons of Horus and perhaps taking place on Terra.

Having an idea of a duel helped to fill out the base for the pose. I really didn't want the hassle of cutting and repositioning the feet, so instead one foot is sliding on the ground to give a more stable stance in an attempt to fend off the incoming attack. I've tried to build up some uneven ground with milliput and then cover it with a texture paint to give just that impression. The base also has some bits of old resin scenery stuck around, but I might end up adding more rubble later on. Sprue cut to pieces, with some holes drilled in a few places, makes for great girders or bricks, and I have some additional scenery that I could use. I don't want to overdo the base and make it look like a junkyard, but right now it feels a little to sparse.

On a note of paint removal, that proved interesting. I used a kitchen degreaser to soften the paint and an old toothbrush to remove it in areas I felt the old paint to be too thick. I also tried an electric toothbrush. Hint: don't bother with an electric toothbrush. This is not something I'll have to do often fortunately because it took a while - if this was a regular thing for me I would definitely invest in a sonic cleaner. I also ended up digging out paint from recesses with a metal pokey stick (technical term) just to really get everything clean. It took a long time, but I think it will be worth it later on. The helmet could have used the same treatment but I had already stuck it in place by then. I'll just have to be careful not to use too many layers and obscure any more detail.

What would I do next time differently? Well I have two more of this kit somehow, so I'll have the chance to practice more. The hip joints are the troublesome part, and so I might focus a little more there. I could build up the connecting internal structure first, separate from the model, and then cut it into place once I've come up with a pose I like. I've learned that milliput is far more workable once it's cured for 15 or 20 minutes, and that should allow me to build up appropriate strips on top of the basic shape and make it look more like the parts from Forgeworld (or the new plastic Contemptors). The feet might prove easier to work with before assembly as well, so I intend to give that a go next time. Otherwise I think the repositioning has turned out about as good as I'd hoped - now to prime the model and start airbrushing the base colours.

-- silly painter.


Sunday, December 25, 2022

Space Marine Heroes 2 - Part VI


Whatever the problem, Thunder Hammer is the answer.

Another two of the Space Marine Heroes 2 set have been completed. There are actually more that are very close to being done too, but it will probably be a few more days before I get them finished so decided to make a post now.

The majority of work on these models is, once again, nothing new. The same basic approach that I've been using for Blood Angels for quite some time now, however I may make some adjustments going forward. I'm always on the lookout for small improvements to the process, and in this case it relates to edge highlights and varnishing.

On these two models I decided to reapply edge highlights of Wild Rider Red before the final varnish step. They weren't coming through well enough and I wanted some areas to stand out just a little more, to help give definition to specific areas (notably the helmet). Unfortunately the edge highlighting gets lost a bit again when the matt varnish is applied later, unless there's a very distinct brightness contrast. In future I may therefore apply the edge highlight after the gloss varnish (seems little point in doing it before), and then reapply it along selected edges after the matt varnish. This does take a little longer, but the double step will help keep selected edges more vibrant, while still allowing a lesser highlight elsewhere. Note that this problem only occurs because of the varnishes I'm using and I could opt to simply not varnish, but I still prefer to lock the airbrush paints in place and to use the properties of the gloss varnish to help with recess shading.

Fist is ready to ram down a xenos throat.

I'm also starting to use my fine detail brushes more regularly, which is helping to speed up painting. Combined with the magnifying headset it just makes it much quicker to apply paint more precisely over specific details. Right tools for the job and all that. Another help is that I can rely on the wet palette to mix colours for unique details and just do what I feel like without having to stop and switch paints out. The bulk of each model still follow the basic formula, but details can really slow me down - so being able to just mix paints off the palette without worrying about noting down what I'm actually doing is somewhat more relaxing than normal.

As mentioned above, there are a couple more of the Heroes 2 series that are very nearly completed, which leaves a couple more (still in early stages) before they're all done. Right now the tally of models I can buy is at 9.5 (I bought something else on holiday) and it would be nice to have it at 10 or more before the end of the year. I also have other projects that need attending to, once these Terminators are completed.

-- silly painter.


Sunday, December 18, 2022

Year in Reflection

The Year in Review

Not quite any more models completed yet, although a couple are very close, now that I'm back and recovered I thought a year in reflection was in order. Essentially I want to go back over the year of painting, if I achieved whatever goals I set, learned anything new in particular, and what I plan on doing next year.

Officially I have completed 50 models this year (and two more to be done in the coming days) so on average that makes one model per week, with a few caveats: a good number of the models were actually started last year, and Necrons make up a portion of models done. So while I can fudge the numbers and feel good about, the reality is that I didn't really paint as many as I wanted. There's nothing to really blame: I have been away quite a lot, but at the same time I'm incredibly slow to paint even when I know exactly what I want to do.

The "Project 20 Marines" taught me that I really cannot batch paint. It's just too demotivating to have so many lined up, especially when it's the older tactical squads where every model is as detailed as any characters and requires individual attention. Primaris Marines on the other hand are more similar and I have fewer troubles getting through those. With this in mind, I will very likely keep one or two Primaris on the go at all times as kind of "gap filler" between other projects.

The Ultramarine Lieutenant was a good deal of fun for something different and allowed me to play more with getting a good blue ready for whenever I paint a certain Primarch. The formula worked very well, giving an intense cobalt blue finish, but does rely on the airbrush. Covering up mistakes will be tricky but not impossible, and I'm certain that will be the approach I use on Guilliman. Further on the Ultramarine I attempted to use oils, and I've come to the conclusion that I don't like using oils on miniatures. They simply don't flow as nicely with fine details compared to acrylics (at least not for my experience level with each) and so I intend to stick with acrylics going forward.

Azrakh has not progressed since the last update, however I'm constantly looking at photos; the NMM effect really works on the model and I do want to explore it more. I still think the use of NMM is more limited to anything that looks part of a diorama where the lights sources are more controlled. NMM also helps define details with greater levels of contrast, but also takes an incredible amount of time to get done. I will continue with Azrakh soon enough, but it's a model that will have to be done in small stages. It should be noted that I'm purposefully replicating boxart, something I've grown more comfortable with purely because it represents practice with less mental heavy lifting.

The Crimson Court was a fresh break from Space Marines, letting me explore more organic shapes and the texture of clothing. Painting each in their own style felt more natural than attempting to give them matching colours, and ultimately lead to one of my favourite results of the year: Gorath the Enforcer. The dark moonlight effect really sells that model, and it just goes to show what can be done with a very limited palette. I'm keen to try something similar again, although with different colours, and have Cypher picked out for this.

 Tools

One thing I haven't written much about is any change of tools. I've been impressed so far with the new (white) synthetic brushes from Games Workshop, and they're now my go-to brushes for the majority of my painting. The bristles will form a slight hook as with any synthetic brush, but so far it's been quite manageable. One brush has started to deteriorate slightly, however I'm quite unkind to it and it's lasted far better than any other that's received such levels of punishment.

I mostly keep older brushes around to help transfer paint onto a wet palette now. This is helping to keep the good brushes from wearing out quite so quickly I've noticed, and also helps control how much paint is within the tip; more control of paint on the brush helps with more control over painting.

I've been starting to keep a small drop of flow improver on the palette and using that to thin paints rather than water. The flow properties compared to water are much more favourable with pigment manipulation, and it ends up saving considerable time in trying to get an even coat.

Lastly for tools, I now use a pair of magnifying lenses. They really help see details, and my eyes are not going to get better in the coming years so I'll take what help I can. Coupled with one of the fine tip brushes (a really good sable hair, the artificer series from GW are sufficient for me) and it makes painting details (especially eyes and lenses) so much more pleasant.

Next Year

I'm happy with a few select models forcing my painting skills to improve, and these won't be done in any hurry; I'll finish specialised models in months, not weeks, taking them well into next year. Equally, I want more practice in just getting through models without over thinking them - thus the intent to keep simple models going in the background at all times.

The big challenge for next year however will be some larger "miniatures". I'm dubbing 2023 as "The Year of the Dreadnought". I have many of those war machines to paint up (nine at current count) and I want to finally get some of them done. At least one will also be the focus of some heavy conversion efforts - the old plastic Contemptor variants could use a bit of reposing, despite the effort that will involve.

I'm hopeful that my understanding of the airbrush, coupled with a healthy dose of paint scheme inspiration from around the Internet, will help complete dreadnoughts more quickly than normal.

There is every chance that plans can change of course. I may simply be inspired to paint something else when the next round of models is finished, or travel plans can interfere, and so on. I'm not going to force anything upon myself: if plans start to feel like a chore instead of motivation then they will change.

-- silly painter.