Showing posts with label sonsofhorus. Show all posts

Sunday, May 11, 2025

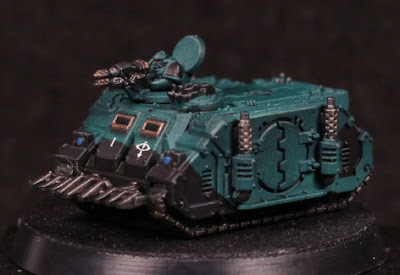
Legions Imperialis - Sicaran Battle Tanks (Part V - Showcase)


Glow-guns

For whatever reason it was an absolute slog to get these four tanks finished. Not much time to paint coupled with indecision over colours and a continual questioning of just how much detail I should go into really took its toll here. In some regards it might have been easier to paint a full sized version (that's for another day - I have a couple of the resin kits from a few years ago). What let me finish them in the end was a change of mindset to just simplify the colours: make the bulk of the weapon covers black and just use edge highlighting to pick out lines. Limit the palette and focus on overall appearance instead of getting lost in the close-up.

The colours work well enough, though I'm not entirely happy with the barrels of the plasma weapons. I'm still not really a fan of blue glowing plasma coils, but that's obviously luminosity from whatever hardened material is used to house all that energy, and it makes it immediately apparent on a tabletop what the weapon is for gameplay purposes. Think I do prefer the look of the other turrets though.

Now that the varnish is dry and the models are done, what would I do if I painted more? The base coats worked well. The main airbrush steps did their job, but I'm still getting used to Contrast paints through an airbrush. I might prefer a standard acrylic paint and multiple passes which will keep the end colour more consistent across each model rather than trying to ensure that last Contrast pass matches for them all. The shading is subtle enough by works, and using Black Legion (Contrast) mixed with flow improver and applied over a gloss varnish continues to provide an excellent way to panel line everything. Selected edge highlights accentuate the armour plates more and the end results is a very readable small scale tank. I also really like how the tracks turned out. Ratling Grime added just the right shading to give the look I was after.

I could do some weathering, battle damage, muzzle burn, etc, but these aren't intended as display pieces (although it's not like I've ever actually played a game with them). The viewports and sensor lenses are far too bright here, I probably could have darkened them with a shade, but again effort and it does give them a sinister look - psychological warfare that this horrifying tank is watching you.

Now I can put these away and see what's next on the list. Probably a dreadnought and devastators.

-- silly painter.


Tuesday, May 6, 2025

Legions Imperialis - Sicaran Battle Tanks (Part IV)


Hold up, how do my pauldrons fit through the hatch?

These models are taking an insanely long time to get finished. This is partially a lack of motivation because they're taking so long (circular reasoning), but also because I just have so little spare time right now. So I've cut a few corners and forced myself to get the Sicaran tanks nearly done - just the other set of turrets to go. I've also not added any decals - I figured paint scheme shows easily enough which army they're part of, and also there's really only one panel to put a decal on. That would require a white transfer, which would stick out like a sore thumb. The alternative is to paint symbols on by hand, which I just frankly can't be bothered with.

I painted the viewports and lenses with a simple mix of Mephiston Red covered in Troll Slayer Orange. Nothing special, no fancy effects, just dots of colour to break up the turquoise. The orange tint is a nod to the Eye of Horus.

Cabling is generically Khorne Red with some Mephiston Red highlighting. This is purely again to break up the monotony and add some visual interest.

Silver metals are Iron Warriors, Nuln Oil, Iron Hands highlights. All of this done before the varnish step. The brass is Balthasar Gold, Seraphim Sepia, Sycorax Bronze highlights. Absolutely nothing special, all of it very simple - just on a small scale and requiring a fine tipped brush that is just now starting to give. It's been an exceptional synthetic brush which I've leaned on heavily recently - I hope future purchases of the same are just as good. Da Vinci size 0, Nova Synthetics range.

Black areas are Corvus Black, Dawnstone (mixed on the palette), and Abaddon Black mixed with water to essentially shade back some areas.

That's pretty much all. The most time taken was in deciding what colours should go where, but once that was sorted then the next steps proceeded smoothly enough. The details make the painting a little slower than I'd like as well, but also because they're so small there is no sense is perfectly smooth blending - you really do want some contrast to pick out edges more than anything else.

And now it's on to the other turrets before I can classify these models as done. Next post however is likely to be about a change in painting approach that I'll be forced to make given the current circumstances - or else I simply won't get anything done all year.

-- silly painter.


Sunday, April 6, 2025

Legions Imperialis - Sicaran Battle Tanks (Part III)


brrrmm brrrmm

I can't seem to find time to get these tanks finished, but there has been some progress.

I'm also incredibly tired right now, so this will almost certainly be brief and to the point.

The metal is mostly Iron Warriors, then Iron Hands over that on the tracks. The tracks had Ratling Grime over the top for a bit of weathering, which is just enough to make the tracks look used without making them look caked in mud while the rest looks suspiciously clean. The weapons are just a base coat right now and need a shade and probably Iron Hands later as well.

Balthasar Gold rounds out the rest of the metallics so far - again, needs a shade and then a highlight with something else. The Omega Destroyer (or whatever it's called) variant has Balthasar Gold on the firing ports, and then Iron Warriors sort of glazed over the top. I intended to go back over that with a thinned black for scorching later on.

Lenses, viewports, and power cables are all base coated with Khorne Red. I'll differentiate viewports from cables with some other colour later on, but the small dots of red accents nicely against the turquoise which otherwise dominates the models.


I was also stalled for quite some time not knowing what colours to use on various components. In the end I'm "cheating" by using the reference photos / box art from GW on the larger version to inform the colours on the smaller scale. Except for the plasma glow - that's purely so the variant is instantly recognisable on the tabletop.

Still a lot of detail left to go, and now that I'm on a roll with them I have to push the pause button and go away for a couple of weeks. Not that I'll have much time when I'm back, but at least the main colours are blocked in - just detailing it (including edge highlights on black areas) and they'll be good enough to call done.

-- silly painter


Sunday, January 12, 2025

Legions Imperialis - Sicaran Battle Tanks (Part II)


An edgy, colourful variety of tank.

There hasn't been a whole lot of progress on the Sicaran tanks recently, but I did manage to finally get the bulk of the armour finished and an impression of how well the (hopefully) more refined approach would turn out.

Last time it was simply building up Typhon Ash, later mixed with White Scar, to ensure the vibrancy showed through. I think that worked well enough that I'll simply continue with that approach in future. Terradon Turquoise was applied in a couple of coats but managed to maintain some of the shading and highlighting. I could have mixed in slightly more White Scar, but on the other hand the edge highlights here help give the appearance of brighter colours.

After the usual coat of gloss varnish, and before edge highlights, I once again went with Black Legion (Contrast) mixed with acrylic flow improver. I wasn't exactly super careful with it, but neither was I being too messy. I did on occasion (particularly on the top areas of the body near the turret) heaving wash nearly all of it, and then quickly wipe away excess with a cleaned brush. This is much quicker than carefully panel lining, and keeps any staining to a minimum. I wouldn't do this on larger scales, but it worked excellently here.

The main armour highlight colours are Gauss Blaster Green and Sons of Horus Green. Gauss Blaster applied to brighter (normally upward facing) edges, Sons of Horus on others but also layered over Gauss Blaster to pull back some of the brightness and help tie everything together. I also mixed the two colours together basically as I felt like it, wanting edges visible but not trying to cosplay as a Tron character. I think so far it worked, even though I'm aware the matt varnish later will tone it back.

Black Legion (Contrast) was used to cover the tracks and black armour panels because of its good coverage and ability to be applied over gloss varnish. The armour panels still had Eshin Grey and Abaddon Black blended together over them - and none of this has been done on the turrets yet. The tracks I was unsure about. I wanted them darker, metallic, but also dirty and distinct from the armour panels. I also didn't want to spend weeks on them. Ultimately it was as simple as Iron Warriors in a couple of layers (this does not have to be completely smooth, just a couple of rough coats) and then Ratling Grime (Contrast) over the top. The Ratling Grime I researched and bought specifically to try this out with - and I'm intending to use it elsewhere for oil stains, or general...grime.

That brings the tanks to their current state. The weapons need blacking and metallics applied, and the housing on the turrets for the weapons will probably be black as well, which is why I didn't bother to highlight those yet. There are a few viewports that need picking out, lenses, other small details - all over which is going to take time. I'm definitely spending more of that on these particular models compared to the Rhinos, but these are also centrepieces. Also I couldn't decide on the turrets, so I'm painting them all - meaning four tanks, but eight turrets in total.

-- silly painter.


Wednesday, December 25, 2024

Legions Imperialis - Sicaran Battle Tanks (Part I)


Tanks a lot.

Delayed post because of being laid low, but back to things now. I have a few things with slight progress, but these little tanks have been sitting assembled and primed for a long while now and I wanted to start them. I'm hoping to use the airbrush very regularly over the next couple of weeks just because I have an window to do that before certain distractions are restored.

Part of the reason in delaying starting these next models has been in wanting to try and get a better handle on using the airbrush. I've been getting used to thinning paints more, using multiple passes to reduce some of the speckle, and even swapping between airbrushes to see how the higher quality ones compare with my skill level. Hint: thinning paints makes cleaning out an airbrush much, much easier! I've been skipping full tear down and clean outs because it's simply not required, and there's been virtually no nozzle clogging. There is a downside that the with the amount of thinner and flow improver I use, the paint definitely does not adhere as well. It takes quite some time to cure and stick to the model, several hours or even a full day will give better results in this regard.

The multiple coats, multiple sessions airbrushing approach I'm developing works for me because I don't have all day to sit and paint - generally an hour session each day works best right now, so I can line up multiple models and batch as appropriate. The tanks here will have another couple of sessions before the paintbrush comes out: the Contrast paint filter stage, and then later gloss varnish to secure everything.

The initial stage on these tanks was Typhon Ash, roughly one part of that with one part thinner and one part flow improver. I probably need to adjust that mixture in future, make two parts paint to one part each of the thinner and flow improver. I did need to hold back the airbrush further initially, and the first coat was far too watery, but later it mixed better and more to my liking. I used about four passes in the end, rotating through the parts to give each time to dry before the next layer, to build up to full opacity and given even coverage. A little patience is needed, but I think it worked well.

Previous models always suffer from the problem that I don't go bright enough with the initial Zenithal highlights, so this time I then mixed in White Scar to the cup and did another pass. I'm hopeful this is now bright enough that the later Contrast filter won't be too dark. I still have trouble with this: I almost always need to go lighter and brighter than I might think, forgetting that mixing paint decreases both. I'll see how I fare this time.

-- silly painter.


Sunday, December 1, 2024

Legions Imperialis - Leviathan Siege Dreadnoughts


His name is "Plod".

These had been sitting in the prepared stage for a few weeks, and I finally got around to finishing them off. It didn't take long once I'd decided on a few colour choices.

These models I went with a simple black primer and then built up layers of Typhon Ash for highlights. Instead of immediately going for the next colour step, I decided to edge highlight with white first. The theory was that this would show through more than the Typhon Ash and give proper edge highlights without needing to colour match the Terradon Turquoise. It kind of worked, but I ended up cleaning a few placed with Lupercal Green anyway, so I'm not sure it was worth the effort. Gloss varnish and Black Legion with flow improver worked a treat as always for recess shading. I touched that up very slightly later with thinned black where necessary, but only where it was going to make a strong visual difference.

One of the major changes from previous attempts was to only edge highlight the black, without trying to perform any volumetric highlights. This saved a lot of effort and particularly with black isn't really noticeable compared to more detailed highlighting anyway. I do like how the green turned out, which for these dreadnoughts makes a difference because of the large, flat surfaces of the body - but even on the legs it's not really very noticeable. For "normal" troops, as I've previously considered, it's just not worth such attempts at all.

I am a dreadnought and I'm digging a hole...diggy diggy hole.

likewise with the metallics it's not worth putting in much effort. For this scale, edge highlights are everything - base, wash, maybe additional definition on raised areas if necessary.  I went with darker silvers because of the darker overall palette, and limited Runelord Brass to add variation where I wanted to break things up a bit, such as the hood over the head. A relatively small brush and light touches, and not even a wash is needed afterwards. 

The eyes are Troll Slayer Orange. I did do a very minor amount of volumetric highlights on the helmet simply because it's a focal point and helps to frame the eyes.

Not much else to say on these. Very quick to paint, mostly because I'm only aiming for a tabletop standard, but the end result is still rather solid and they look impressive enough when grouped together. Next are some more tanks, which I hope to have done by the end of the year - if I get time enough with the airbrush.

-- silly painter.


Saturday, October 26, 2024

Legions Imperialis - Deredeo Dreadnoughts


Oreo Dreadnought

(Warning: long day, a lot of spelling and grammar mistakes below no doubt, and I can't be bothered to proof read and find them.)

Pursuing more testing of small scale Legions Imperialis, I've managed to work on some Deredeo Dreadnoughts. They're honestly not my favourite design, just personal preference, but do provide some interesting shapes to serve as a test platform.

For these I opted to try a base coat of Night Lords Blue with Typhon Ash kind of Zenithal'd over the top. I put some extra emphasis on the upper body area, the upper missile racks, and the base of the legs. I also drybrushed Wraithbone over the top because I felt like I hadn't gone bright enough and wanted to try and catch some edges - but edge highlighting on models this size are rather pointless to do everywhere. A gloss varnished followed by flow improver mixed with Black Legion sorted out the shading, which actually isn't too visible aside from around the legs. It's still easy enough to do that I think I'll keep this step.

Black Legion was again used to base all of the black areas, and I still prefer that paint over anything else when doing this. The pigment count is very high and the paint consistency works well even over the gloss varnish. Troll Slayer Orange for the eyes to try and make them stand out, but they're barely visible at any sort of distance.

I did try some fluro acrylic paint, but that was a complete mess. The consistency was wrong, opacity was wrong, everything about it was just wrong for this usage - but that's what you get for using canvas paints on little models. It was worth the experimentation to see if it might be useful in future, but I think I'll stick to dedicated miniature paints for now.

Back to the black details and initially I was trying to do some volumetric highlights, but my patience was wearing thin. Lack of time to paint coupled with not really liking the model, and eventually I just stopped and instead only went with edge highlighting. Here's the biggest takeaway from this test: other than boxy tanks, and perhaps even not then, it's simply not worth trying to do volumetric highlights on this sort of scale. Save it for the Titans and larger vehicles. Anything smaller than a tank, just use a solid base coat and edge highlights to make it readable. It will give a cleaner look, take less time, and be far more impressive on the tabletop.

When Rifleman from Battletech goes grimdark.

The other major mistake on these was just a little playing about with Runelord Brass. I put Spiritstone Red over the top of that for the missile rack sensor array. It's a nice colour, it works well standalone, but it's far too bright here and attracts all the attention even with a matt varnish.

Lastly, I still need some practice with the airbrush. I suspect I didn't leave enough time between coats of Terradon Turquoise, which resulted in a grainy appearance instead of the smooth finish that I'd like. Practice will help I'm sure. The next models on my list (more dreadnoughts) I'm going to try give white edge highlights before that step, just to see if it will show through.

And no, I'm not drilling out those gun barrels.

-- silly painter.


Tuesday, September 3, 2024

Legion Imperialis - Tarantulas


Turret Defense!

For these weapon platforms, sentry guns, whatever, there's not a whole lot different from before. Certainly nothing revolutionary, just trying to fix some mistakes and add a whole bunch of new ones.

The starting point with these weapons (four in total, just double up on what's shown) was Typhon Ash to serve as an undercoat, and Terradon Turquoise over that. The Typhon Ash seems to have some kind of grainy problem: I checked airflow, checked it was properly thinned and mixed, enough flow improver, but somehow it was hitting the model like flecks of sand. I don't mean it was dry when it came out the airbrush, I mean it was like adding small flecks of sand to a thinner medium and airbrushing that, with the result being a very grainy appearance across the surface. Spray primers have a more even coverage. Next time I'm going to add a drop of white ink to see if that will smooth things out. As it is I needed a couple of passes with Terradon Turquoise, which in turn darkened the base colour more than I'd have liked.

I also worked with the edge highlighting using Gauss Blaster Green again, but I think I can do better. I'll try to edge highlight with white before the turquoise and see if that makes any difference. I can always go back over them again if not.

Not worrying about volumetric highlights of any kind was a big help to these models. They're so small that they just don't need it: the edge highlights are sufficient to help with definition. A top-down approach with the airbrush will give some gradient in places anyway for next to no effort.

These models were given a gloss varnish and then gently covered with a Black Legion Contrast mixed with acrylic flow improver wash, which really helps with all the definition. It could have been a slightly darker wash so next time I'll try play with the ratio of contrast paint to flow improver.

Lastly, always dry fit to the bases before just blindly gluing these models on. The bases aren't always even, and not all of the feet might make contact with the base properly. Just worth keeping that in mind.

-- silly painter.


Wednesday, August 28, 2024

Legions Imperialis - Heavy Support Batteries


Teeny tiny troops.

Painting Legions Imperialis a certainly different to anything larger scale. The brutal lesson from these is: don't bother much with volumetric highlights on the smaller models. It's simply not worth it, not at this scale, for anything other than competitions or purely display purposes (box art, that kind of thing).

Here I wanted to try not using the airbrush, just because I didn't want to setup and later clean for such a minor amount of use. Instead I used a spray primer (Wraithbone) from the top and then Terradon Turquoise with a brush. It didn't work very nicely at all. The primer was hit & miss, the Contrast paint pooled badly, and I spent a little while fixing it up. In future I might as well just mix up a base coat for troops and evenly cover them with an airbrush - no Zenithal, or volumes, just even coverage. Later I can use thinned Black Legion to help define some of the model.

Most of the the rest is fairly straight forward: I used Sons of Horus and Lupercal Green to tidy up some mistakes, Black Legion for the black areas (it has very nice coverage, so I'm starting to favour it over other blacks for a base coat), and some minor edge highlights with Dawnstone (for black), and Gauss Blaster Green mixed down with Sons of Horus for the green. A little Troll Slayer Orange for lenses, which are barely visible at all, but do add a nice touch.

The metallics are kind of drybrushed in places, using an old an worn out small layer brush. This allows black to remain in the recessed areas, but the brighter silver defines the shape overall. Ironbreaker for select highlights on barrels, and Hashut Copper for a bit of visual interest in places (notably on the weapon platforms and left pauldron studs). 

The treads on the weapon platforms I didn't want to be just black, but neither did brighter dusty tones seem to fit with the bases. Instead I went for a 1:1 mix of Snakebite Leather and Agrax Earthshade and lightly shaded over them. Just enough to dirty them up a little, but not enough to make them look muddy.

Simple is key to these models I think. Basic colour blocks to define shapes, some shading, and minimal edge highlights to help pick out some details. I did try putting a basic Eye of Horus symbol on the shoulder pads, but at this scale it's not really visible. Instead it merely gives the impression of something being there, so I didn't even bother trying to be neat about it. I also clipped the little bump between the feet of the troops because I felt it would look nicer that way.

So that's it. Nice and simple - but sometimes simple can also be very difficult. It's a balancing act to make them look presentable and readable at scale, with too much effort, and focusing on what's important instead of getting lost in the details. I'll see if I can use some of these lessons on the next batch of models, which hopefully won't be too far away.

-- silly painter.


Friday, December 29, 2023

Sons of Horus Rhino Transports - Part II (Showcase)


Rhino to war.

I could have posted earlier, but wanted to get the convoy finished up. No pictures of them all in a row because I don't have an appropriate background, but the idea is that two with the gunners and dozer blades are out the front, and the rest follow behind.

Ultimately I put far too much effort into these models, but they do look impressive all lined up. The main thing I would change is more shadow emphasis on the sides, and then recessed shading to give extra definition to the shapes. The models in general are uniformed in the colours, but I would like that to be slightly more the same shade. That's to be expected when using multiple Contrast layers over an uneven pre-highlight, which I'm sure will be improved on with a little more practice.

4 exhausts must mean 4 engines.

The black panelling was close to the usual grey black that I do, with one fewer step:

  • Abaddon Black
  • Corvus Black to highlight some panels, but mostly keeping it flat across surfaces.
  • Dawnstone to edge highlight.

That's really all. The focus is on defining shapes, not smooth blends: the models are far too small for anything else to matter. The front viewports are framed to give some more visual interest and create a slight focal point, but the "glass" is simply black - there was no intention to try make it look anything different. All of the metal parts are also painted black around here, which makes the metallic paint show up better afterwards. The viewport edges themselves were going to be simply Castellax Bronze, but I decided it needed to be brightened up slightly and so Sycorax Bronze was layered over the top.

Most metal was painted in Iron Warriors, with the exception of the tracks which were Iron Hands Steel. The exhaust stacks were very slightly highlighted with a mix of Sycorax Bronze and Iron Warriors, but it's not visually significant.

Caledor Sky for the headlights, some red dots on targeting lenses, and Warpstone Glow on hatch lenses. The latter could've been brighter, but also isn't necessary at all. Again, with the size, no sense in trying to give them a reflective look unless it's being entered into a competition.

Captain Blackdoor.

The final touches were decals of course, although a very (very) thin wash of black was added afterwards to tone down the otherwise bright white of those decals, and Wyldwood thinned with water and washed over the tracks. The intent was simply to muddy the tracks a little, make it seem like they've been driving over a battlefield and have picked up some dirt. I could have added some weathering as well, but it just doesn't seem worthwhile: the oil wash already dirties the tanks somewhat and gives them a used look.

I've considered trying to add magnets or cut small trenches in the tracks to put metal strips into, but ultimately I'll probably just make some kind of small boxes or sectioned tray to store them in. Varnish should protect the paint for a long while. A couple of Baneblades are next up for tanks, but there are many other works in progress that I'd like to finish off as well - guess I'll see what inspires me next.

-- silly painter.


Sunday, December 17, 2023

Sons of Horus Rhino Transports - Part I


Tiny Tanks.

Naturally I have something from Legions Imperialis. The full release box I couldn't justify, but a squadron of Rhino transports? Now that's something to play with.

I've decided to paint up the Epic models as Sons of Horus, simply to avoid the truly massive amount of red that I already have for 40K models. It does mean that some of the titans might have to be alternative colours to what I've already been dealing with, but there's time enough to ponder on that.

One of the driving goals here is to not care quite so much about the details on these models. There's no way I'm going to ever finish them if I try to paint them to the standard of their larger counterparts, but equally I didn't want them to be too bland. I'm trying for a basic colour, simple highlights, then fill in basic details. Keep the colours to a minimum, keep edge highlights to a minimum - if they're going to be done at all. Recess shading can serve just as well to help define shapes, and it's here that oil washes can be useful.

Turret gunner has eye lenses on the helmet.

Of course there are some mold lines that exist when pictured up close, but they're almost invisible when first priming the models. I'll have to keep an eye out for a few usual suspects later - for now almost all the troublesome areas will be painted black which should hide them again. And naturally I need to paint in eye lenses, because I can.

To start with on these models I used a thinned white (White Scar) to sketch out the basic highlight areas. This doesn't impact the end result, but it does make the model easier to see. I may well avoid this step in future now that I know what I'm doing. After this I coated the entire model with Sons of Horus Green. This serves as the mid-tone, and a follow-up Lupercal Green (which is a darker colour) in shaded areas. The trick behind this with an airbrush is to really thin the paints with flow improver and thinner. It's almost wash or glaze consistency, just enough to tint the existing colours more than anything else.

Once here I wanted to try something else and used Typhon Ash (thinned of course) to apply a pre-highlight. This should serve to keep the next step brighter in highlighted areas, but not substantially change anything darker. Terradon Turquoise through the airbrush using either thinning, or preferably just a smaller nozzle. The smaller nozzle means a finer spray of the Contrast paint, which should stop it from overpowering the pre-highlight like happened that last time I tried this. And it mostly worked quite well this time around, although I needed to apply two coats in places when I'd thinned it too much as well. Not every single rhino looks exactly the same when doing it this way - there is some slight variation in tone, saturation, etc, but it's close enough and practice will improve on it more.

While I'm happy with how this turned out, it's also far too many steps. In future I intend to give a darker blue base coat, sketch highlights with Typhon Ash again, and then directly to Terradon Turquoise. The result should be very similar, but with 3 fewer steps - and possibly something that could be done in a single sitting. I'll eager to try that out, but don't have any spare models to test it on just yet.

Oil washes are still annoying for me. Mixing up the wash, keeping a mask on because the "odourless" spirits still smell, and dealing with drying time are all very frustrating. I pin washed a couple of Rhinos, then got annoyed at how long that was taking and drenched most of the rest. Wiping away the excess also took a while, but unfortunately the cotton pads I was using caught on edges far too easily and put small fibres everywhere. I am not taking that approach again. I had forgotten a single Rhino, and so I tried a different approach with that one: black acrylic with water and dish washing liquid to help break surface tension. That works almost as well as the oil wash, but only across a gloss surface. So I'll need to gloss varnish before that, but I think it will be the approach I use in future.

Acrylic pin washed.

The oils still give sharper definition, but I think with a bit of practice and experimentation (perhaps with a Contrast paint, which might need less dilution with water) then I can improve on things more, even if it's good enough already.

Next step is going to be blocking in metal areas in black, adding some basic hull stripes or patterns, and decals. The decals are a problem though: putting them on hatches is problematic because of the centre line, which will obscure the decal, but also be troublesome for a decal to kind of fold into. I may need to resort to getting very good at free-handing the Eye of Horus.

-- silly painter.


Saturday, February 4, 2023

Sons of Horus Contemptor Dreadnought - Part IV (Showcase)


Traitor with nothing but contempt.

A little later than I wanted, but I'm calling this model done. I could go a bit further with battle damage and chipping, particularly on the black areas, but if I did that then I'm not sure when I'd get the model done! I'm increasingly doing this to models, and it's not a bad thing so long I reserve that extra effort for the special sculpts. Such as Azrakh, which hasn't seen progress is some time and I really need to get to.

Ultimately a Contemptor is very similar to painting a big Space Marine. There's really not a whole lot different; even Terminators felt like they had more detail and troublesome areas to paint. The vast majority of work on this piece was done with airbrushing - but also I've left a lot of parts as "dirty", which meant they were never intended to get precision paint tip attention. On the whole I think the model came out well enough in the end, and as it was really only an initial experiment with slight conversion and re-posing, then perhaps that's more than could have been hoped for.

I did end up finding some chain on cheap store jewellery and used that to hang a couple of skulls on the left arm. That was not an enjoyable process: gluing chain together and in the right place involved dots of superglue and hanging the chain in the right spot, at the right angle, and making sure it remained undisturbed until the glue dried. It took a whole day just to put those skulls in place! It does add a lot of character, so I think the effort was worth it, but I'm not really wanting to repeat it anytime soon.

The skulls on the base kind of detract away from much of the rest of the model. A glaring bright point surrounded by dark, how could it not. I tried to tone them down with Nuln Oil, just to make them seem dirty as befitting their surroundings, but they still stand out too much. Not a whole lot to do about that now - I could add some marble, bricks, etc, to even out the colours and restore some balance with the base, but basically too much effort. I did some freehand where the right foot is sliding into a new stance. The smoother paving underneath gives a story to just how much rubble has built up over it, hinting at the destruction wrought across the battlefield.

In an attempt to draw attention back to the upper areas of the model I ended up with two red dots surrounding the head. I imagine these to be searchlights, but the contrast against the green helps to frame the head, creating an area to focus the viewers eyes on but without overwhelming everything else. The freehand symbols were actually chosen for similar reasons, and intentionally they are not visible from the front angle. This kind of three dimensional appreciation of the art is not actually something I've seen discussed much (or indeed at all), but I think I want to explore it a little more. Most of the time I guess people only consider one angle because that's how it will be photographed, but if at least the front, left, and right angles are planned out then I believe the overall visual impression would be greatly enhanced.

Tally is 11.5 and unlikely to budge for another month. Interruptions galore, and complex models on the go. I'm hoping to at least prepare a resin Contemptor, which I can use to get the pose right for another plastic dreadnought before I start cutting and converting it.

-- silly painter.


Sunday, January 29, 2023

Horus Ascended - Part I


Horus Asc...assembly required.

This model sucks.

Kind of a click-baity start to this post, but I do have strong (perhaps even valid) reasons for this opinion. I'll get to them in just a moment, but to start with I'll go over some of the niceties, some of the middle ground, and then finally some of the issues it has.

Assembly

The model itself is very detailed, as everyone has come to expect from the Forgeworld Heresy Character range. There is no doubting that the quality of production is very high, and has improved in leaps and bounds in recent years. I can point out the polygons on rounded surfaces in some cases, if I look _very_ closely. This is an important point for later: the actual manufacture of the model is superb, which means any flaws come from elsewhere in the process.

The dynamic pose of the model is nice to see, and for those who want to play with it then the detachable smaller base is great. The full base itself is so over the top that only a truly insane designer could have dreamed it up, and it is glorious. I keep finding new and interesting details every time that I look at it. It's truly a base of horror that befits Horus having gone evil.

For all of this, everything is pretty much intended for this model to be a showpiece and not for gaming. In particular, some of the details are very flimsy and will certainly break with any moderate usage. I've already broken the ammo belts feeding in the Talon of Horus, in four separate locations no less, and the model wasn't even assembled enough for painting, let alone playing with.

The numbering on each piece is missing, meaning that following the assembly instructions is a case of visual matching alone. Normally that's ok, but when some pieces look very similar (say, the fingers on the Talon) then it's basically a guessing game as to which piece fits where. I'm pretty sure I got that wrong on the fingers. I almost had it wrong on some of the wolf pelt.

Then there's the bad: the model does not fit together properly at all. I mentioned build quality earlier because this cannot be a manufacturing error - it's simply that nobody checked before it was shipped. The wolf pelt in particular is just plain terrible. Even after hacking away at the underneath to get it sitting properly aligned on the armour cowling, the leg hanging over the right pauldron simply doesn't line up with the appropriate connection point. There's a 3mm gap or so - which is unforgivably large for such an expensive kit, and is where the blu-tac is located in the photo above. I'm going to have to break out the putty to fill that gap, which quite frankly won't look as nice, and worse: for nice sub-assemblies it will have to be done after much of the painting has been completed. That leg is actually the last piece to glue on, and so now I get to look forward to finishing the model, only to then putty up and repaint an entire area or two. The base has some places that don't quite line up as well, but thankfully they're mostly hidden and really don't need to be touched.

The only model I've dealt with that has a similar problem is actually the Primaris Mephiston, where cables just didn't align. They could be bent and glued during assembly at least, and the massive mold line running down his cape was easily filled in and smoothed over. Horus Ascended is far more expensive, with a far greater gap, and can't be fixed until the model is just about completed. When the motivation is assembly and painting nice looking models rather than playing the game, then this just makes me question why I bothered with this model at all - and I haven't even primed it yet!

So with some clever planning, painting, and more than a dash of stubborn perseverance, I will continue with this model. Hopefully it won't take four and a half years to complete, but it will certainly take more than a couple of weeks, and I'm not convinced about putting in the effort to get to such a high standard as the previous Horus model.

Planning

Part of the assembly process is planning how to paint it all up. On the photo it can be seen that I've drilled some holes in the feet and pinned paperclips in, and then taped the whole thing to a painting handle. This is because painting handles are great and I won't need to touch the model itself, and because I wanted easier access underneath; gluing to the base would have caused complications in painting some areas. This took longer than it should have for me to come up with, but everything appears sturdy enough and will make painting easier.

The left arm is missing because it needs to be put on after the cape. The cape I intend to airbrush separately, and leaving it off allows me to reach the back of the legs much more easily. Owing to the placement of the mace over the cape, the cape must be put on and then the arm. If the wolf pelt were already glued on then it would get in the way of the mace, and so the wolf pelt must go on only after the mace. This in turn means that the leg draped over the right pauldron can only be attached after the pelt is properly in place, which leads to only being able to fix that gap after everything is just about painted up.

The colours will be heavily influenced by the work on the previous Horus model. I don't feel any particular need to modify them. I will not even think about trying NMM; I had considered it, but the assembly problems have convinced me that this model isn't worth that amount of effort.

To contrast against the burgundy of the cape, then earthen greens on the base will very likely be used. This will likely mean Salamanders armour, although if I keep symbols off they can be interpreted any way the viewer wishes. Most of the lore doesn't have Horus actually fighting on Terra itself (he just sat in his flagship), so who knows what location it's intended to be.

I have a rough idea that a subtle red glow about the feet could help give the impression of Horus giving off an evil aura. Easy enough to do with an airbrush - just glaze one of the clear reds over the areas surrounding his feet - but I'm undecided if I should do the same from within the armour itself. Obviously the glow surrounding his head needs to be done, but I'm wondering how to make the armour itself seem alive. Maybe it will just be some red on the metallics; I'll keep thinking on this topic.

I'll need to prime the model soon and then just begin. Priming with black and then covering with a very thin white through the airbrush will allow me to visually pick out details with ease, so I'll get to that in the next days. I do want to switch focus back to a certain dreadnought, but I've spent the last week airbrushing other models (certain arrangements mean that if I don't do the airbrushing now, it'll be a couple of months before I next have the chance) and then assembling Horus.

-- silly painter.


Tuesday, January 17, 2023

Sons of Horus Contemptor Dreadnought - Part III


Eye of Sauron Horus

This next post might be slightly early, but I was having a lot of fun and decided to record a few notes for future reference (being the entire point of this blog).

I've been slowly blocking in base colours around the model, trying to decided which colours should go where. That's mostly sorted out now, however silver metallics are currently missing, and for good reason. I don't want much of it, and what is there I want to be quite dark rather than bright and, well, silver. Also, traditionally many of the skeletal components (for lack of a better term) might be done in metallics, but looking around at vehicles, photos, reference materials, military equipment, construction equipment, bridges, etc, many of those components are also painted in the primary colour of the equipment. Basically anything that doesn't move might get a layer of paint, and everything else gets grease and oil to aid movement and prevent rust. So I was thinking to keep metallics to a minimal, keep as much as possible the sea-green of Sons of Horus, and build up joints with chipping and washes of various kinds. Guess I'll see where that takes me.

I might have gone a little overboard with painting over decals, but that has been fun. Good tip on a brush (I'm using one of my best for it), magnifying lenses, and a lot of patience, but it's been fun. The main problem is that I actually didn't want to fork out a good deal of money for the Legion transfers, just to use a small handful. Perhaps if I were collecting an entire army it would make sense (and I may do that one day), but for now I wanted to print my own - and I could then customise several different transfers onto the one sheet. I fortunately have a laser printer for this purpose, but the printer is only monochrome. Also, the printed transfers can be seen as small "dots" when looked at closely enough - not always noticeable, but in this case it was. None of this really mattered too much because the entire intent was to use them as a guide, painting over them with the desired colours.

Ideally I should have done an colour invert on some of the decals applied to black areas. I could have painted the base colour (gold, in this case) and then placed the decal on top, leaving the base colour to show through where the design is. I didn't think that far ahead at the time and so had to very carefully outline everything in black after tracing over it in gold. I'm also not following the exact original design colours - they have a reflection in them that just doesn't seem to work for me, so I drew on inspiration from how I painted up Horus and did a more light-source-neutral scheme. I'm not finished yet, but I'm pretty happy with the results.

I also ended up buying Gauss Blaster Green, and have used that on a few edges. It works, but most importantly gives me more edge highlighting options when painting up Sons of Horus.

Some good progress all round, but I'd like there to be much more over the next week. I have a lot of other dreadnoughts to get to.

-- silly painter.


Sunday, January 1, 2023

Sons of Horus Contemptor Dreadnought - Part II


Using an assault cannon as a club, probably not a good idea.

The Year of the Dreadnought has started, so I thought I might post about the first work in progress. I'm quite happy with how it's coming along, however painfully slow on account of the multitude of other projects still being worked on (such as those jetbikes). The intended painting level is also being ratcheted up a notch because as a Sons of Horus war machine it's unlikely to be kept in pristine condition during the Horus Heresy, and so that will mean battle damage, weathering, perhaps a bit of rust here and there.

As a bit of a disclaimer, the above photo isn't yet finished with edge highlights or chipping. There's a lot more to get done.

To start with however: the airbrushing stage to get a base colour and simple highlights down. I'll note that Sons of Horus Green doesn't come with the Air range, so that was done by adding thinner, flow improver, and the layer paint into an airbrush cup. This works just as well in the end, but the initial test had too little thinner and the paint is surprisingly thick for a layer paint (or at least my pot was).

  • Sons of Horus Green / Abaddon Black. This is around a 1:1 mix to desaturate and darken the green to act as a shadow colour.
  • Sons of Horus Green over most of the model as a mid-tone. Some of the shaded areas were left well alone.
  • Lupercal Green as a highlight. This is an odd choice (normally it would be used as the mid-tone), but it's a more saturated colour than Sons of Horus Green and I wanted to use that saturation for highlights rather than relying on brightness. I thinned it slightly so that it performed more like a filter than providing coverage.
  • Deathshroud Clear to make the darker areas that little bit darker. This wasn't really noticeable, but I suspect the new Nuln Oil wash would be useful for this step.  Alternatively, a dark blue could also be used sparingly.

And that's about all for the airbrush. I should probably mention that I did prime the model through the airbrush, but honestly that particular primer is terrible and does not stick to the model very well at all. I much prefer Citadel's offerings, but I will continue to use the airbrush primer on occasional models in future just to avoid waste.

One of the benefits of using a Sons of Horus as a mid-tone is that being a lighter colour I could actually go back and use it for edge highlights. This sounds crazy, but it works. It's not a strong highlight, and contrasts best with the darker areas, so this isn't the only highlight colour.

Mixing Sybarite Green with Sons of Horus Green gives a brighter colour to use for edge highlighting those areas facing more towards a light source. Sybarite Green on its own can then be used to go even further if desired. I would use Gauss Blaster Green, but I don't actually have that paint. I definitely will invest in some should I start to paint up a Sons of Horus army (no plans on that anytime soon - I need to finish a lot more Blood Angels first!).

Coelia Greenshade works wonders in recesses for the lighter areas, and Drakenhof Nightshade is equally effective for those parts in shadow. Ordinarily I would apply a gloss varnish to help this step, but as this whole project is part experimentation I wanted to see how it would look straight away rather than trying to picture the result after a matt varnish.

The lack of varnish has exposed one particular weakness with this model: the poor primer, and not stripping all the paint to begin with leads to paint chipping and scratching off with startling ease. I've kind of leaned into it by using that as a natural guide to weathering, but I am slightly concerned with the longevity of the paint on the finished model, so I hope varnish steps later will help. For now I made sure to use a painting handle as much as possible (just a little blue-tac underneath the base and it's good to go). Painting the chips and scratches is a relatively simple matter of working with the existing paints - black, highlight around some edges, that's it really.

The other new item of note is the use of decals early on. Not all are visible in the photo, but I've been experimenting with printing out my own. Quite honestly, putting down a lot of money for a small handful on a single model didn't seem worthwhile, so I printed my own out. The downside is that my own are monochrome and if you look closely enough then the printing is obvious. So I'm mostly using the decals as a guide for painting over later, which can be seen on the left shoulder where I've already started doing that. It will make painting the black shoulders a bit of a nightmare, but the end result should be worth it. Again, if I was working up an entire army then the official transfer sheets would be much more worthwhile.

I'm going to try keep the palette slightly limited to reduce painting time. The more I have to think about what colour goes where, the longer this will take. It's not actually an incredibly complicated model to paint, about on par with the Titanicus Knights, but I have many more models to get done this year and it will motivate me more if I don't spend too many weeks on a single one.

-- silly painter.

Monday, December 26, 2022

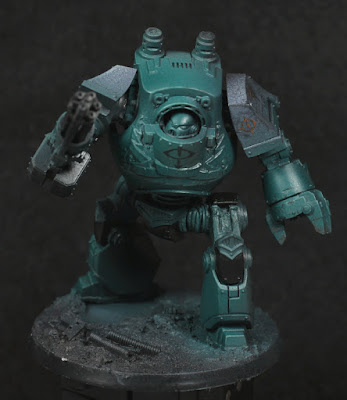
Sons of Horus Contemptor Dreadnought - Part I


That look of "well this is going to be fun".

A few days ago I had the brilliant idea of starting preparations on the Year of the Dreadnought, and started on converting a pre-painted model. I wasn't sure which Legion it would belong to, but I just wanted a bit of practice with the re-positioning the old Contemptor plastic kits. Their original pose isn't my favourite, but with a little effort I figured I could make something more dynamic.

I ended up purchasing a piercing saw (also called a jeweller's saw) for precision cuts that didn't remove too much of the model. It was an excellent purchase and really allowed this project to go forward. There was just one small problem: dust. A vacuum cleaner is great for cleaning all the plastic dust, but care should be taken to keep a tight grip on the pieces; much to my misfortune I lost one of the hip joints into the vacuum cleaner! Using green-stuff and a white clay mold I managed to build one from scratch, but I would have preferred to keep the original.

Oooh, my hip!

There is of course the issue of building joints up again after repositioning. The thighs I needed to almost completely reconstruct, after using spare sprue to glue pieces in the position I wanted. The sprue acts as a foundation to build upon, either with green-stuff or milliput. I'm pretty terrible at sculpting, but the results are...serviceable. The hips were somewhat interesting in that I ended up filling internal space with (rounded) sprue, and then pinning the legs into position with a paperclip. This appears to have worked nicely enough and should make the model a little more robust. The torso was a simple cut and rotate slightly, and with the head being much the same - just with a lot more cutting away to allow that to happen.

The hips I covered up with flexible ribbing by rolling green stuff into thin sausages and then carefully (and most frustratingly at times) layering each next to another on the model. I think it works well enough and I'll keep it in mind for future conversion work.

The original idea for the re-pose was to have the left leg standing on a tactical rock, with the torso turning slightly for the occupant to point the assault cannon at some target of interest. In doing this I had the model standing at some point on the desk and rotated the assault cannon arm up high - and behold he looked way better as if trying to block some attack with that arm. Having recently watched the Death of Hope trailer (awesome!) again, I then had the notion that perhaps another Contemptor was charging in and about to give this one a bit of a beating. This in turn made me think that perhaps a Blood Angels dreadnought would be on the assault (preferring that combat role in general) - which then makes sense for this to be Sons of Horus and perhaps taking place on Terra.

Having an idea of a duel helped to fill out the base for the pose. I really didn't want the hassle of cutting and repositioning the feet, so instead one foot is sliding on the ground to give a more stable stance in an attempt to fend off the incoming attack. I've tried to build up some uneven ground with milliput and then cover it with a texture paint to give just that impression. The base also has some bits of old resin scenery stuck around, but I might end up adding more rubble later on. Sprue cut to pieces, with some holes drilled in a few places, makes for great girders or bricks, and I have some additional scenery that I could use. I don't want to overdo the base and make it look like a junkyard, but right now it feels a little to sparse.

On a note of paint removal, that proved interesting. I used a kitchen degreaser to soften the paint and an old toothbrush to remove it in areas I felt the old paint to be too thick. I also tried an electric toothbrush. Hint: don't bother with an electric toothbrush. This is not something I'll have to do often fortunately because it took a while - if this was a regular thing for me I would definitely invest in a sonic cleaner. I also ended up digging out paint from recesses with a metal pokey stick (technical term) just to really get everything clean. It took a long time, but I think it will be worth it later on. The helmet could have used the same treatment but I had already stuck it in place by then. I'll just have to be careful not to use too many layers and obscure any more detail.

What would I do next time differently? Well I have two more of this kit somehow, so I'll have the chance to practice more. The hip joints are the troublesome part, and so I might focus a little more there. I could build up the connecting internal structure first, separate from the model, and then cut it into place once I've come up with a pose I like. I've learned that milliput is far more workable once it's cured for 15 or 20 minutes, and that should allow me to build up appropriate strips on top of the basic shape and make it look more like the parts from Forgeworld (or the new plastic Contemptors). The feet might prove easier to work with before assembly as well, so I intend to give that a go next time. Otherwise I think the repositioning has turned out about as good as I'd hoped - now to prime the model and start airbrushing the base colours.

-- silly painter.