 |
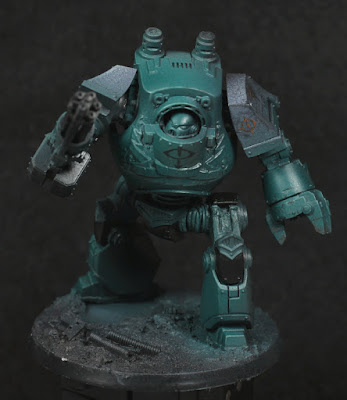
| Using an assault cannon as a club, probably not a good idea. |
The Year of the Dreadnought has started, so I thought I might post about the first work in progress. I'm quite happy with how it's coming along, however painfully slow on account of the multitude of other projects still being worked on (such as those jetbikes). The intended painting level is also being ratcheted up a notch because as a Sons of Horus war machine it's unlikely to be kept in pristine condition during the Horus Heresy, and so that will mean battle damage, weathering, perhaps a bit of rust here and there.
As a bit of a disclaimer, the above photo isn't yet finished with edge highlights or chipping. There's a lot more to get done.
To start with however: the airbrushing stage to get a base colour and simple highlights down. I'll note that Sons of Horus Green doesn't come with the Air range, so that was done by adding thinner, flow improver, and the layer paint into an airbrush cup. This works just as well in the end, but the initial test had too little thinner and the paint is surprisingly thick for a layer paint (or at least my pot was).
- Sons of Horus Green / Abaddon Black. This is around a 1:1 mix to desaturate and darken the green to act as a shadow colour.
- Sons of Horus Green over most of the model as a mid-tone. Some of the shaded areas were left well alone.
- Lupercal Green as a highlight. This is an odd choice (normally it would be used as the mid-tone), but it's a more saturated colour than Sons of Horus Green and I wanted to use that saturation for highlights rather than relying on brightness. I thinned it slightly so that it performed more like a filter than providing coverage.
- Deathshroud Clear to make the darker areas that little bit darker. This wasn't really noticeable, but I suspect the new Nuln Oil wash would be useful for this step. Alternatively, a dark blue could also be used sparingly.
And that's about all for the airbrush. I should probably mention that I did prime the model through the airbrush, but honestly that particular primer is terrible and does not stick to the model very well at all. I much prefer Citadel's offerings, but I will continue to use the airbrush primer on occasional models in future just to avoid waste.
One of the benefits of using a Sons of Horus as a mid-tone is that being a lighter colour I could actually go back and use it for edge highlights. This sounds crazy, but it works. It's not a strong highlight, and contrasts best with the darker areas, so this isn't the only highlight colour.
Mixing Sybarite Green with Sons of Horus Green gives a brighter colour to use for edge highlighting those areas facing more towards a light source. Sybarite Green on its own can then be used to go even further if desired. I would use Gauss Blaster Green, but I don't actually have that paint. I definitely will invest in some should I start to paint up a Sons of Horus army (no plans on that anytime soon - I need to finish a lot more Blood Angels first!).
Coelia Greenshade works wonders in recesses for the lighter areas, and Drakenhof Nightshade is equally effective for those parts in shadow. Ordinarily I would apply a gloss varnish to help this step, but as this whole project is part experimentation I wanted to see how it would look straight away rather than trying to picture the result after a matt varnish.
The lack of varnish has exposed one particular weakness with this model: the poor primer, and not stripping all the paint to begin with leads to paint chipping and scratching off with startling ease. I've kind of leaned into it by using that as a natural guide to weathering, but I am slightly concerned with the longevity of the paint on the finished model, so I hope varnish steps later will help. For now I made sure to use a painting handle as much as possible (just a little blue-tac underneath the base and it's good to go). Painting the chips and scratches is a relatively simple matter of working with the existing paints - black, highlight around some edges, that's it really.
The other new item of note is the use of decals early on. Not all are visible in the photo, but I've been experimenting with printing out my own. Quite honestly, putting down a lot of money for a small handful on a single model didn't seem worthwhile, so I printed my own out. The downside is that my own are monochrome and if you look closely enough then the printing is obvious. So I'm mostly using the decals as a guide for painting over later, which can be seen on the left shoulder where I've already started doing that. It will make painting the black shoulders a bit of a nightmare, but the end result should be worth it. Again, if I was working up an entire army then the official transfer sheets would be much more worthwhile.
I'm going to try keep the palette slightly limited to reduce painting time. The more I have to think about what colour goes where, the longer this will take. It's not actually an incredibly complicated model to paint, about on par with the Titanicus Knights, but I have many more models to get done this year and it will motivate me more if I don't spend too many weeks on a single one.
-- silly painter.
No comments:
Post a Comment