 |
| I see a white dust and I want it painted red. |
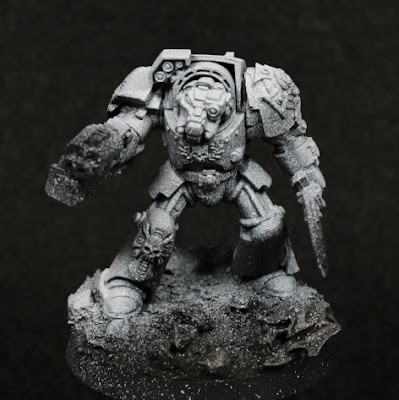
As the next round of background models I've started on more Shield of Baal models: a Blood Angels Terminator squad. These are the older models, but still look excellent on the table. As can be seen above, I've also decided to try a few things and see how it goes.
First off, I made a couple of assembly mistakes. The Sergeant has the wrong torso piece, it's on another squad member, so I'm not sure what to do about that yet. I'm thinking of going through spare bits and seeing if I add something to not-squad-leader that makes sense still. The other problem is the left pauldron - I attempted something one one (more on that in a moment) and it didn't work - meaning there's two "special" Crux-Terminatus icons. Little things, but still annoys me.
I still have some old Forgeworld resin shoulder pads, but seeing as they're not made anymore I tried to make a mould of them and copy the insignia onto plastic shoulder pads. It can be made to work, but the effort involved and the number of mistakes along the way was just too much. I could be at it for a week per should pad, and that's just a waste of time. There are limits, and I'm constantly trying to find ways to reduce my backlog faster, so I'm far more accepting of "less than perfection" these days. In this experimentation I ruined one of the plastic shoulder pads, so the Sergeant is now using one of the resin ones.
The right shoulder pad I cheated slightly with - it turns out that the Aggressor shoulder pads are an excellent fit for Terminators. Some excess trim needed to be removed, and there's a "cut" into a corner that doesn't match up, but none of that is really noticeable. I don't like decals and I had the spare shoulder pads, so it seemed appropriate.
One of the problems with older models is scale creep. The old Terminators are rather short compared to Primaris, and they would look rather small next to the newer Terminators, so I wanted to give them some extra height. I'm not willing to try bulk out the legs and give more torso - other than being a lot of effort, I'd also not do a great job of all of that. Instead I decided to raise the base just to make the models taller when standing next to others. I'm not sure how well it will turn out, but have to try. To do this I put each model onto a 32mm base, and then glued that to a 40mm base. The edges of the 32mm base where wrapped in milliput, with slate stones and skulls pushed into it to give more weight and to make it look less like a spherical mound. Some was glued on top as well just to break up the flat surfaces. Some PVA glue and sand added texture, with texture paint applied selectively where necessary. So far it appears to look alright, but again I'll need to wait for the models to be finished before I really know how it will turn out.
I'm going to try something different for painting the armour this time, which is why there looks like an excess of white highlighting. That's mostly just the angle. I used some black primer through the airbrush (no reason not to use a rattle can other than I need to use up the airbrush primer), and then highlighted with white mostly from above. I was perhaps a little too heavy with the white, and I didn't thin it enough - the spatter is most annoying. Hopefully this will fade with future steps, but the main reason for the white is to try make the red highlights a little more vibrant. I intend to use the darker red in the shadowed areas, then start covering the white with Mephiston Red and blending that into the darker locations. That should help inform where to apply Evil Sunz Scarlet, and if it works will give a much brighter finish.
In future I would like to try a yellow covered with Blood Angels Red, and perhaps compare that against white and grey covered with red as well, all using the airbrush. It's a bit late to do that across squads as it probably won't fit with the army, but I'll find models to use.
I do have some other models being assembled, but I probably won't start posting about them until initial airbrushing has been done. Hopefully not too many days until that's ready, I'm trying to use the airbrush once a day just as preparation for all of this.
-- silly painter
No comments:
Post a Comment