Showing posts with label imperialknight. Show all posts

Thursday, March 30, 2023

Cerastus Knight (Showcase)


Born to the purple.

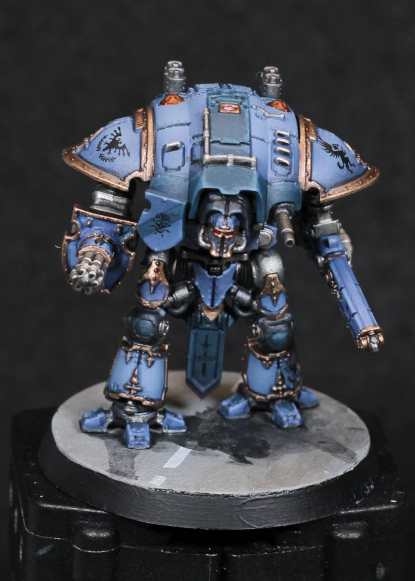
Having recently completed one of the Cerastus Knights in the box, and having the other assembled, not much motivation was required to try and quickly get the other done. I was debating whether the entire force would belong to the same battle group, but that really only makes sense if I'm playing it against some opponent. I don't play the games so I decided a different colour scheme would be far more interesting - and besides which, having opposing forces would help if there was someone interested in playing but didn't have models of their own.

I've gone for a rendition of Legio Mortis in this case. Officially they're black and red, but I always felt like the artwork tended more towards dark purple and red (specifically on the very dark pink side of red). These colour invoke regal imagery, and yet keeps the model dark (one could almost say grim dark).

The purple is Naggaroth Night, shaded down to black and with no real highlights to speak of. 

The red is more complicated and I can't actually remember which base colour I started from. It was either Gal Vorbak Red or a 1:1 mix of Dryad Bark and Mephiston Red. Either way it was then highlighted with Mephiston Red, and edged with Wazdakka Red. This was heavily shaded down with a black oil wash.

The same oil wash was used everywhere else and then removed with a cotton bud dampened with odourless mineral spirits, exactly as was done on the previous model. I'm actually wonder now, despite the excellent result it gives, if similar would just be done with Nuln Oil (Gloss), or any shade that's given low surface tension. I varnish it later anyway, so any gloss appearance would be removed well before the Ironbreaker drybrushing step. I will consider this in future.

To balance out the dark reds and purples I opted for an almost fluorescent green on the "eyes". Dots of Dorn Yellow later covered with Hexwraith Flame is all that needed - and the latter being applied over a yellow works extremely well. If I paint Necrons again then that's probably the step that I'll use for at least some of the green glow on their weapons.

There's not too much else to really say other than intentionally I kept some areas less clean and crisp than my usual painting style. The model is dark, looks slightly unmaintained, and is quite possibly going mad - all of which fits the storyline for Legio Mortis. The downside is that while thematically it very much fits, it also feels like I've done a relatively messy job of the whole model. I'm trying very hard not to care however, as it's still another model finished.

The tally in total now stands at 14 models that I can buy. There are some things I definitely would like to get, but I'll hold off longer just to see if maybe I can get that number a little bit higher first.

-- silly painter.


Saturday, March 18, 2023

Cerastus Knight (Showcase)


Pilot's favourite game: poker.

Sometimes I'm motivated to paint a particular model that I hadn't planned on that day or week. This is one of those occasions. I've actually had a couple of Titanicus scale Cerastus Knights assembled for quite some time now, and I wanted to test out a smaller nozzle on one of my airbrushes. I just wanted to see what level of control I could achieve, what limits of painting parts there would be. The Cerastus Knights were already painted with some metallic paints, so trying to get just the armour panels seemed like the ideal practice.

I followed the same scheme as used with previous Knights, but in this case I went too heavy with the second highlight layer and it just made everything a brighter blue-grey. A mistake, but not a terrible one because it makes this model stand out a little bit more. I just need to remember to mix the paints a little next time and keep some of the base layer showing.

Another change this time around was that when looking over the whole model I decided that it was both very detailed, but also heavily oriented towards metals. Instead of trying to pick out tiny details and then later add weathering I decided to give an oil wash another go. Before I had used them for panel lining, but this time I thought I'd wash the entire model and then remove the excess. I have to admit, this worked brilliantly: recesses are darkened which helps with light/dark contrast to read the model, and the use of a cotton bud to remove excess from larger panel areas naturally leaves behind some smudging and smearing. This fit the theme perfectly and I was pleased with the results.

Following on with experimentation I drybrushed over the metal areas with Ironbreaker. Drybrush is perhaps not the best term, but it does help explain the reduced level of paint in the brush's bristles and the motion used to apply paint to upper surfaces. There are some areas that I considered too detailed for this approach, but they're very few and easily fixed up later with a "normal" approach.

Much of the rest is as it's seen. I used Screaming Bell on the shield and the lance to help them stand out from the armour trim, and actually used less black armour than on previous Knights. Shadows on the ground is a continued theme to help represent some impression of scale, though I would like something else there - street cones, a lamp, something. Perhaps on later models I can do that, which will give these ones the same feel through association when standing together.

The base has one small addition that was a bit of fun: an explosion crater. It was make by prodding Astrogranite into a small circular mound, smoothing away the outside edges and then later painting in various browns. Nothing too fancy, but it definitely adds character. A character that some people could do without in the real world, sadly.

On the running tally I'm not at 12 models that I can allow myself to buy.

-- silly painter.


Sunday, August 2, 2020

Adeptus Titanicus - Imperial Knight - Part V

Stampy is all fired up.

Mr Snuggles says something is about to have a very bad day.

Stompy and his big cannon.

The Imperial Knights, Titanicus scale, are now done. Not too much beyond what was mentioned before, mainly just the banners and, for lack of a better term, rondel shields. The banners are painted in the same manner as the secondary trim colours, except with thinned Black Templar to make them slightly darker.

The decals turned out well. I'm improving with their application; copious amounts of solvent to soften them, and a cotton bud to press them into the underlying shape makes all the difference. There's no real purpose behind the applied decals, I was mostly just playing around.

Photos are a little blurry due to the normal photography area being used for other purposes.

The Purity Seal does dull the metallics quite a lot, but I don't really mind that too much. The colours are still there, the models are protected, and I probably put more effort into them than I originally intended as well. I've learned enough I think that future Titanicus models will be as easy to paint, and may come out slightly better. Whenever I get around to getting them done.

-- silly painter.


Monday, July 27, 2020

Adeptus Titanicus - Imperial Knight - Part IV

Stompy
Although my painting speed has slowed down recently for reasons, I'm still progressing on the Knights. Owing to taking so long, bits of dust have started to appear on the models, which can be seen in the photos because I forgot to brush it off.

Stampy
No change to the basic approach, so this won't be a lengthy post. The only real different is deciding to paint the banners with a base of Stegadon Scale Green, after which I intend to highlight with Thunderhawk Blue (as with the trim colours), but then darken it back down with thinned Black Templar.

Mr Snuggles
Still to come are finishing touches, decals, and a coat of Purity Seal. That last step will dull the metallics, but will protect the models.

-- silly painter.

Saturday, July 4, 2020

Adeptus Titanicus - Imperial Knight - Part III

The Knights go marching one by one.

Some progress on the Knights, although none are entirely finished quite yet. I decided that that main reference model was far enough along that I could starts the others, and hopefully then finish all three at about the same time.

Before going into detail particulars, I've tried to use upper carapace patterning to give simple differences to each, and I may try to further this on the "shoulders" and other larger armour plate areas. They're obviously part of the same House, but differences in markings help reinforce that they're ultimately a collection of individuals rather than a more cohesive military unit.

The bases took me some time to figure out, and in the end I'm still not entirely happy with them, but didn't want to delay further. It makes painting them somewhat easier at this stage if they're glued to a base. In the end I went with concrete road that they're walking down. It implies an urban environment, or industrialised to some degree, is easy to paint (it's just a flat surface), and lane markings help give a sense of scale. I could (and maybe should) add rubble or impact craters at some point, but I also want to not put quite as much effort into painting these models as I do for Blood Angels; I need to paint faster, and the Titanicus models are intended for playing with one day.

Anyway, the road is simple enough to paint:
  • Celestra Grey over the entire base.
  • Administratum Grey layered over the entire base.
  • Dawnstone layered over the entire base.
  • Stormvermin Fur, watered down quite heavily, and painted along each "lane". If roads are looked at, then where cars travel there will be dirt, wear & tear, etc, where tires are constantly passing. This means the centre of the lane is relatively clean, but flanked by colour variation. Brush strokes are always in the same direction when doing this step.
  • Ulthuan Grey for the road markings. I used some specialised masking tape to stencil in the straight lines, but this is only done once previous steps are completely dry. Not all tapes are equal, but anything can be used that doesn't lift up the paint.
  • Black Templar is also being used to give some shadow on the ground. Imperial Knights are large, and will cast noticeable shadows - however this is best done after the model is fully assembled, and I'm still getting this step right. I suspect I will need to work at it a lot more.

Reactor casings, which are on the rear of the models and not seen here:
  • Warplock Bronze
  • Sycorax Bronze
  • Fulgurite Copper

The void shield generators on top:
  • Screaming Bell base.
  • Agrax Earthshade, with two coats probably needed to tone down the base colour.
  • Fulgurite Copper for highlights.
The repetition of Fulgurite Copper here is to convey a sense of those components being more archaic, barely understood technology, as opposed to the brass and bronzes of shell casings.

All cabling is being painted the same. It's not fully done at the time of typing, so this is more of what it will be: something simple as a time saving step. Hazard stripes look nice, but the Imperium likes to standardise equipment, so I'm using that as an excuse to paint all outer cabling the same.
  • Dark Reaper - this may require two coats as it's layer paint.
  • Black Templar (Contrast)

Finally, for the second and third knights I tried to paint with Nuln Oil (Gloss) instead of using Deathshroud. It does not work as effectively, and so future models will revert back to using Deathshroud. It's less precise, but gives a much darker shade to the metallics that just fits better with these models.

-- silly painter.


Monday, June 15, 2020

Adeptus Titanicus - Imperial Knight - Part II

Room for a knight.
Some progress on the Imperial Knight. Still a bit slow going, as I decide on colours here and there. I'm having real trouble making it seem like a Knight instead of an attachment to an Astartes battleforce - I've been painting it like Space Marine armour, not considering cheverons, markings, and the like. Never have been one for bling.

Anyway, the metallic trim from before is now fully:
  • Castellax Bronze
  • Agrax Earthshade (Gloss)
  • Sycorax Bronze
This keeps it distinct from the Space Wolf model I painted, in helping make my chosen Titanicus colour scheme different from them. What also helps is the trim. I wanted a more harmonious colour to the blue-grey, which discounts black, and also not a metallic. Too much of that, and it would detract from the head. A complementary colour would do the same. I also didn't want simply a shade of blue-grey. Any shade of red would also not fit for the same reason. This really only left muted purples or greens - a dark blue-green would be about right. I think I've managed something rather well with:
  • Stegadon Scale Green
  • Thunderhawk Blue (been wanting an excuse to use that one for a long while!)
  • Drakenhof Nightshade in the deepest of recesses, or to border the trim. I may revisit this and use Coelia Greenshade instead at some point.
This trim colour is used on the upper carapace, half of the cannon shielding, and the knees. I'm also experimenting with it on the banner hung between the legs, but the jury is still out on that one.

Cowling above the head is:
  • Corvus Black
  • Dark Reaper for initial highlights.
  • Thunderhawk Blue for edge highlights.
  • Abaddon Black thinly applied to tone it back and tie it all together.
The same was done on the edging around the knees. This separates the metallics on the thigh and trim armour, giving more definition to there being knees, and creates a kind of triangle (head and knees) for balance.

Some Agrax Earthshade (Gloss) has been added in various unseen areas from that camera angle. It's meant to give hints of oil, grease, lubricants mixed with battefield dust, etc. I'm still working my way through that, but have to be careful not to overdo it. The gloss shade isn't as strong as the non-gloss variant, which is mostly why I'm using the gloss shade for this step.
A little Nuln Oil in places has been used, though sparingly - mostly just to better outline rotors around the elbows and other joints.

The pelvis joints have been covered in Black Templar (Contrast) just to make them distinct and give a less rigid appearance to the grey metallic skeleton. That area is crucial to a walker's movement, and I wanted something that gave an impression of more flexibility (less shine, less rigid, more flexible).

Finally, a bit of whatever was on my palette to give the visor on the head a red glow appearance. This spot colour really draws attention there, although I might make it a little brighter later on. I believe it was actually Gal Vorbak Red.

-- silly painter.


Wednesday, June 10, 2020

Adeptus Titanicus - Imperial Knight - Part I

'Tis but a scratch!
And so I've started on models from Adeptus Titanicus. Actually I've had the Knights ready to go for a while, but couldn't fully decide on the colour scheme. The colours I choose now will be across the Titan battlegroup, and the Aeronautica Imperialis aircraft as well.

Ultimately, I decided not to have red. Well, maybe a Red Baron or something for a single model at some stage, but overall I wanted something distinct from Blood Angels. I also didn't want a deep blue, for no other reason that many of the reference models and colour schemes are that, and I wanted something a little more original. In the end I settled on blue-grey, which works within urban settings, and allows brass and copper trim to be used instead of gold. This is highly similar to Space Wolf colours I know, but still works as a neutral colour scheme for combat machines. House details will likely be either black or red, or some combination thereof.

The model shown has really only just been started. The foundations were done with an airbrush:
  • Leadbelcher across all metal areas.
  • Ironbreaker to highlight some metal areas.
  • Deathshroud Clear to add some shading. Nuln oil would also work to a degree.
In future I may try a base coat of Iron Warriors owing to it being a darker silver, allowing Leadbelcher to serve as a midtone. Continuing the airbrush:
  • The Fang across upper panelling, and shin armour.
  • Russ Grey to highlight these areas.
I then painted in remaining armour panels by brush with the same colours. I've also started on using Drakenhof Nightshade in some areas, but haven't completed that yet. I will do more as I continue the trim, because it allows me to hide mistakes with that easily.
Not seen, the reactor core (I presume) on the back has been base coated with Warplock Bronze. I will likely continue with a bronze or copper highlight on that. The armour trim is Castellax Bronze - a slightly lighter bronze, but a layer paint and so may need a couple of coats.

And that's about it so far. I need to continue with the armour trim, and then work on showing oil, rust, and grime on the pistons and joints before I can glue the arms into place. They have been started as well, but won't be glued in until I've done enough on the areas they'll block easy access to.

-- silly painter.