Showing posts with label tyranid. Show all posts

Sunday, January 5, 2025

Captain Karlaen Kitbash - Part II


That Carnifex is....hammered.

Continuing to paint up various works in progress as I'm inspired as resulted in some paint applied to the Captain Karlaen kitbashing effort. The red I airbrushed at the same time, and in the same manner, as the recent Praetor - mostly to avoid wasting too much paint, but also to confirm the result with a second model. Not much to say about the result which hasn't already been covered. Then I was watching a random YouTube video, by The Feral Painter if I remember rightly, and was inspired to paint the head of the vanquished Carnifex.

Painting the base would allow me to attach the model completely and keep it on the painting handle, but I'll mention now that I could have waited longer to get the cape finished first. It will be more difficult to access that now, but I figured difficult doesn't mean impossible, and with the top icon having snapped off twice already then I was eager to get the model assembled and more easily handled.

Back to the base, the initial black primer was done before adding Armageddon Dust around the edge, and then a quick dusting with Wraithbone primer gave what I thought was a solid foundational colour for just about everything. I then used a simple base coat of Wraithbone out of the pot to give more even coverage over the Carnifex head. One thing I have noticed: the pot version is a very subtly different colour, a little more saturated compared to the spray primer.

In the most basic overview for the fleshy areas:

  • Wraithbone over everything.
  • Baneblade Brown painted into shaded areas, mixed with the previous colour to blend as necessary.
  • Druchii Violet thinned with flow improver (or Lahmian Medium, or just water) and glazed over everything. Try to avoid it pooling too much, and use a second pass in the deeper recessed areas.
  • Volupus Pink thinned with Contrast Medium and glazed over the lips, some of the prominent fleshy sections, and any apparent wounds.
  • Wraithbone layered to highlight areas again as necessary. I used much more on the rib-cage in the hopes of giving a more rigid look compared to the varied browns, pinks, and violets on the head.

The carapace in turn is:

  • Naggaroth Night / Black (1:1 ratio) over the carapace. I did leave some places with only one coat to give variation, but for the most part two coats.
  • Naggaroth Night thinned and layered to build up basic highlights. None of the typical carapace lines are done yet, this instead informs where they might go later.
  • Naggaroth Night / Dechala Lilac (1:1 ratio) to start edge highlights and building up some of those carapace lines.
  • Dechala Lilac to build up extreme highlight points, and make some of the carapace lines more prominent. A little water goes a long way to build this up in layers and blend it together.

The usual disclaimer applies to all of this: there's a lot of going between the stages to fix, blend, rework, and adjust while painting. It's not a one step, then another, then another, then done approach: everything was on the wet palette and I pick and mixed as I wanted.

The blood and entrails I used Flesh Tearer's Red for, but I'm not sure it's quite suitable. I might adjust the colour with a little more purple later. Carroburg Crimson in the eye to outline that, however it still looks partially alive. I might use a blue to darken it later.

I'm not done with the base yet. There are details such as the teeth to fill in yet, and the ferrocrete (or whatever it is) could use some more attention. So far I'm happy with how this model is turning out, and I do have a spare Tyranid model somewhere that I could practice this scheme on - just that I'm not in any particular hurry to start on that model. Yet. Cheers to The Feral Painter for the ideas here.

-- silly painter.


Wednesday, September 16, 2020

Tyranid Carnifex


Carnie the Carnifex.
 

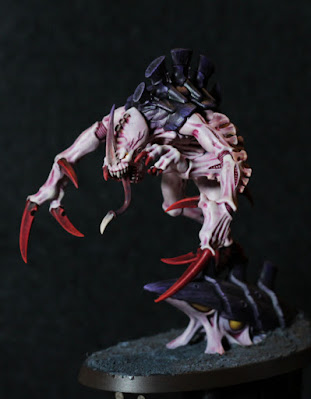
And this is the last of my Tyranid models, hopefully now in a position to sell and then free up storage for something else. Obviously named Carnie, the carnage loving Carnifex.

There's not a whole lot different again from the methods I've been using to paint Tyranids so far, and that's making everything fit together really well as a fully painted army. There are some small additions: Nighthaunt Gloom with Contrast Medium around the sack attached to the left hand, and again as a spot colour on the weapon. Hexwraith Flame is also applied in some areas as hints of venom sacks (not visible in the photo) which ties that into the Tyranid Warriors as well. Otherwise only differences in that it's such a large model.

The model itself I didn't really enjoy too much. It's nice now that it's finished, but the assembly was very problematic. The legs aren't quite flush with the base, and I had to use green-stuff to give additional purchase under the left hoof. It's not noticeable once the texture paint is applied, but I have a concern about how well it's going to hold a fairly heft model. Perhaps I should have pinned it - and I may well do so if it breaks off. Owing to this, I think the torso is angled down more than it should be as well, which in turn affects the positioning of the head.

The arms don't sit quite as I would have liked. The right talon in particular is at a strange angle because the other right arm gets in the way. The weapon arms were a pain to try and partially assemble before painting - and in the end I had to break them apart when gluing to the torso, and then fill in gaps with green-stuff and paint over it again.

The carapace didn't fit together nicely at all, and a lot of gaps were plugged with green-stuff, or misalignment (e.g with the "chimneys") filed back to make them more flush.

Finally: mould lines everywhere! I kept finding them after Volpus Pink coverage, and would either have to carve them back, or try use Wraithbone to make them a little less obvious. That was very frustrating.

I may have to do another post showcasing the entire army (for some small definition of army), but Carnie was definitely a good way to finish the Tyranids. The contrast paints made it much quicker to get the models to an acceptable finish, and a little bit of effort on the carapace makes them really stand out. If nothing else, it was just good to get models done.


-- silly painter.


Tuesday, September 8, 2020

Genestealer Broodlord


Freddy the Hunchback
 

The Spawn of Cryptus painted, for no other reason than it was relatively simple and I felt the sudden motivation to try and get the Tyranid models finished.

In terms of paints used, there's no difference to how the Genestealers, or any other Tyranid in general, was done before. Same paints used, although a little more care in places because this is such a centrepiece model:

  • The "skin" was given a Wraithbone glaze after the contrast stage just to give some areas more definition, or because they were too pink previously.
  • Additional blending was done on bones to remove any clear line between them and the "skin". Mostly I wanted it to look like the carapace was slowly hardening more as the creature grew. In some places I started to put a slight purple tint, just to show it turning slowly into the hardened carapace seen on the back. The blending on the "horn" for example shows this in progress.
  • Much finer lines on carapace edges, and some blending back of the purples if the colours were sticking out too much.

-- silly painter.


Thursday, June 4, 2020

Tyranid Ripper Swarm

om-nom-nom-nom-nom
Just for a light little something to paint, I decided to clear out a few of the extra bits from the various Tyranid sprues. Some come with Rippers, so I decided to assemble them into a little swarm, 3 to a base to try make them flexible for use.

I did not even attempt to do more than tabletop quality of them because they're not a centrepiece, but fundamentally there's no real difference in painting them when compared to any of the other Tyranid models I've done.

Collectively, they're known as "you little Rippers". I'm sure they're so eager that they just let rip all the time. Ripper & tear.

On the subject of letting rip...

Sphincters. With teeth. And tentacles.

I'm not really sure what these other accessories are intended to be (spore chimneys perhaps), but they look more like the, uh, back end of a Tyranid invasion. Really didn't spend long painting them (four in total, but only one pictured), because they're not really even a playable piece, but might be useful for objective markers or something.

Still a couple more 'nid models to go before the army is ready to be sold off. It's the Carnifex that I'm dreading the most to get done.

-- silly painter.

Tuesday, April 7, 2020

Tyranid Warriors

The Three Tyranid Stooges.
Continuing the army of Tyranids being painted, three Tyranid Warriors are now complete. I could always do more on them, but reached a point where I simply thought they were good enough for tabletop and didn't want to do more.

The paint scheme is exactly as with previous models in the army. One difference is that some of the weapons here have what is perhaps meant to represent venom sacs. These were painted extremely simply with:
  • Wraithbone base.
  • Hexwraith Flame covering the desired area.
  • Biel Tan Green shade to give some extra depth.
That's it. Nice and simple. The Hexwraith really is an excellent green for this, and is basically a precursor the Contrast range of paints.

I did use an artificer brush on the carapace this time around. There are fewer of these models, and with a larger carapace area, so I wanted the edging higlights to be more controlled. The highlights here are what really make the model, and the finer control paid off in the end.

Finally, the feet positions were difficult to get right, and they don't have a large surface area of attachment to the base. This is partially because I might have messed up a little owing to lack of assembly instructions in the box. I've tried to fix what I can, but if they fall off much then pinning will be required.

-- silly painter.

Saturday, February 8, 2020

Genestealers (Hive Fleet Leviathan)

Sneaky 'stealers looking for jeans.
The genestealers are finally finished. Levi is there, obviously, and look closely and Tyranood can be seen as well. Overall the paint scheme is very similar to the termagants, with some adjustments to account for differences to the model.

As usual, start with black primer, followed by Wraithbone spray over the entire model. It might take a couple of coats, but better to spray it lightly twice than a single, thick spray that obscures detail. An even coat helps later stages, so it's worth the extra caution at this point. Once everything is dry, a rundown of the paint scheme is below.

Main body:
  • 1:8 (Volupus Pink / Contrast Medium) over the whole body.
  • Volupus Pink directly in gaps between chitin.
  • Skeleton Horde over "bones" (typically elbow and heel).

Face:
  • Volupus Pink around the "gums", shadows under veins on the head.
  • Guilliman Flesh around the "gums", inside of the mouth.
  • Highlight teeth with Wraithbone if necessary.
  • Flesh Tearers Red over the tongue.
  • Evil Sunz Scarlet highlight over the tip.
  • Barak-Nar Burgundy, thinned, over the whole tongue.
  • Iyanden Yellow over the eyes.

Claws and blades:
  • Flesh Tearers Red all over.
  • Carroburg Crimson near the base of each.
  • Evil Sunz Scarlet highlight along edges and the tip.

Carapace:
  • Shyish Purple
  • Xereus Purple in lines along edges
  • Genestealer Purple in overlaying lines
Base:
  • Astrogranite over the whole base.
  • Mechanicus Standard Grey if necessary to cover some areas missed by the texture paint.
  • Drakenhof Nightshade over the whole base.
  • Agrax Earthshade in a few random patchy areas.
  • Stormfang drubrush over the whole base.
  • Rhinox Hide around the edge of the base.

Little details on the base were painted similar to the genestealer, mostly as extra support to glue in, but also as a hint that genestealers don't openly attack until the world is already in a lot of trouble, and tyranid flora is starting to appear.

Of course Purity Seal was applied at the end to help protect the models. Hopefully it should stop paint rubbing off too easily - something I've noticed can happen with the Contrast range.

Centrepiece type models will be up next for the tyranids, so I will probably spend a little more time on them, but fortunately they're fewer in number.

-- silly painter.

Saturday, February 1, 2020

Genestealer WIP

Levi Genestealer

No back pockets.

Wow, yet another post. On a roll. Don't expect this to continue however, as I intend to finish all eight genestealers before showcasing them.

For a genestealer from Hive Fleet Leviathan, obviously the name of the first model should be Levi. I should probably paint that under the base.

These particular models take a little while to assemble. Many mold lines to clean up, and the arms can get in the way if not positioned properly. The good news is that once assembled, there's really nothing blocking any part of the model - no need to paint in parts and assemble at the end.

Nothing too much to say about the painting techniques used: they're identical so far to the termagants. I've been using a medium glaze brush with contrast paint on finer details - I find the brush keeps the tip better than the layer brushes with those particular paints. It really helps when trying to be neat around fine details.

Volupus Pink is very useful here in the joints, and seeing as it's thinned down and used all over the model, then it's also excellent to accent various details. It's mostly a matter of intensity. I've used it to draw out the veins on the head a little more, and to add a little more contrast (heh) around the nostrils. The head was always going to be the focus of the model, and so it deserves that little bit of extra attention.

I tried to thin out the Shyish Purple and sort of fade the back carapace into the rest of the body in places. The idea is to make the carapace look more like it's a part of the genestealer; hard lines would make it look more like something attached to, rather than grown from, the beast. It can be difficult to use water for this purpose, as it breaks the flow properties of contrast paints and turns it into more like a wash.


Not a bad start though, and shouldn't take too long until the brood is finished.

-- silly painter.

Sunday, January 26, 2020

Nidrick and Friends

'Nids on the run.

Look at how they move, just like a flock of birds.

It took a bit of an effort, but the whole set of termagants is now done. To tabletop standard anyway. There is a lot more I could do to individual models, and there are mistakes that I'm ignoring, but it's a learning experience in batch painting.

Since the last time, I've tweaked a few things to either speed up the process, or because it just looks better:
  • No drilling out "barrel holes"! They were often off-centre anyway, and on these models a small black dot looks just about the same.
  • Wraithbone spray directly over black, no Corax White spray at all. It's better to make the first spray a bit thin and then do another later. Also, really shake a new spray can, otherwise the paint can be very thick on the model, and will ruin detail most effectively. Mostly recovered with some clever painting, but ideally I should have stripped the paint and started again.
  • Pre-mixed Volupus Pink and Contrast Medium. This was done by putting each into a dropper bottle, and then measuring it out back into the original Volupus Pink bottle. This ended up as a 1:8 (pink to medium) ratio, which is much lighter than the original test, but also allows the drybrush of Wraithbone to be skipped entirely.
  • Barak-Nar Burgundy for the tongues. For more important models I'll also highlight this with something, but in this case it was covering up some red tests anyway.
  • Stormfang drybrush on the base. It was too dark previously, and so just a light drybrush to raise some detail makes all the difference.
  • Rhinox Hide around the rim of each base. I debated leaving it as black, but after a test it was determined that a dark brown just looked that much better.
As far as lessons learned go, if I were to paint these models again (a strong possibility if I want to build and sell a tyranid army), then I would batch paint the arms separately. It makes getting into certain areas that much easier. Fortunately the left/right pairs can be grouped and put onto any model, so there's no need to track which pair of arms belongs to which particular body.

I would possibly do some initial contrast coats without the base attached, which does make holding the model more difficult, but if that's solved then it again makes accessing various areas that much easier. Easier access to areas of the model improves both speed of painting and the quality of the finished model, so it's well worth planning such things in advance, especially for large batches of models.

With batched painting I do find it easier to not actually do all the same area of every model all at once. I might do four models at a time with, say, assembly and priming. Then I'll do some initial step. Then I'll go back and assemble another four and prime them. Then I'll do the next step on the original batch of four models, followed by the first step on the next batch of four, and so on. By switching steps often, it prevents boredom from setting in too quickly. This was really the key to getting twelve termagants finished in just over a week (a very fast pace for me).

-- silly painter.

Saturday, January 18, 2020

Nidrick

nid nid nid nid
Here is Nidrick the Termagant, finished apart from a coat of Purity Seal (which will be done when there's more to batch together). I'm also considering Rhinox Hide to edge the base in, however that considered a minor detail and will also be done in batches.

The finishing touches to Nidrick were the claws and hooves. This was a simple matter of:
  • Flesh Tearers Red, which is truly an amazing contrast paint if used right.
  • Evil Sunz Scarlet to add some lines and give some grain, similar to the purple carapace.
I did a small test with Cadian Fleshtone used before the Evil Sunz Scarlet (making the edges even brighter), and that's definitely something to use on more special models (Carnifex, Hive Tyrant, that kind of thing), but it's simply not worth the effort here.

The base is simple, but time consuming if done one at a time. Further models will only have it done in batches.
  • Green Stuff to cover any holes in the base.
  • Astrogranite everywhere. It helps to move this up to the feet in places and make it look like the termagant is pressing down into the earth beneath.
  • Mechanicus Standard Grey, very watered down, to cover any black base showing through, or any Green Stuff that hasn't been covered properly. This is slightly darker than Astrogranite, but the next steps tie it all together.
  • PVA glue, watered down, and spread over the base. The entire purpose of this is to prevent the texture paint from easily falling off. Paints and Purity Seal should help protect the glue from degrading later. Wait for this to fully dry before continuing.
  • Drakenhof Nightshade over the entire base.
  • Agrax Earthshade in patches.

And that's it. I could do more on the base, but that of course takes more time and effort - something I'm keen to avoid on such a small base, especially when it might be lost among the crowd/brood.

This is truly a tabletop quality model. I've spotted a few mistakes, fixed a couple, but others I'm not going to bother with. I'll need that mindset if I'm to get an army of these things painting relatively quickly. That being said, I'm still very pleased with how Nidrick turned out and have learned a lot more of how to use contrast paints.

Next step is to batch paint three more termagants and make sure the process is ok, before premixing paints and continuing with the rest.

-- silly painter.

Friday, January 17, 2020

Termagant (Hive Fleet Leviathan)

(Tyra)Nidrick the Termagant.
Starting off the year with a resolution: to paint and sell some Tyranids from the Deathstorm boxed set. Termagants aren't in that set, but they are in most Tyranid armies and so I bought some to test out how to paint the little buggers.

This is the start of a tabletop quality (or is that battle ready now?) army painting project. I'm not intending to go all out on the models, because the whole idea is reduce the plastic mountain I have stashed away. There is a chance that I'll become too attached to the paint job and won't want to sell the models - but then at least I'll have experience with more than just Space Marines.

I'm using contrast paints, and broadly following some online tutorials from WarhammerTV. I want something a little better quality to sell, so I've made a few tweaks to the formulae, but given the organic nature of 'nids, contrast paints seem the way to go.

So the first step on Nidrick the Termagant was a black primer spray. This isn't for colour purposes so much as that spray being an awesome primer. Over the top of that was a spray of Corax White. Only a single coat, which lets some of the black peek through in recessed areas. This helps give depth to the model later on.
Final base step was a coat of Wraithbone. I used the base paint for this, but future models I'll just grab the spray and use that instead. The time savings of using the spray will be well worth it, especially for batched painting.

Then the fun with contrast paints begins. I've put the Contrast Medium and Volupus Pink into dropper bottles to accurately remix the ratios in future.
  • 4:1 ratio of Contrast Medium / Volupus Pink, applied over the whole model. This was somewhat stronger than I originally intended, but ended up in my favour.
  • Wraithbone drybrushed all over the model. This tones down the strength of the first contrast coat, adds extra highlighting, and gives more of an organic texture to the 'nid.
  • Wraithbone directly painted onto the eye areas (Nidrick and his weapon's eye). They will be coloured differently later, but I didn't want the pink to show through.
  • Volupus Pink directly in joints, or flexible points between the exoskeleton. Also added around the mouth. Any brush with a fine point is suitable to keep it neat.
  • Shyish Purple contrast liberally applied to the carapace. I had a concern it would be too dark, or too blotchy, but for this sized model (or rather, for the carapace segment sizes) it works nearly flawless. The few blotchy areas actually give the carapace a more natural feel, without being overly obvious. Very impressed by the result with that.
  • Iyanden Yellow contrast applied to the eyes. Fine brush tip helps.
  • Guilliman Flesh contrast applied to weapon ribbing, and to Nidrick's teeth.
  • Wraithbone used to pick out the teeth. As this is only tabletop quality, I'm not willing to go much beyond that.
  • Seraphim Sepia wash over the weapon "ammo". This was just to differentiate it from everything else.
  • Bloodletter glaze over the weapon. Two or three layers were applied to give it enough red. This step was to make the weapon a different organism: bonded to the termagant, but not the same creature. Bloodletter because red is the typical Hive Fleet Leviathan colour for weapons. I had considered a dark red, but ultimately I thought that didn't reflect how closely the weapon is bonded to the termagant. Considering that Bloodletter is no longer available, my next choice would be incredibly thinned Blood Angels Red contrast.
  • Xereus Purple applied in fast stripe motions to the carapace edges.
  • Genestealer Purple applied in fast stripe motions again, covering about half of the previous step. More important models may have additional carapace highlighting with an edge paint, but considering the numbers of termagants I'll have to paint up, I didn't think it was worth it in this case.

The model isn't quite finished. I'll add an iris to the weapon's eye, and I've yet to do the claws and hooves. Need to grab an extra paint from the local Warhammer store, or else I'd have this model completed within a single day. Which is awesome.

To be honest, I'm not sure I could do a better job with more traditional methods of painting Tyranids. The same result, sure, but using the contrast paints has most definitely sped up the process dramatically while maintaining a high standard.

-- silly painter.