Showing posts with label wyrd miniatures. Show all posts

Thursday, March 26, 2020

Nekima - Part V

Pinup for Kurt Wagner.
Nekima is finished, based, and varnished.

The base was quite easy in the end, and like all good bases it was just playing around to see what worked. The grass is Scorched Grass from Games Workshop, which despite the name works quite well to give an impression of fields of normal grass. The trick behind it is that the it's not a uniform green; shades of brown and gold give it some extra depth.

Originally I had painted the base, not knowing quite how much the flock would cover it. That step wouldn't be needed in future if so much is going to be applied.

I won't go into exact details of everything, but the small note that I did figure out is to add some flock to the rocks, because they've probably been there for some time and plant life will find purchase wherever it can in such circumstances. Also, once the PVA glue was dry, some small amount of Agrax Earthshade over the grass on the rocks helps to tie it in a bit more.

One must wonder who her tailor is.
The original plan was to add some tufts of grass, or shrubs, but the flock works so well that I just don't feel the need. I could work on the little stream some more, but motivation is moving on to other models, so I'll just leave it be.

Overall, a fun model, and fun to try something different.

-- silly painter.

Friday, March 20, 2020

Nekima - Part IV

Magical night-light sword.
A good deal of progress on Nekima, in fact the body is done and all that remains is the base.

Diving right in, the left shoulder armour and right vambrace was painted mostly in traditional gold:
  • Balthasar Gold.
  • Reikland Fleshshade.
  • Gehenna's Gold as a first stage highlight.
  • Auric Armour Gold as edge highlight.
the top of the armour looks more like some kind of fur, and I figured it was to padding under the metal. So this was painted differently:
  • Wraithbone.
  • Gore-Grunta Fur (Contrast).
Small detail, nice and simple, didn't need any further work.

The sword hilt metallics:
  • Balthasar Gold.
  • Reikland Fleshshade.
  • Runelord Brass as a first stage highlight.
  • Skullcrusher Brass as an edge highlight.
The last step is a little bit of a mistake really. Skullcrusher Brass is far more yellow than Runelord Brass and doesn't particularly fit. I have trouble with brass colours still.
The blade is more interesting:
  • Caliban Green down the length of the blade.
  • Corvus Black down the end, in multiple thin passes.
  • Kabalite Green glazed towards the base of the blade, starting at about half the length of the blade and building up to a solid colour at the base.
  • Sybarite Green, about a quarter of the length of the blade and again multiple glazes. It's frustrating having nothing else to glaze while waiting for each pass to dry. Small dents and chips in the blade also had a little applied just for effect.
  • Aethermatic Blue thinned with Contrast Medium and glazed over the entire blade to help tie it all together.
  • Mechanicus Standard Grey thinly applied as edge highlights along the tip of the blade.
The blue-green appearance was deliberately chosen to complement the purples, but also to tie in with the eyes, as though she's channeling power through the blade.

Finally, hooves and horns. I borrowed the technique used by Darren Latham in his youtube series (soon to be removed - shame on you Games Workshop).
  • Rhinox Hide over all the horns and hooves.
  • Rhinox Hide / Abaddon Black (just mixed on the palette) on the tips.
  • Doombull Brown over about half of the detail.
  • Skrag Brown over about a quarter of the detail.
  • Balor Brown as small highlight lines over the previous step. It was at this point I also reversed back to Rhinox Hide for the hooves. They stood out too much if the base of them was too bright, so I glazed backwards to with paint from the palette, just to tone it back.
  • Ushabti Bone as further highlight lines, though fewer in number.
  • Screaming Skull as final edge highlights. I also glazed Skrag Brown back over some of the horns because again they were too bright and it just didn't quite fit.
  • Screaming Skull / Rhinox Hide (about 1:2) just mixed on the palette, and added as shine highlights to the tips of the horns. I also applied this to the tips of the wing "claws" for a bit of colour because I didn't know what else to do with them.
Takes a fair bit of patience with such small details, but it's those that really matter the most I find.

Quite a fun model to work with, and hopefully I won't mess it up with the base. I'm also contemplating whether I should really give this a pass of Purity Seal, but I suppose I should, even if it will dull the metallics. I can always use a bit of gloss on them later.

-- silly painter.

Sunday, March 15, 2020

Nekima - Part III

Red pants time.
Continuing with Nekima, some additional colours have started to be added. The model is starting to come to life now, but much remains.

In the interests of getting the model done more quickly, the clothing is fairly simple. I'm relying mostly on the sculpt and shades to bring out the detail.
  • Khorne Red over all the clothing.
  • Drakenhof Nightshade over all of the clothing.
  • Word Bearers Red to highlight. This red has a lot of brown in it, and gives a more earthy tone.
  • Mephiston Red for select highlighting, just to brighten a few areas and because it was on the palette still.
That's really it. Perhaps a contrast paint would have suited for the leggings, or perhaps some mixing with brown a little more, but I'm not going to go overboard here; this miniature is for fun, not for competition. I've also painted the upper thigh areas as though covered by part of the leggings too. I would have preferred the purple tones, for flesh, but the model has some join lines in those areas and skin just didn't fit with that, so red stockings or something it is. It's more apparent from a different angle to that shown above - next time I might take a rear photo as well.

A very fine brush and a very small amount of Aethermatic Blue (Contrast) was added around the eyes. The detail is very small and getting eyes in there would have been too much of a pain. Instead, a kind of magical glow seemed fitting. Aethermatic Blue is actually more of a blue-green in colour, so it complements the reds and purples well.

Originally I was going to go with black hair, but decided that this might unbalance the model slightly, and a white or silver colour would frame the face better.
  • Administratum Grey over all the hair. This needed two or three coats, especially as it's a layer rather than base paint.
  • Nuln Oil. Not heavily applied, but enough to darken the recessed areas.
  • Administratum Grey again to highlight.
  • Ulthuan Grey for further highlights.
  • White Scar, thinned down, for final highlights.
Needs a brush with a fine tip, and a good deal of patience, but whoever designed this model really did a good job in helping someone to paint it. I've had far more trouble with the hair on miniatures from Games Workshop.

I've been starting to consider how the base might look, and strangely I might end up going for a forested look. A small stream running next to the rocks, some tufts of grass about. Something different than a blasted battlefield.

-- silly painter.

Friday, March 13, 2020

Nekima - Part II

Don't stare.
Next phase on the Nekima model: after the basic airbrush steps, go back with a paintbrush and further highlight and shade as necessary. This time it was more than perhaps I would have liked, but the airbrush phase still gave an excellent baseline from which to work. That, if nothing else, still makes the airbrush worth it.

I chose layer paints to work with going forward, mostly because they're more translucent than the base paints and I wanted to glaze more than cover up. Owing to a wet palette making the paints easier to mix, I simply put down Xereus Purple, Genestealer Purple, Lucius Lilac (an edge paint) and White Scar, and mixed them as necessary.

Don't use the edge paint. It has a very high pigment count, thicker medium, and does not glaze as easily. I had to cover up quite a few mistakes with that.

Genestealer Purple ended up as the primary colour used on the skin. This was highlighted in places by mixing in the White Scar. Xereus Purple was used to add some shade to places as necessary. Very little Genestealer Purple was used on the wings as well, but it wasn't highlighted to the degree of the skin; I want the wings to be darker and not draw attention away.

I've not used any shades at all on the model yet, although a blue based shade on the wings later might be used between membrane folds. On the subject of the wings, a little Warpfiend Grey along skeletal outlines gives them more depth without going too bright, or too purple.

-- silly painter.

Monday, March 9, 2020

Nekima - Part I

Born to the purple.
Today's post is about Nekima from Wyrd Miniatures. Not a Games Workshop model for once. A friend left some behind, and I've been contemplating how to go about using the models for some time. I think I've come to the point where I need to try different techniques, or simply different models, to progress as a painter. Not everything can be a Space Marine.

The miniatures I have from Wyrd are all unique, of a smaller scale than from Games Workshop, and entirely different from a design perspective. The model of Nekima has exposed flesh, wrapped clothing, ceratin (horns and hooves), leathery wings, and possibly a sword of dubious magic in nature. I confess that I think the main horns are overly large and unbalance the model, but I'm leaving them in place because it's something extra to paint.

The colour scheme I wanted as purple, just because I wanted to try more of a colour I don't normally play with. I didn't want a complementary colour for the clothing, so the primary for that would be red. Turns out that this is not an unpopular choice for this particular model. The sword I'll likely try some NMM on, using blue-green to complement the skin. Split complementary from purple tends towards green and yellow; bronze and gold metallics for sword details and armour will provide more yellow oriented tones.
The base I'm not entirely decided upon, but I do like the idea of blues around the feet, sort of like a magical aura lighting up otherwise neutral grey rocks.

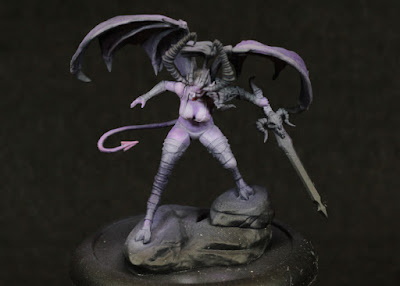
The photo above is immediately after the airbrush base colours:
  • Night Lords Blue over the whole model.
  • Chemos Purple over most of the model, leaving some of the previous code in the downward facing areas.
  • Genestealer Purple highlight.
  • White Scar added to the cup, mixed in, and highlight larger curved areas of the body.
  • Additional White Scar added to the cup, mixed in, further highlights.
The darker blue is done because that allows later shading to be more natural. The white mixed in was done to deliberately desaturate the purple and give a much brighter skin tone. The wings did not receive this step much, which is on purpose to help give them a more leathery look, and to keep focus on head and torso.
Going back and defining the abdomen muscles will prove to be an interesting challenge no doubt, but then that's all part of the reason to be practicing on such a different model design than I'm used to.

-- silly painter.