Monday, July 21, 2025

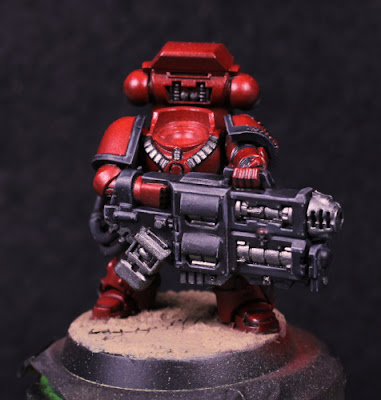
Devastator Squad - Part VII


Oh....yeah.

Slow and steady as the saying goes, and finally the Devastator squad is fully assembled. That doesn't mean they're complete - just that I can finally finish painting everything without needing to access otherwise difficult to reach areas.

There's simultaneously not a whole lot left, and yet it feels like an overwhelming amount. The armour needs edge highlighting and probably some of the volumetric highlights given another pass. While I was considering that last point I realised that perhaps the airbrushing could be simplified if I knew I was going to highlight again later anyway: rough sketch with the airbrush, fine tune with the brush later, edge highlight at the end. Worth thinking about. 

The right knee pad for Blood Angels shows which squad they belong to, and I picked blue with white cross this time around. I knew it would clash with the rest of the model and so I never used white (it's actually Grey Seer) but I think it's still too bright. Going still darker with the blue (near black then volumetric highlights with Night Lords Blue maybe) and a darker grey as "white" is probably the way to go. I'll bear that in mind next time.

Most of the rest is just filling out colours. I am painting them now one at a time, moving on when I get a bit bored, switching around for the last details. This is part of what I do like about the finished models - they're all a little unique - but it's also a nightmare for batch painting. I knew that going in, and now I just need to push through and get them done.

There is one final piece that's new though, and on all of them. The base. My usual drybrush paints are Underhive Ash followed by Terminatus Stone. Both of those are basically congealed pigment now and unusable (unless I get a mortar and pestle) so I needed a replacement. To that end:

  • Nurgling Green / Ionrach Skin (1:1) which gives the desaturated yellow-green of Underhive Ash.
  • Wraithbone, which is a close enough approximation for Terminatus Stone as it is.

They don't need to be calibrated and colour matched exactly, just close enough for the drybrushing to look the same, and I think the end result is most acceptable. Now I just need time to get through everything else so I can call these models done - time that should be on the way soon.

-- silly painter.

Saturday, July 12, 2025

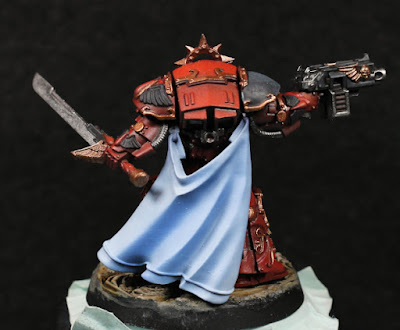
Blood Angels Legion Terminator Praetor - Part IV


Not afraid to get that cape dirty.

It's been a few weeks since the last post, but I've not actually been idle - just haven't had time to take photos. One of the more recent tests has been the cape for the Praetor. I considered for a long while of how I wanted to show this, if it should be white, cream, or some other colour. Ultimately I wanted white to show purity and to help frame an otherwise darker model while still providing something to harmonise the brighter values of red on top and serve as a visual line to draw the eye upwards.

So the cape would be white, but white itself is never pure. There needs to be shadows, highlights, reflections from other colours, and so on. I ended up going for blue tints to continue the purity and angelic theme. Cream or beige is often associated with coarser material suitable for more rigorous endeavours, where as the blue is finery and status for the administrative halls of Terra. A high ranking Blood Angel seems to fit with status, purity, and the ornate armour already suggests artisan finery.

So far at least, the cape is just the basic outline and was entirely done with an airbrush. A few edge highlights will likely be added in, and then there's patterning to be added as well to break up the large surface (I'm thinking bright gold trim). I've struggled with capes in the past when using a brush, so this was mostly an attempt to gain experience with an airbrush to see what I could do.

The initial base colour is Night Lords Blue. This gives the deeper shadow colours, but it's not really too visible at the end - it will be entirely covered by the end, but covered with translucent layers. Next I mixed in Chemos Purple and used that to highlight some of the inner cape areas to act as a kind of reflection from the red armour. The end effect is subtle, but it's there.

Moving onwards through the paints I generally just remixed into an emptied but not thoroughly cleaned airbrush cup. The idea is to subtly influence each layer and help it blend into the one before - not sure it works too much, but it saves on having to deep clean between switching out paints. The next step up in blue was Macragge Blue, followed by Calgar Blue. These I started to add as highlights, but painting in thin layers and allowing them to over-spray into the folds.

One of the keys to cloth is that it's less about highlights and more about shadows: the mid-tones are the most important, deeper shadows away from the angle of the light source (_not_ just recessed areas, which might actually get direct light) and very soft highlights. The airbrush helps here: just angle the model and hit the sides or "walls" of the folds from one direction, adjusting the angle to reach recessed areas too as necessary.

Next up was White Scar, which was mixed with Calgar Blue in different ratios for multiple passes. Keep it thinned to almost glaze consistency here, and focus on raised areas the most. This was generally a filter to whiten the cape more than anything else.

After all of that I noticed some of the shading had been lost and so I went back with incredibly thinned Macragge Blue and deepened them again. I didn't want to go too much darker, again just filtering the colour is enough as that will naturally darken compared to white anyway. If I were to do this more then I would need to start adjusting air pressure, but as it was I played with trigger control and distance from the model for more or less the same effect (kind of, not really).

As always, the airbrush works best if the paints are thinned. Do not use them straight out of the bottle (at least not Citadel paints). Work in multiple layers, change colours gradually instead of going for large value jumps, and the end result can be very smooth without any speckling or "noise".

The cape is currently a little too contrasting to the rest of the model, however this will be sorted once edge highlights are applied on the armour (including the gold) and other details are added to the cape.

-- silly painter.


Sunday, June 22, 2025

Devastator Squad - Part VI


The most high powered laser pointer.

Not a long post, mostly just a whole bunch of words to say that another of the squad is fully assembled. Fully assembled does not mean complete - it just means that all the sub-assemblies are entirely glued together and I can finally see how the model will be.

The colours used are almost entirely:

  • Iron Warriors
  • Iron Hands Steel
  • Black Legion (mostly to base over the varnish stage)
  • Abaddon Black
  • Corvus Black
  • Eshin Grey
  • Dawnstone

By and large that's it. I did use Warplock Bronze with Castellax Bronze for the (charging coil?) and also for some smaller details - yes, only those colours, but what a difference it makes to change the ratio when painting components.

This might seem like an overly zealous selection for what amounts to black and silver, but they aren't used all at the same time and this does include all the highlights and shading. I'm not entirely done (that silver cable needs perhaps Basilicanum Grey on it) but having a smaller selection on the palette for just e.g the black casing is quite manageable and I have ended up putting paint to more than just the lascannon. For the result I do consider the palette limits, but I could remove a couple of the blacks: the Black Legion is an effective glaze when thinned, but it's also not something which interacts with the other acrylics in the same way. There is a tradeoff occasionally, and black is especially difficult to highlight, so I think the count isn't so bad in the end.

There's still two more of the squad to fully assemble, and I hope they won't be too far behind. Work is kind of crazy still though, so I guess another couple of weeks before I get that far. I really do hope the pace will pick up again in a few weeks and I can complete all of this.

-- silly painter.


Monday, June 9, 2025

Devastator Squad - Part V


monocle, binoculars, trioculars?

This long running series will no doubt make it to ten posts, but that's mostly because updates are shorter and I'm trying to keep them running for motivation to actually get a little done every day. Except today, while I write this out.

The first of the Devastators has finally been fully assembled. Focusing purely on the one model has definitely helped keep me moving forwards and I've still managed to paint little extras on the rest as well. The sergeant is almost ready for full assembly too, just a few little details that are easier to reach for now, but actually the next I'm likely to focus on will be a lascannon wielding marine. Before I get that far however, I have realised one mistake in full assembly: the right knee pad. I kind of forgot to put a squad marking on there. I've lost where I keep track of what I've already used so I'll need to go back over all my painted models and figure it out.

That out of the way, I decided to try and make the grav weapon have a green glow, or energy indicator, to it. Hexwraith Flame in the recesses is all that is - I might have used one of the brighter Contrast range, but Hexwraith Flame is sufficient and already in my paint collection. I tried not to go overboard but I'll still need to add highlights again later to brighten up a few edges - and that can wait until after the varnish stage if I decide to mix in metallics.

Iron Warriors with Black Templar (mixed with flow improver) is looking to be my go-to for darkened metal. My painting style is not exactly bright, saturated colours and so going darker is necessary to keep a value range. It's been working well enough so far but I'm still stopping at Iron Hands Steel before the varnish stage.

To simplify everything I ended up just painting all the helmet lenses green. I could have used varying colours except that would then have needed more decisions on which basic colours and an awful lot more time to pick out the right paint pots; far better to just use what was already on the palette. I also have come to appreciate once more the fine tip of a good sable brush. I've been using a synthetic brush for a while now that allows me to base coat smaller details, but for eyes, lenses, etc, the equivalent of an artificer brush can't be beaten. Considering I really only intended the synthetic to last for metallics on the Sanguinary Guard, then it's been lasting surprisingly well.

The last little update to how I paint things is actually the cabling. Colourful cables suit some of the of saturated schemes from 2nd edition, but I go for a utilitarian approach these days. The outer layer of cables is probably hardened for protection while colour codes are on the ends or inner sheaths. As a flexible material though I want that cabling to have less stark highlights but also shadows that aren't as deep. For that I've been experimenting with:

  • Corvus Black base latyer.
  • Corvus Black / Stegadon Scale Green (1:2) over most of the cable to help define volume.
  • Stegadon Scale Green / Dark Reaper (1:1) for highlights.

The end result is fairly subtle with the highlights and is more about giving some colour to make it distinct from the black of weapon casings and armour. I like it so far, but only because it's contrasting against the red of the armour. I'm not sure it would be suitable with, say, Raven Guard. I'd want perhaps some Thunderhawk Blue in such a case. Something to think about anyway.

-- silly painter.


Saturday, May 31, 2025

Devastator Squad - Part IV


This is really heavy.

Well. A few things have prevented me doing much for some weeks, and it's not likely to let up anytime soon. This means something has to change if I'm going to get any painting done and models actually finished. These stalled Devastator Marines are going to serve as a bit of practice in that regard.

The number one thing that stops me is not knowing how to paint various bits & pieces. What colours to use, what material I'm trying to represent, that sort of thing. I'm slowly solving that with references to models already painted, but also going by box art to decide. The latter doesn't show everything though, notably it only typically has a single view point and rarely shows the backpack - so even with box art I still need to spend time deciding what colours go where.

Related to that is the number of paints to apply: switching paints out all the time is very demotivating, especially with my current setup where the paints are actually in another room. I generally need to know which ones in advance, get them all, lay them all out on my (small) wet palette, and make sure to stretch that as far as it will go before starting all over again. It suits my painting style of focusing on details, but it's very slow to make obvious progress.

Slow painting is its own demotivator - the less I paint, the less I want to paint. It's very hard to break that cycle, which is why tackling something that makes a bit visual change is always a good idea - but I'm running out of that on these models.

So what to do? I think I've come up with a plan to tackle the above problems and get back to painting, to a degree. First I'm going to focus on a single model at a time for the Devastators. That's not to say I won't batch paint where possible: all purity seals for example can be done at the same time, it's just that other models will be done as more of an afterthought against the primary. This will keep visual changes more frequent, and fits in with these particular models all being that little bit different (a hallmark of Blood Angels as they used to be designed).

The next idea is to simply reduce the number of paints used and rely on "good enough". I've been using metallics for skull icons recently for example - only three or four paints for all the little details across the whole model. The idea is to break up monotonous surfaces rather than show off as many paints as possible. The weapons are going to be black, metallic, and some minor details. Edge higlighting I'll try make more apparent to show off the shapes, otherwise just keeping the colour palette very simplistic.

Finally I'm trying to paint smarter by using paints to their strengths. In this example I make sure to paint most details with a layer of Black Legion for the simple reason that it helps later layers adhere and cover better. The varnish layer normally takes many coats of paint before everything covers properly - but even a single thin layer of high pigment Contrast acts as both primer of sorts and pull back excessive red in areas. Black Templar mixed with some acrylic flow improver turns into a sort of Nuln Oil, and flows nicely into the joints.

All the above I've started to do on the weapon and shoulder pad trim. It was a marked improvement in speed and let me actually assemble everything. Of course the arms didn't quite line up properly and I had to use putty to  help them stick (it looks really ugly from the rear), but I was expecting that to happen on at least one model. The price I pay for sub-assemblies. From here I'll start to fill in some details and try get this one model done, moving on afterwards to the rest of the squad.

-- silly painter.


Sunday, May 11, 2025

Legions Imperialis - Sicaran Battle Tanks (Part V - Showcase)


Glow-guns

For whatever reason it was an absolute slog to get these four tanks finished. Not much time to paint coupled with indecision over colours and a continual questioning of just how much detail I should go into really took its toll here. In some regards it might have been easier to paint a full sized version (that's for another day - I have a couple of the resin kits from a few years ago). What let me finish them in the end was a change of mindset to just simplify the colours: make the bulk of the weapon covers black and just use edge highlighting to pick out lines. Limit the palette and focus on overall appearance instead of getting lost in the close-up.

The colours work well enough, though I'm not entirely happy with the barrels of the plasma weapons. I'm still not really a fan of blue glowing plasma coils, but that's obviously luminosity from whatever hardened material is used to house all that energy, and it makes it immediately apparent on a tabletop what the weapon is for gameplay purposes. Think I do prefer the look of the other turrets though.

Now that the varnish is dry and the models are done, what would I do if I painted more? The base coats worked well. The main airbrush steps did their job, but I'm still getting used to Contrast paints through an airbrush. I might prefer a standard acrylic paint and multiple passes which will keep the end colour more consistent across each model rather than trying to ensure that last Contrast pass matches for them all. The shading is subtle enough by works, and using Black Legion (Contrast) mixed with flow improver and applied over a gloss varnish continues to provide an excellent way to panel line everything. Selected edge highlights accentuate the armour plates more and the end results is a very readable small scale tank. I also really like how the tracks turned out. Ratling Grime added just the right shading to give the look I was after.

I could do some weathering, battle damage, muzzle burn, etc, but these aren't intended as display pieces (although it's not like I've ever actually played a game with them). The viewports and sensor lenses are far too bright here, I probably could have darkened them with a shade, but again effort and it does give them a sinister look - psychological warfare that this horrifying tank is watching you.

Now I can put these away and see what's next on the list. Probably a dreadnought and devastators.

-- silly painter.


Tuesday, May 6, 2025

Legions Imperialis - Sicaran Battle Tanks (Part IV)


Hold up, how do my pauldrons fit through the hatch?

These models are taking an insanely long time to get finished. This is partially a lack of motivation because they're taking so long (circular reasoning), but also because I just have so little spare time right now. So I've cut a few corners and forced myself to get the Sicaran tanks nearly done - just the other set of turrets to go. I've also not added any decals - I figured paint scheme shows easily enough which army they're part of, and also there's really only one panel to put a decal on. That would require a white transfer, which would stick out like a sore thumb. The alternative is to paint symbols on by hand, which I just frankly can't be bothered with.

I painted the viewports and lenses with a simple mix of Mephiston Red covered in Troll Slayer Orange. Nothing special, no fancy effects, just dots of colour to break up the turquoise. The orange tint is a nod to the Eye of Horus.

Cabling is generically Khorne Red with some Mephiston Red highlighting. This is purely again to break up the monotony and add some visual interest.

Silver metals are Iron Warriors, Nuln Oil, Iron Hands highlights. All of this done before the varnish step. The brass is Balthasar Gold, Seraphim Sepia, Sycorax Bronze highlights. Absolutely nothing special, all of it very simple - just on a small scale and requiring a fine tipped brush that is just now starting to give. It's been an exceptional synthetic brush which I've leaned on heavily recently - I hope future purchases of the same are just as good. Da Vinci size 0, Nova Synthetics range.

Black areas are Corvus Black, Dawnstone (mixed on the palette), and Abaddon Black mixed with water to essentially shade back some areas.

That's pretty much all. The most time taken was in deciding what colours should go where, but once that was sorted then the next steps proceeded smoothly enough. The details make the painting a little slower than I'd like as well, but also because they're so small there is no sense is perfectly smooth blending - you really do want some contrast to pick out edges more than anything else.

And now it's on to the other turrets before I can classify these models as done. Next post however is likely to be about a change in painting approach that I'll be forced to make given the current circumstances - or else I simply won't get anything done all year.

-- silly painter.