Monday, July 1, 2013

Quiet Times

Been a little bit since I last posted here, but I've not been idle. Not entirely, anyway. Work has been getting in the way, along with some other side projects, so the painting has been slow recently. It should gear up this week though, so maybe I can get to that spray gun soon.

Anyway, a picture of some changes are show below.

I'm mostly done with the Death Company first armour highlight (blending Eshin Grey), and have started on some more solid highlighting (still Eshin Grey, but sharper lines on appropriate edges). I've also started on some more base colours - nothing special to write about yet, just groundwork to make it look a little less black - also helps give the model some form, which just helps motivation to paint more.

I've started on some rope on a couple of jump packs. Actually, I mistakenly glued the wrong top/bottom components together - I figure they're just sharing it. Anyway, White Scar is being used to pick out the rope, and I intend to cover it with Yriel Yellow next. The white also helps the yellow come out more; yellow on black just doesn't quite work, and I want it fairly bright. Later shades will darken it again, so the end result won't be so vibrant.

I'm also slowly getting through some of the Dark Angels on the desk. They're up to the final armour highlighting stages now, and then it's onto some of the details.

  -- silly painter

Friday, June 14, 2013

Faces and Hair #2

Eyes

From previous experience, I knew the eyes were going to be difficult. They always are. They're just one of those things difficult to get right.
Seeing as I'd already done most of the colour, shading, highlighting, I thought I'd give the "normal" way a try. This involves painting the eye entirely black, then white (trying to leave a very thin black border), and then finally putting a small black dot in the middle for the actual eye. A variation on this is to put white dots to the sides of each eye, leaving a black iris in the middle. Seems simple enough. Yeah, right.

It's the final stage I have trouble with. That final black dot always is either too large, too small, in the wrong spot (making the model look cross-eyed or something), or some combination of it all. Then it all has to be redone, and the surrounding areas fixed up from any mistakes. I perservered, and the result is seen above. The other side looks much the same, but the photos didn't turn out as well.

(side note: tip from a friend is to put tissue paper in front of a flash to stop it from being too reflective. That really does help sometimes!).

Next time, I'm going to do the eyes different. They'll be done after the shading stage, and the final dot won't be a dot at all. It will be a vertical line. The idea is that, if mistakes are going to be made anyway, you may as well get the central eye area correct. Using a line helps with the the brush stroke, and it's much easier to paint over the mistakes, leaving the central eye area as it should be. This normally ends up looking the same in the end, but it's a much less frustrating approach, and the one I used to take back in the day. I will likely use this approach, or at least one based upon it, with future models - at least until I'm a lot better at painting!

The final touch was actually a little bit of Ungor Flesh for the eyebrows. I didn't want full yellow - that would be too much - but I wanted something to use as just a very slight hint. A darker haired model could get away with more of a brown for the eyebrows, in this case it wouldn't have fit. In the end, it looks much better for the hint of eyebrows - with the face, it's the tiny, subtle things that really help the overall expression.

Hair Again

As can be seen with comparisons to a previous post, a little more attention was given to the hair. Based upon a suggestion, I tried with some very subtle white highlights. They didn't really turn out, so I glazed over it. That didn't work either. In the end I resorted to another layer of Yriel Yellow to make it less dark. Maybe a stronger white undercoat will help in future - definitely something worth investigating at some point.


The photo is a little dull on the colour, but the teeth are a little lighter than surrounding areas. They're not white, just lighter.

I'll probably get back to highlight black now, and perhaps thinking of colours for rope. Something worked rather well on a testing Dark Angels model, so I'll probably try it again here soon.

  -- silly painter


Wednesday, June 12, 2013

Faces and Hair #1

Over the last few days I've been pondering the issue of faces, hair, skin tones, that sort of thing. Colours for armour, weaponry, and bases can be a little experimental and things still turn out, but the unhelmeted head of a Space Marine really has to be done right the first time. It will ruin the whole model if the colours or tone are too far off, and the detail is easily obscured if a little too much paint is used.

With that in mind, I found there wasn't too much on google for the new Citadel range of paints, though there's a fair amount for the older paint set, so I figured it couldn't be too different.

The Face

Much of the face is based off reading this blog (a good read), found simply via a google search, with my own tweaks and subtle differences.

The first thing I did was base with Rakarth Flesh. This is far too light of a colour for human flesh, but would probably be just fine for something like Dark Eldar, or Legion of the Damned. It doesn't really suit a Death Company marine though, so that was a bit of a mistake, but it may have actually helped out in the end.

Over this a layer of Cadian Fleshtone was applied, with touchups where I felt the base was showing through that little bit too much. This is a much nicer colour for use on the face.

Once dry, Reikland Fleshshade was washed on, just to darken things a little. A touch of Agrax Earthshade was also set under the eyes and lower lip. It's amazing how such a little thing brings out the expression that much more. A very good tip from the afore mentioned blog. The lips were then touched with Wazdakka Red, mostly on the lower lip. I also used some Agrax Earthshade on the inside of the mouth just to make it dark. The next step was to highlight areas back over with Cadian Fleshtone, including a very, very thin layer over the lips because the red was a little too vibrant. Getting the lips right is going to be one of those tricky things.

The last step for now is something I just made up on the spot: "highlighting" with a base of Ratskin Flesh. This is probably the colour I should have based with in the first place, but the idea here was to apply it thinly to the cheeks, darkening them, creating a slightly blushed effect. Someone yelling out a battle cry is going to have a flushed face from it.

The eyes aren't finished yet, but that's a topic for next time.

Same stage from different angles and lighting.


The Hair

Wanting this model to have golden blonde hair for the whole angelic appearance, I didn't really find anything appropriate in the paints that looked right. This one is pure guess, but it seems to have worked out ok. When doing this, note that the model doesn't have much detail about the hair - it's not a finecast. The paint will have to fill that void and make it look like hair in addition to being coloured like hair.

The steps were rather simple in the end:
  • Base with Averland Sunset
  • Highlight with Yriel Yellow. This step is "messy" - the highlight shouldn't be even. It's hair, not armour plating.
  • Extra Yriel Yellow along the fringe, and a little more sort of drybrushed to give the hair a bit more of a textured look.
  • Wash with Seraphim Sepia.
And that's it. Very simple, and I'm happy enough to leave it as is. Next time I paint a marine with hair, I'll probably look into building it up from layers of brown, just to see the difference.

-- silly painter


Friday, June 7, 2013

Blending 101


Today's post is all about blending. Not making ourselves tasty beverages, but instead the blending of one colour into another. This is largely done as part of the overall subject of highlighting, but it's difficult enough to do that I've been experimenting with various methods to find the one that's right for me.

There's a fair bit of information out there for the older paint sets, some of which I've attempted, and there's no actual one particular way of doing this. Different people will use different methods, so try them all and see what works for you. For me, I wanted something that could:
  • Blend very smoothly.
  • Be done quickly.
  • Use only as much paint as required (prevents waste).
Getting blending done quickly, while still being smooth, is mostly for squad based work, but it also means that I should be able to use a technique repeatedly without problems.

One technique that I've not even bothered with is "wet blending". This is applying the two colours next to each other, and then mixing them in place on the model. While it was my style of choice with the Tamiya range, the Citadel paints dry too fast for this to be really feasible - the layers will be dry before you can even start to mix them.

Another technique that I've read about is applying a small amount of paint with one brush, and then using another to sort of "pull" at the edges, leading the paint outwards from the edge. This can work quite well, particularly with a damp brush (note: damp, not water-laden!). Unfortunately, I was also suffering from the problem of the paint drying too quickly, leading to patchy areas. I'm not entirely sure, but I suspect the newer paint range makes this a little more diffiult.

The last method I tried ended up working out, but is the most tedious of them all to start with. After a bit of practice, it gets faster though and is actually best suited with squads (you can return to the first model after finishing the last). The results are shown below, though the photo doesn't do it justice.

Note that this model was used for experimenting different techniques, so not all blending and highlighting is even across it, but the knee pads and helmet muzzle are the best examples to inspect.
At this point I'll mention that it's far easier to blend by using a dark base and a lighter layer. Going the opposite direction can also be done, I tend to prefer washes in that case.

So the final approach is:
  • Using a damp brush, apply a little paint, and then spread it outwards using brush strokes perpendicular to the blending gradient. That means if you want to blend from top to bottom, use brush strokes left/right to right/left. This isn't a hard rule, but I find it helps.
    • If the paint is a little dry, this can quickly turn into a sort of drybrushing, but that's ok for now.
    • If the paint is a little wet, you might have to "push" it back towards the edge.
    • Another tip, is that sometimes I find it helps to use a damp brush to sort of "pre-dampen" the surface under scrutiny.
    • Basically, this step needs a bit of practice to get the right amount of paint on the brush to start with!
    • When learning, this can ruin a brush fairly well. So use an older, slightly frayed brush (which I find ends up working better anyway).
  • Keep in mind that the paint will dry much darker in the end, so repeat as necessary. This is where it's suited to squad based models - by the time you've finished the first coat, you can immediately start on a second.
    • Don't be overly concerned with keeping the blend perfect just yet either. That gets fixed in a moment.
  • When happy with the basic blend gradient, the next step is to apply either a wash, or a very thinned down (almost wash consistency) base paint.
    • This removes hard differences, and is they key to a smooth blend. Keep in mind that it will darken things a little.
The results should speak for themselves, though it really is much nicer than shown in the photo. I've used this technique across 3 models now, with different colours, and it's working fairly well so far. It's also easy to fix mistakes - just use either the lighter layer colour, or the darker base colour to touch things up a bit as you go along.

A final note on the technique itself is that it's best applied to larger areas (knee pads, greaves, that sort of thing). It can be a bit fiddly with smaller areas such as eye lenses, gems, fingers, etc, so I prefer straight forward highlights in those cases.

I've worked with blending from a base black spray to Eshin Grey, but it wasn't too visible on the photo, so instead enjoy a picture of Death Company in the works, led by Lemartes.


Sunday, June 2, 2013

Model Preparation

Today's post might be a bit shorter, and won't contain any photos, which is actually related to the subject at hand: model preparation.

First of all, a statement of the obvious: good lighting is very important. Not only does it save on the eyes, but it lets one see the model more clearly during painting. So there will be a lack of photos until I have a new desk lamp suitable for the purpose.

With that in mind, I thought I'd waffle on about getting models ready to be painted.

There's plenty of information out there, and included with the boxes and instruction sheets, of how to assemble a model. The usual pliers, sharp knife (be careful), etc, all apply. There's also the the recommendation of modelling files to remove left over sprue, a "mould line remover", and emery "sticks".
I find that most of it is actually fairly useful, but for the emery paper. The files do a good enough job, with the emery reserved for those cases that just won't go smooth any other way. So for saving money, definitely go for the files first. They'll also last a lot longer. I recommend a flat file first, and a rounded one second. There are often places where the flat one is too large to fit, and the rounded file works just nicely here.
When using files, I find it helps to keep an old piece of clothing under the model being prepared. The plastic can build up as a dust on the file, and the old clothing (or whatever material) is excellent at wiping this off. I don't recommend paper - the file will likely rub the paper into dust itself. I also don't recommend blowing on the file; other than being ineffective, it just puts the dust into the air.

The mould line remover is actually quite useful, but you can probably use an old butter knife just as effectively (depends which is cheaper!). It's actually more useful at removing mould lines than simply trying to file them off, and saves a lot of time when working with entire squads.

With actual model assembly, it should be obvious to put together as much as won't hinder painting, and leave the rest until after it's all painted. For Space Marines, this generally means leaving the backpack and gun off. Assault troops can make this interesting because the guns are attached to the arms, and swords in particular can cross over the chest and obscure it a little, but I still find it easier to paint them when attached to the model first (I find that my own fingers get in the way of the paintbrush otherwise). Personal preference.

When painting entire squads at a time, spray paint is really useful. Used correctly, I've found it applies a thinner base layer than directly painting with a paintbrush, and it is definitely much quicker to use. I do have a spray gun in my list of tools as well, but I haven't used it yet. I'll be sure to dedicate a paragraph after I've actually tried it out.
One thing to be careful of with spray paints is ensuring that an even coat is applied to the whole model. Spraying one side when laying flat, and then flipping it over and doing the other side can lead to a middle area that doesn't get covered much, if at all. Using an angle to cover these areas can help, but models standing up make it much easier to work with - assuming you have a well ventilated area suitable for that.

Lastly this post (which is already longer than I thought it would be): liquid green stuff. Having learned from the finecast of Commander Dante, I knew that something to fill the gaps left over from manufacturing faults would be very useful. Liquid green stuff is basically a putty than you can paint on, and hardens after a little while. It's very useful for filling in gaps between model components, or filling in moulding faults, but can't really be used as a generic modelling putty. Luckily there were very few places it was required on the recently acquired Lemartes finecast (easily one of the best Space Marine models out there), so the first tries weren't complicated. It really is easy to apply: just paint it on, and let it dry. It thins out well with water, but it's better to use less water, lest it become too runny. The old adage of two thin coats is better than one thick coat applies here too - and it's the second coat I find that really does the best job. The green stuff will shrink a little as it dries, which is one reason that the first coat shouldn't be too "perfect" when applied; leave the proper finish for a second (or later) coat.

And that's about it for now. Most of this post is either going to be old hat, or obvious, but it should hopefully have one or two items that are food for thought in there.

  -- silly painter

Friday, May 31, 2013

Commander Dante - Work in Progress #3 (and final)


As the last in this series of posts on Commander Dante, there's not a whole lot more to say about remaining details. There are a few notes though, so I'll go over each in brief.

I missed talking about the belt buckle in previous posts, and yes, it was never meant to have blue tinted wings. That would be too much, and a little variety doesn't hurt.

The hidden shoulder pad I actually used a very fine pen to write his name on, although looking at it I'm sure I'd like to use a brush next time. Words are difficult to do correctly, but I'm sure a very fine brush is better suited to such detail. Where the fine pen does work great is on small dots and dashes on the purity seals (can't be seen in the photos above). This is something that can be achieved with a brush too, but using a pen is simply easier. The only downside to the pen is that the ink takes a while to dry, and has a gloss rather than a matte finish.

There was also a decal of a skull applied to the hidden shoulder pad. I used that to experiment with mostly because it would be hidden in the end anyway. The decal was perhaps unsuitable to the shoulder pad however, and suffered from that terrible problem of folding, or edges sticking out where it doesn't quite conform to the curved surface. Cutting small slits in places helps with this, but I find that it also doubles up in certain places, making the decal look "odd" on the crease lines. Painting over it can help, but only if the decal lies flat. I did use a coat of Lahmian Medium to seal the decal, touching up the edges with Auric Armour Gold to help blend everything into the underlying paint better. I definitely need more experience with decals.

Lastly here, the base. Finecast miniature bases seem to continue the tradition of coming with a large gap down the middle of the base. I used a putty similar to blu-tac to seal over this, however masking tape is actually just as effective. Given a layer or two of paint and it can be barely seen. The base here was given a layer of Armageddon Dust, followed by a drybrushing with Underhive Ash, and then a touch of Longbeard Grey drybrushed over that. The lighter colour of the grey helps break it up a bit, although certainly some other colours might help some more. I didn't want the base to overshadow the model however, and so stuck with something very simple. The texture paints work rather well - it's like painting small sand onto the base. I will experiment with texture paints more in the future.

Overall I'm fairly happy with the finish. The gold works well, and the blue tint to the wings also turned out respectable. The axe head doesn't really look how I want it to however, so I may at some point in the future do some more work there.

Now, time to apply what I've learned to other models.

  -- silly painter

Thursday, May 30, 2013

Commander Dante - Work in Progress #2

This post is about the details other than the base gold armour. To start with, the base colours are used.

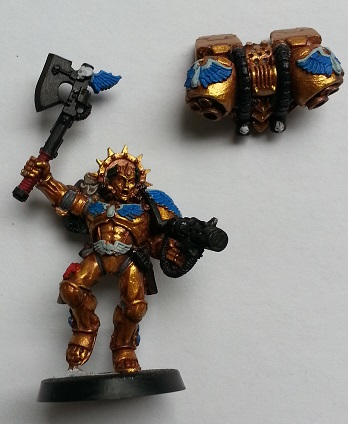
The usual black is applied where it's obvious, but the strangest part may be the wing iconography. The wings were based with Caledor Sky, with the tops and blood drop done with Celestra Grey. From another model being used to practice with, I had tried a blue wash over light colours for wings, but it didn't really turn out too well. In hindsight, a lighter blue might have been a better option, but I wasn't sure how much would show through in the end.

Mechanicus Standard Grey was used with the joints, for opposite reasons to the wings. Normally I would paint them black, and then highlight over the top. This time I'm reversing that and using a lighter colour, with the intention of using Nuln Oil later to make the recesses darker. This is something that did turn out rather well.

Rhinox Hide for the pouches, and Khorne Red for the axe handle. The handle I wanted darker than the blood drop gems, so a darker base is used. Caliban Green on the wreath on the head, Warplock Bronze on the mask tubing, Rakarth Flesh on the scrolls, and Mephiston Red on the seals rounded out the base colours.

With the base done, it was time to start layering.


Mephiston Red, although a base paint, was thinly applied to any blood drop gems. Watering it down slightly let it be applied more smoothly, and also gave it a brighter colour due to the underlying Celestra Grey. Ulthuan Grey was brushed onto the wings, although it's there that a bit more work should have been done to cover the blue. As it is, I feel the blue stands out too much rather than acting as more of a shadow colouring. Better brushes would have let me paint individual wing "feathers" to solve this issue, which is something to try next time. Still, it's not so bad, and the tips, also painted with Ulthuan Grey, help give a whiter appearance.

Leadbelcher was applied to any gun or other shiny weapon areas. Again, this is a base colour, but it looks far better when applied over a black coat, so I consider it more of a layer paint. I also gave a highlight of Ironbreaker to most of the same areas.

Nuln Oil was applied to the armour joints, which gave a far better look than trying to highlight the edges. I'll be using this method on future models.
It's not really apparent in the photos, but a tip picked up from a Games Workshop "colour card" (used to show their recommended paints for Blood Angels) helped with highlighting black edges. Eshin Grey was brushed onto the jump pack cabling, and along the gun edges. Black is one of those tricky colours to highlight, and while I wasn't impressed with my first efforts (really must get a better brush soon), I'm convinced that Eshin Grey will be more effective with a bit of practice.

A shade of Carroburg Crimson was given to the purity seals, just to darken them a little when compared to the gems. It was also applied to the axe handle.

Kabalite Green on the wreath finished this stage. The wreath is one of those tricky parts, because it's a fairly minor component, but the contrast of green against the golds and reds is crucial to balancing out the head when compared to the rest of the model.


Above is the next stage of highlights and layering. Blood drop gems were given a watered down Abaddon Black darkened tip, Wild Rider Red highlighted base, and a white dot inside the black to give it that gemstone quality. While this is sometimes effective, I'll probably work on that method come the next model.

A little Runefang Steel on weapon edges gave them a brighter look, after shading with Nuln Oil (and spilling it in the process - darn).

Scrolls and parchment were shaded with Agrax Earthshade, and then highlighted with Karak Stone. During the shade phase, I also made sure to apply a little in the corners where the scrolls meet the armour. This gives a darkened border to a) help those elements stand out, and b) makes the join look more shadowed. It's difficult to describe the difference without better quality photos, but the results are far better this way, and it's again something I'll be doing more of going forward.

A glaze of Bloodletter was given to the shaft of the axe, just because I thought it would look better than all silver. It does. All silver is sometimes abused a little too much, and models can be far more interesting with a subtle change in hue (perfect for glaze work). The axe head was given two coats of Guilliman Blue glaze for that glowing energy look. It's an ok effect, and worked with the Dreadnought, but isn't as effective here. I may give some light blue edge highlights later.

The wings were given a final highlight of White Scar. This time, I tried to carefully paint each "feather", one by one. It worked rather well in the end, and is again something I'll be doing more of in future. While they might appear ideal for drybrushing, I find wings need to be more exact than I can currently to with drybrushing, which is perhaps better suited to armour edges, hair, fur, etc. Or I just need to get better at drybrushing.


Last details (for now) are the pouches, touchups to armour (not visible from these photos), and a bit of colouring to the gun. But first....

The scrolls and parchment were given a final coat, or two in the case of the shoulder pad, layer of Screaming Skull. This turned out quite well, and would likely work rather well with Dark Angel robes. With the wings already highlighted to white, I didn't want the parchment to be as bright and so didn't highlight them all the way to white.

The head wreath was given a final highlight of Warpstone Glow. I might be tempted to mix a little white with that and do another highlight down the track, but I'm happy enough with it for the moment.

The pouches on the model's right were highlighted with Gorthor Brown on the edges, just to give them some form. The right holster, on the other hand I decided was too brown, and something more fancy befitting a Commander would be needed. A thinned down coat of Screamer Pink, followed by a shade of Carroburg Crimson gave it a very velvet appearance, and really does give a much better finish than brown. I did not highlight the edges - instead, I simply made sure the shade wasn't applied there, and gave extra shade towards the centre areas. I haven't felt the need to highlight the edges after that, so that's another trick to keep in mind.

Although not really visible in the photos here, I did end up using small amount of Brass Scorpion on the gun barrel to give it a blasted look. The layer was actually a little too much at first, so I then went over some of it with a very thin layer of Ironbreaker. I would actually blend the Ironbreaker in towards the more blasted areas where possible, ensuring the brass look didn't vanish. The effect is quite reasonable, and I'll be exploring that combination with further models.

So this time a lot of techniques were learned that can be put to good use with future models. This is something you really only get to experiment with from those extra special models, another good reason to not leave them to paint until last.

'til next time.

  -- silly painter