Sunday, December 15, 2019

Blood Angel Intercessor (again)

Told apart from his twin by looking another way.
Another Intercessor from the Dark Imperium boxed set. Still another three in the squad to go, but I'm definitely getting faster at having these guys painted. The practice on this model was just to use some more airbrush.

I've been having some trouble with getting a bright enough red out of the airbrush right now. Seemingly the air reds are a little thinner, and so might take a couple of coats to show through. In this case it was the usual:
  • Mephiston Red / Dryad Bark (1:1)
  • Mephiston Red
  • Evil Sunz Scarlet
Some sharper edge highlighting has been skipped on this model, now that I look back at it. I've been reserving that for special characters and trying to keep everything to a table-top standard, though I think just a little extra Evil Sunz Scarlet in this case would have been useful on the arm. The helmet has received the bulk of brush highlighting, seeing as that would be the natural focus of the model.

Next time I might try a more prominent base coat of Mephiston Red to start with (still have an old spray can of that stuff), darken it in shaded areas with the 1:1 mix, fix again with a thin Mephiston Red, and then finally Evil Sunz Scarlet. I'm hoping for a less desaturated red result. So that's for the next Intercessor, which owing to the holiday season means it won't be for another 4 - 6 weeks.

Still, it has been fun "speed" painting (for me at least) one at a time. It gives me a chance to get airbrush practice in more frequently, and has been a real boost to motivation.

-- silly painter.

Wednesday, December 11, 2019

Blood Angel Intercessor

Here's looking at you.
Not much of a painting update, but rather proof that I can complete a single Blood Angel in four days. This is incredibly fast for myself, and hopefully I can continue on this to clear off some of my pending models.

The relative fast speed is a combination of experience in knowing what colours to use, how they combine, nice brushes, and a wet palette. Not having to spend a long time considering which colours, in what order, really made all the difference though.

I originally airbrushed the model, but that didn't turn out properly. Poor mixing of the paint I suspect, but regardless I had to fix up everything with tried & true paintbrush. This is where the wet palette came in handy - the paints were ready at my disposal, easily thinned, and easily used to correct mistakes. Not having to constantly switch paint bottles saved a lot of time, particularly with the reds.

I did end up using Corax Black for all the of the initial black areas, highlighting with Eshin Grey and Dawnstone, and later going back over it with thinned down with the more traditional black. This works quite well to get the highlighting right, so I'll be following this pattern going forwards.

The eye lenses were also a simple Wraithbone and Waywatcher Green glaze, but despite the menacing look of a Blood Angel clearly starting to fall under the influence of the Rage, I'll switch back to my normal method in future. More tricky, but a better result.

Forwards! To find my head!
Couldn't help myself, and when the opportunity arose to get the Space Marine Heroes 2 set, I did. Also really wanted to play with one while motivation is high. This is imply an initial airbrush highlight, and I'll be going back over the armour to really make it "pop" later on. Of far more immediate interest is the Barak-Nar Burgundy being used on the baltea. I strongly suspect this will soon become a default for baltea, once I've figured out beyond the base colour.

-- silly painter.

Thursday, December 5, 2019

Sanguinary Priest (finished)

Care for a drink?

Espresso machine. Or beer fridge.
There's really not too much to say, this is mostly a showcase of the finished model. Face and hair are largely the same as can be seen with the Aggressor Sergeant, and is something I picked up from a White Dwarf once upon a time. I should perhaps detail what was used one day, perhaps a special on painting faces (though I still can't do them right).
Two things I'm trying however are: don't use pure white for the eye (Grey Seer was used in this case), and use something other than black for the iris. I'm not actually sure what was used here - simply something from the palette, perhaps left over Dark Reaper from some Horus work.

Side note: lighting is a little better for these photos, so the red appears different to previous, but nothing was actually done.

Rear view shows the vials, and how a little brighter line makes them look partially filled. A little 'ardcoat over the top makes them look more like glass as well, but does mute that line (especially on the red).

Yellow cabling was Averland Sunset, a little Agrax Earthshade, and then some Bestigor Flesh. I didn't want a bright yellow, so was looking for other colours and that just seemed to work. I'm not entirely happy with the result, but it's close to what I wanted.

Random note: old Finecast models are horrible to prepare.

-- silly painter.

Monday, December 2, 2019

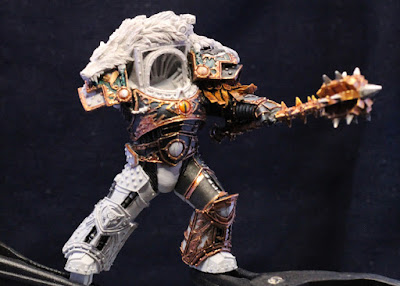
Horus Lupercal (WIP)

Arming himself for the Heresy.


Time for a more dedicated post to continued painting of the Warmaster. There's not a whole lot to actually say - for the most part it's continued with the same as before, just more done now.

As can be seen, the left arm is actually glued into place now. If it comes off then I'll pin it in place; the superglue being used isn't the best batch ever produced.

Last time I was unsure about the studs on areas of the armour. I've ended up with a simple approach of:
  • Leadbelcher
  • Black Templar (contrast, blobbed on top of the stud)
  • Leadbelcher (mostly in the lighting direction)
  • Ironbreaker (fewer studs, in the lighting direction)
So far it seems they aren't overtaking the model in terms of focus, so I'll continue with that method. The use of a contrast paint here helps to really darken things down, and it also pools mostly about the edges, giving a kind of natural shading. Nuln Oil could easily be used as well, but might require two or more applications to get the same effect; contrast is being used as a bit of a shortcut in this case.

The mace ended up using the "Sanguinary Guard gold" approach, which was intentional for two reasons: it again ties back to Horus' closeness with Sanguinius before the Heresy, and also helps to differentiate the weapon from the armour (which is more of a brass or bronze than gold).
  • Balthasar Gold
  • Reikland Fleshshade (gloss; I'd use Seraphim Sepia instead if that came in a gloss)
  • Gehenna's Gold (first stage highlight)
  • Auric Armour Gold (edge highlight)
The silvers were similar to the usual:
  • Leadbelcher
  • Nuln Oil (gloss)
  • Ironbreaker
  • Stormhost Silver
And the rest of the mace grip:
  • Warplock Bronze
  • Castellax Bronze
  • Sycorax Bronze
No need for a shade owing to how small the areas are, but I would use Agrax if I felt the need for a larger piece.
Furthermore, the mace had a little blow dryer done to straighten it out. I wasn't sure if I was willing to risk that, given that it could crack or otherwise damage the paint, but the slight bend was annoying me too much. No damage fortunately, but I really should be more careful in future resin model preparations.

Just because it's good to do a roundup, the armour detail is:
  • Balthasar Gold
  • Reikland Fleshshade (gloss, or normal for deeper recesses)
  • Sycorax Bronze (first stage highlight)
  • Runelord Brass (edge highlight)
With the base colour:
  • Abaddon Black (several thin coats to get this really smooth)
  • Dark Reaper (built up slowly with thin coats)
  • Russ Grey (edge highlight)
The wet palette makes this very quick to do now. It will hopefully show more in future photos; the shadows and white balance easily hide it in most.

There's some small detail on the legs, with light rays being depicted that are normally a different colour to the rest of the detail (at least from most reference models I've looked at). I've been playing a bit with that, so I'll jot down some thoughts in case it goes anywhere:
  • Retributor Armour (too yellow)
  • Liberator Gold (nicer, but still too yellow)
  • Reikland Fleshshade (gloss, helps tone it back)
  • Ironbreaker (kind of drybrushed across the top)
I'll probably fill in the rest of the leg black before deciding whether to stick with that, or redo those areas completely.

Going forward, I've started to black in some of the left leg, and will continue with that until it's completely smooth. I'll likely get the thigh finished first, and then just work down from there. Once the left leg is entirely complete, the same for the right will have to be done. At that point I'm not sure about getting the right arm done, or trying to attach the model to its base. While painting on the base might be slightly trickier, it does help with motivation and would allow me to start harmonising Horus and the base. I've some time to think about it though, so I'll see what I feel like later on.

-- silly painter.

Sunday, December 1, 2019

Sanguinary Priest (continued)

Could just be turtling.
The Sanguinary Priest is coming along, but nowhere near where I had hoped to be by now. It's all the little details really - figuring out how to paint them takes a hefty amount of time.

Oh, and the picture is a little blurred. Rushed the photo, didn't accurately focus the camera.

The metallics are the normal, mostly. Balthasar Gold, Gehenna's Gold, Auric Armour Gold. Shoulder pads have some Agrax Earthshade (gloss) on the wings, which actually works ok. I wanted something different than Druchii Violet, for no particular reason. A little Carroburg Crimson for ornamental chalice handles, but that's not very visible. It was just to give them a little extra colour.

Corvus Black definitely works as an excellent base to highlight from, normally by using Eshin Grey. The more traditional black can then still be used very thinly to darken as required. Need to keep that in mind for future Death Company marines, but the more immediate use will probably be boltgun casings.

Another note is that after continuing with Corax White, and a contrast paint of Apothecary White, this works quite well. It's probably very suitable for future painting of wings (again, something Death Company will have), though perhaps I would mix in just a touch of a blue. The final contrast leaves a colour similar enough to Grey Seer in recesses, and Ulthuan Grey on raised areas, so each of these can be used to fix mistakes later on.

A note on blood in vials: techical paint (Blood for the Blood God) works as a base, but I finally figured out how to create a "level" of blood (i.e the capsule/vial/whatever isn't entirely full): a very thin line of red mixed with white, running along the "top". It really only works for side-on views, but for that it works really well. Perhaps later I'll show this with a photo of the back of the model.

There's a very small strip of rope wrapped around the top of the flask, hanging from the left hip. A minor detail, but excellent to continue experimenting with to get that golden rope appearance. I'm a bit further with that, using:
  • Steel Legion Drab
  • Balor Brown
  • Agrax Earthshade
  • Tau Light Ochre
It could use a little brightening still, but I think it works better than my usual approach of basing with Averland Sunset. Perhaps a glaze of Lamenters Yellow, but I'll hold off on testing that until I find something larger to play around with.

Not shown in the photo, but the green vial on the backpack (presumably some kind of combat drug cocktail) ended up as:
  • Caliban Green
  • Vulkan Green
  • Kabalite Green
  • Kabalite Green / Ulthuan Grey (tiny mix to use as the "level" in the vial).
Rather than try to show the "empty" space in the vial any other way, that was left as pure Caliban Green showing. It's quite a dark paint, so there's no need to do anything else. Only the "filled" space received highlight colours. While somewhat more muted in tone than the neon show in the reference photos, it still gives an excellent contrast to the red elsewhere on the model.

Not much else to say other than new tools that I've been playing around with. I'm getting better at using a wet palette, which really helps to layer blend. Paints don't dry as fast (or at all), and so some mixing can be done to really speed the process up.

Another little tool recently released is the Citadel paint pot holder. Basically a bit of rubber that can hold pots and prevent them from accidentally being knocked over. Invaluable when using shades and contrast paints. It's also useful to stabilise a pot when trying to remove dried paint from a lid. Much easier and faster to use than a 3d printed alternative I have, I can highly recommend getting one.

Final note: I've been slowing doing little bits & pieces of Horus. I'd hoped to have one arm glued on by now, but keep delaying it. Not long though, and I'll prepare better photos then.
Still looking for his armies.
-- silly painter.