Sunday, January 12, 2025

Legions Imperialis - Sicaran Battle Tanks (Part II)


An edgy, colourful variety of tank.

There hasn't been a whole lot of progress on the Sicaran tanks recently, but I did manage to finally get the bulk of the armour finished and an impression of how well the (hopefully) more refined approach would turn out.

Last time it was simply building up Typhon Ash, later mixed with White Scar, to ensure the vibrancy showed through. I think that worked well enough that I'll simply continue with that approach in future. Terradon Turquoise was applied in a couple of coats but managed to maintain some of the shading and highlighting. I could have mixed in slightly more White Scar, but on the other hand the edge highlights here help give the appearance of brighter colours.

After the usual coat of gloss varnish, and before edge highlights, I once again went with Black Legion (Contrast) mixed with acrylic flow improver. I wasn't exactly super careful with it, but neither was I being too messy. I did on occasion (particularly on the top areas of the body near the turret) heaving wash nearly all of it, and then quickly wipe away excess with a cleaned brush. This is much quicker than carefully panel lining, and keeps any staining to a minimum. I wouldn't do this on larger scales, but it worked excellently here.

The main armour highlight colours are Gauss Blaster Green and Sons of Horus Green. Gauss Blaster applied to brighter (normally upward facing) edges, Sons of Horus on others but also layered over Gauss Blaster to pull back some of the brightness and help tie everything together. I also mixed the two colours together basically as I felt like it, wanting edges visible but not trying to cosplay as a Tron character. I think so far it worked, even though I'm aware the matt varnish later will tone it back.

Black Legion (Contrast) was used to cover the tracks and black armour panels because of its good coverage and ability to be applied over gloss varnish. The armour panels still had Eshin Grey and Abaddon Black blended together over them - and none of this has been done on the turrets yet. The tracks I was unsure about. I wanted them darker, metallic, but also dirty and distinct from the armour panels. I also didn't want to spend weeks on them. Ultimately it was as simple as Iron Warriors in a couple of layers (this does not have to be completely smooth, just a couple of rough coats) and then Ratling Grime (Contrast) over the top. The Ratling Grime I researched and bought specifically to try this out with - and I'm intending to use it elsewhere for oil stains, or general...grime.

That brings the tanks to their current state. The weapons need blacking and metallics applied, and the housing on the turrets for the weapons will probably be black as well, which is why I didn't bother to highlight those yet. There are a few viewports that need picking out, lenses, other small details - all over which is going to take time. I'm definitely spending more of that on these particular models compared to the Rhinos, but these are also centrepieces. Also I couldn't decide on the turrets, so I'm painting them all - meaning four tanks, but eight turrets in total.

-- silly painter.


Sunday, January 5, 2025

Captain Karlaen Kitbash - Part II


That Carnifex is....hammered.

Continuing to paint up various works in progress as I'm inspired as resulted in some paint applied to the Captain Karlaen kitbashing effort. The red I airbrushed at the same time, and in the same manner, as the recent Praetor - mostly to avoid wasting too much paint, but also to confirm the result with a second model. Not much to say about the result which hasn't already been covered. Then I was watching a random YouTube video, by The Feral Painter if I remember rightly, and was inspired to paint the head of the vanquished Carnifex.

Painting the base would allow me to attach the model completely and keep it on the painting handle, but I'll mention now that I could have waited longer to get the cape finished first. It will be more difficult to access that now, but I figured difficult doesn't mean impossible, and with the top icon having snapped off twice already then I was eager to get the model assembled and more easily handled.

Back to the base, the initial black primer was done before adding Armageddon Dust around the edge, and then a quick dusting with Wraithbone primer gave what I thought was a solid foundational colour for just about everything. I then used a simple base coat of Wraithbone out of the pot to give more even coverage over the Carnifex head. One thing I have noticed: the pot version is a very subtly different colour, a little more saturated compared to the spray primer.

In the most basic overview for the fleshy areas:

  • Wraithbone over everything.
  • Baneblade Brown painted into shaded areas, mixed with the previous colour to blend as necessary.
  • Druchii Violet thinned with flow improver (or Lahmian Medium, or just water) and glazed over everything. Try to avoid it pooling too much, and use a second pass in the deeper recessed areas.
  • Volupus Pink thinned with Contrast Medium and glazed over the lips, some of the prominent fleshy sections, and any apparent wounds.
  • Wraithbone layered to highlight areas again as necessary. I used much more on the rib-cage in the hopes of giving a more rigid look compared to the varied browns, pinks, and violets on the head.

The carapace in turn is:

  • Naggaroth Night / Black (1:1 ratio) over the carapace. I did leave some places with only one coat to give variation, but for the most part two coats.
  • Naggaroth Night thinned and layered to build up basic highlights. None of the typical carapace lines are done yet, this instead informs where they might go later.
  • Naggaroth Night / Dechala Lilac (1:1 ratio) to start edge highlights and building up some of those carapace lines.
  • Dechala Lilac to build up extreme highlight points, and make some of the carapace lines more prominent. A little water goes a long way to build this up in layers and blend it together.

The usual disclaimer applies to all of this: there's a lot of going between the stages to fix, blend, rework, and adjust while painting. It's not a one step, then another, then another, then done approach: everything was on the wet palette and I pick and mixed as I wanted.

The blood and entrails I used Flesh Tearer's Red for, but I'm not sure it's quite suitable. I might adjust the colour with a little more purple later. Carroburg Crimson in the eye to outline that, however it still looks partially alive. I might use a blue to darken it later.

I'm not done with the base yet. There are details such as the teeth to fill in yet, and the ferrocrete (or whatever it is) could use some more attention. So far I'm happy with how this model is turning out, and I do have a spare Tyranid model somewhere that I could practice this scheme on - just that I'm not in any particular hurry to start on that model. Yet. Cheers to The Feral Painter for the ideas here.

-- silly painter.


Wednesday, January 1, 2025

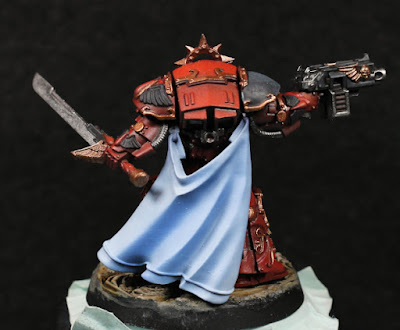
Blood Angels Legion Terminator Praetor - Part I


The new turnip-head helmet design.

To start the year off I thought I'd go with a model that's been sitting in the background for a while. I've actually already painted up the head because it's difficult (nearly impossible) to put in place once the body is fully assembled, but painting the body before full assembly would leave gaps. The solution was therefore to paint the head, glue that in place, glue the body together, and then mask around the head with a lump of blu-tac. Touching up around the head will need to be done later but should be relatively easy to do.

I was originally thinking I would paint this model up by hand instead of using the airbrush, but while that would most definitely look amazing, I eventually decided the time was better spent on experimenting on how to use the airbrush to give brighter highlights for Blood Angels. That's been a problem I've had for some time: there's not been enough difference between shadow and highlight regions and the models look kind of flat.

To start with I applied the usual base coat of Dryad Bark and Mephiston Red in a 1:1 ratio. Following that was pure Mephiston Red, and then Averland Sunset. I probably overdid the Averland Sunset too much and at least here it makes the pure Mephiston Red step a waste of time. I built up the Averland Sunset in a few layers to give smoother transitions and prevent overt speckling, but it also meant I covered up all of the pure Mephiston Red by accident.

I could alternatively have gone back to Evil Sunz Scarlett here, but using Averland Sunset has a particular benefit: I can see where the highlights will be before everything is unified. I can get lost in the transitions too easily when sticking to reds and that's part of what makes me lose track of the difference between shadow and highlight. I'll revisit this again one day when I'm more comfortable with trusting the process.

Wait, aren't I supposed to be red?

Knowing that the later filter will pull back the brightness, I decided that Averland Sunset wasn't high enough in value. I didn't want to add a brighter yellow as that would just look orange. Instead I had the cunning plan of adding another colour to brighten and desaturate the Averland Sunset while still staying clear of being too close to white. I've been using Typhon Ash recently and was familiar with its properties, so I ended mixing that with Averland Sunset in a 1:1 ratio and applying to make a few areas just that more bright. It's probably worth keeping the previous Averland Sunset step, however it's also likely a good idea to experiment with building up layers of this mix directly. Fewer steps means a faster turnaround time on the base coat and highlighting process, and that would benefit painting up squads.

Ah, that's more like it.

Using Blood Angels Red (Contrast) through the airbrush in multiple thin glazes gives a very saturated end result that I think is overall an improvement. There is of course a gloss varnish to help with recess shading, and when the matt varnish is applied there will be some loss of vibrancy, but I'm hoping edge highlighting will help trick the eye into restoring some of that. Evil Sunz Scarlett is still ever so slightly more vibrant, so I guess the next test might want to increase that pre-glazing highlight level even more to compensate.

There are enough other models in the works that I should find a test subject for all that I've learned here. As for this one, it's time to think of getting a base sorted before I proceed too much further.

-- silly painter.