Monday, May 24, 2021

Painting Blood Angels - Part II

 Welcome to part 2 of this list of how I paint Blood Angels. This is the details section, and there are quite a few, it's a bit of a wall of text again. I'm also not really listing things in any particular order.

Let's dive in, starting with purity seals.

I didn't want a contrasting colour for purity seals, otherwise it might detract from the eye lenses of the helmets and unbalance the model. Instead I went for a darker pink for the wax, and faded white for the parchment. 

Wax:

  • Screamer Pink.
  • Drakenhof Nightshade, around the inner circle and outer edge where the wax meets armour (or weapon).
  • Pink Horror on prominent areas.
  • Fulgrim Pink for spot highlights.

Parchment:

  • Steel Legion Drab.
  • Ushabti Bone, thinned down, and on about 80% of the parchment, focusing on raised areas.
  • Agrax Earthshade, but don't allow it pool heavily.
  • Pallid Wych Flesh, thinned as well, and applied slowly to blend everything together.
  • Black, either paint or a better yet a fineliner pen. Those pens are really great for this sort of thing.

That's for paper, but sometimes there's carvings on armour to look like paper or parchment:

  • Zandri Dust.
  • Seraphim Sepia
  • Karak Stone, leaving some of the recesses alone.
  • Ushabti Bone, leave even more areas untouched.
  • Screaming Skull for edges, but thinly built up so as not to be too strong of brightness contrast.

For bone carvings I use something subtly different just to make it stand out from parchment appearance:

  • Zandri Dust.
  • Seraphim Sepia.
  • Ushabti Bone on raised areas.
  • Screaming Skull as a secondary highlight, covering fewer raised areas.
  • Pallid Wych Flesh as an edge highlight.

Chestpiece Aquila:

  • Corvus Black
  • Dark Reaper, slightly thinned, and across roughly half of each "feather".
  • Russ Grey, slightly thinned as well, and across about one quarter of each "feather", but pulling the paint to the tips.
  • Nuln Oil, or watered down Abaddon Black applied directly in recessed areas.

Although only the "feathers" are mentioned, I generally apply the above to all of the symbol (usually a skull centrepiece). The trick is really using Corvus Black at the start because it allows further darkening later to hide mistakes and give a really good depth to an important focal area.

For Death Company it's a little different:

  • Morghast Bone.
  • Skeleton Horde Contrast.
  • Agrax Earthshade applied directly into recessed areas to give more depth.
  • Ushabti Bone along edges, and about half of each "feather".
  • Screaming Skull as final edge highlighting, and the tips of each "feather".

Crux Terminatus, although being done before Contrast paints were a thing, this might change in future:

  • Mechanicus Standard Grey
  • Dawnstone over raised areas.
  • Nuln Oil over the whole area, but not allowed to pool heavily. Just want it to settle in deeper areas to give a good outline of the details.
  • Russ Grey as an initial highlight.
  • Fenrisian Grey as a secondary highlight, but on the skull icon in the middle.

Actually the above is also quite good for general stone, which is often seen on shields.

Wreathes:

  • Caliban Green.
  • Moot Green along leaf edges.
  • Drakenhof Nightshade (yes, a blue shade, not a green one, because blue is a good shading colour against green).
  • Sybarite Green edge and trim highlights. It's this last step that really brings it to life.

Helmet Lenses:

  • Caliban Green.
  • Warpstone Glow, maybe 2/3 of lens, pulled toward the centre of the helmet.
  • Moot Green, about 1/3 of the lens and pulled toward the centre of the helmet.
  • Coelia Greenshade around the edges. This needs a pretty fine brush, but if too much gets in the way just wash the brush and use capillary action to draw it out.
  • Nuln Oil in the corner of the lens opposite the highlighted section.
  • White Scar, applied as a dot just on the edge of where the Nuln Oil has dried (the wash should be completely dry of course). A really, really fine brush tip helps here, and a little Lahmian Medium mixed in can help prevent the paint from drying too quickly on the brush before it gets to the model.

Utility Pouches:

  • Corvus Black.
  • Skavenblight Dinge, either drybrushed or painted to look like scratches and worn edges.
  • Stormvermin Fur, applied over the previous step buy as smaller scratches.
  • Nuln Oil or watered down Abaddon Black (I often have that on the palette) to tie it all together, normally leaving edges alone. Black Templar Contrast is also good for this.
  • Leadbelcher on clasps.

Sidearm Holster:

  • Rhinox Hide.
  • Sylvaneth Bark drybrushed over edges and raised areas. Using an old, small, brush for this is useful.
  • Lamenters Yellow over the whole area. This paint is no longer available, but maybe Iyanden Yellow thinned down a lot would also be suitable.
  • Bloodletter over the whole area once the previous step is dry. This paint is no longer available, and at the time of writing I haven't looked into the red and orange Contrast range enough to make a judgement. Maybe thinned (a lot!) Blood Angels Red Contrast could be used.
  • Agrax Earthshade kind of glazed over the middle areas, applied more heavily around recessed areas or to outline specific points of interest.
  • Leadbelcher on the clasp.

An alternative for Death Company offers more a red tone. It doesn't quite work on normal troops, for which the more brown of above is more suitable.

  • Zandri Dust.
  • Screaming Skull to add scratches and patches of wear. This should be quite a strong brightness contrast to make sure it's visible in the next step.
  • Gore Grunta Fur Contrast over the whole area, but applied sort of like a heavy glaze. Don't want it to pool too heavily.
  • Agrax Earthshade in recessed areas, or anywhere that should be darker.
  • If there's a cap on the end, treat it the same as a utility pouch.
  • Leadbelcher on the clasp.

Chainsword Handles, usually not very visible:

  • Doombull Brown
  • Tuskgor Fur on raised sections.
  • Carroburg Crimson over all of it.

Golden Rope:

  • Steel Legion Drab
  • Balor Brown highlight on all raised areas.
  • Agrax Earthshade across all areas.
  • Tau Ochre Light across raised areas.

Psyker Weapon Metallics (ok, not usually seen on troops, but I wanted to note it down anyway):

  • Balthasar Gold
  • Reikland Fleshshade Gloss in the more recessed areas.
  • Runelord Brass as a first stage highlight (normally after any varnish spray).
  • Sycorax Bronze as an edge highlight.

And finally, to wrap it up, Blood Angels have many gemstones on their armour. If it's directly on red armour, I'll typically use purples, but I appear to have lost that particular combination. It might have been:

  • Naggaroth Night
  • Xereus Purple highlight.
  • Genestealer Purple second highlight.
  • Abaddon Black shading.
  • White Scar reflection dot.

Red gemstones however are often found on the Blood Angels heraldry, the chapter symbol on their pauldrons:

  • Mephiston Red. Keep this around on the palette.
  • Abaddon Black across about one third of the gemstone from the direction of the light source.
  • Wazdakka Red across about half of the gemstone away from the direction of the light source.
  • Evil Sunz Scarlett across about one quarter of the gemstone to highlight the previous step.
  • Wild Rider Red as a sort of edge highlight of the previous step.
  • Mephiston Red thinned to glaze consistency is often used here to blend everything together and give it more of a red tone if it's otherwise too orange.
  • White Scar reflection dot, normally about half way into the black area.
  • After any varnishing, a layer of 'Ardcoat is applied to give the gemstone a glossy finish.

And there we have enough to cover most of the Blood Angels models I've painted, and pretty much all of the troops. There might be little details on specific models for which I'll make up something on the spot. This should provide a good basis for army painting at least, and will continue to serve as a personal reference.

-- silly painter.


Monday, May 17, 2021

Painting Blood Angels - Part I

 Instead of the usual post of a work in progress of a model, this time I thought I'd start a summary of the steps I take to paint Blood Angels. These are for line troops, not special characters, but the formulae can be applied to most models anyway.

I intend to make this a two part post, after which I hope to have finished these Assault Intercessors and then move onto something new.

Armour

To begin with then, perhaps rather obviously, is the armour. Red. This is something mostly unchanged in the paints used since I began painting again, but has been tweaked and adjusted in how I do it, and probably will be modified more in time. I also almost always use an airbrush for this now, but the same can be done with a normal brush for more exacting highlight control.

  • Black Primer. I use Chaos Black from Citadel (actually all the paints listed here are from Citadel because they're easiest for me to obtain). A dark grey might also work, but really anything dark so as to make shading a bit easier.
  • Mephiston Red / Dryad Bark (1:1) (Air). I spray this over the entire model in an even coat. It might take two coats in places, but I normally find one sufficient. I have a pre-mixed bottle of this ready to avoid needing to mix it every time.
  • Mephiston Red (Air). This is sprayed over most of the model. Some deeper recesses or heavily shaded areas (or areas I just want some gradient to show) are left alone.
  • Evil Sunz Scarlett (Air). Highlight step mostly from above, but not really following the laws of physics when it comes to light. Models are painted for show, so a little artistic expression helps to do this. Mostly on the should pads, chestpiece, base of the feet, tops of the arms, tops of the backpack, that kind of thing. For helmets I do this step on the front face area. This may not always fit light sources, but it really draws attention to the helmet and makes it stand out.

That's really all for the airbrush. It's taken a bit of practice to get it how I want, but the results are much quicker than with a normal brush, and some very nice highlights can be done.

On with the normal brush, I keep the non-Air versions of all the above on my palette for the next steps. Sometimes the airbrush goes places I don't want and need to pull back highlights, or increase them in others, mostly by just glazing as appropriate.

  • Crimson Carroburg used for recess shading. Directly applied to recessed areas to help outline them. If mistakes are made, they can be corrected later.
  • Wild Rider Red for edge highlighting. Not every edge needs to be done, and this is a case of just getting a feel for it.
  • Evil Sunz Scarlett very thinly glazed over the previous step. I find strong edge highlights make everything a little too neon in appearance, like it belongs in Tron, so I prefer to tone down edges that are too bright. Glaze consistency is key.

And that's about all for red armour. Red isn't the only colour for Blood Angels armour however: helmets can be red, blue, yellow, or gold, there's all gold armour, and there's black for the Death Company. All of this follows the same techniques as above, but with different colours.

For blue armour:

  • Kantor Blue (Air)
  • Macragge Blue (Air)
  • Drakenhof Nightshade (recess shade)
  • Caledor Sky (edge highlight)

For yellow armour:

  • Averland Sunset (Air).
  • Flash Gitz Yellow (Air).
  • Phalanx Yellow (Air).
  • Casandora Yellow (outline areas).
  • Fuegan Orange (deeper recessed areas).
  • Dorn Yellow for extreme edge highlights.

For gold armour I'm still getting that sorted with the airbrush, but likely it will follow the steps used recently on the Sanguinor. For now though:

  • Balthasar Gold
  • Seraphim Sepia as general shader, mostly in recesses. Removes metallic shine, but that's fixed up later.
  • Gehenna's Gold for an initial highlight. It's best to do this after any varnish has been applied.
  • Auric Armour Gold as trim highlight.

For black armour I'm again still experimenting with the airbrush but it should mostly follow the same steps as with a normal brush:

  • Corvus Black over all the the armour. This colour is hinted more towards grey anyway, so highlighting is much easier to perform from here.
  • Eshin Grey as initial highlight.
  • Dawnstone as edge highlighting.
  • Abaddon Black, thinned down to glaze consistency, over the previous steps to tie it all together. This can be done with an airbrush too, but more selectively applied.

Black trim on armour is done exactly the same as described above, but with a normal brush. 

Weapons

For the most part, weapons for Blood Angels have black casings. This is painted exactly the same as the steps above for black armour. The difference comes in with the metallic components:

  • Iron Hands Steel over the metal areas. This is a darker metallic, and great to build up from.
  • Nuln Oil over the previous step. This will remove any shine, but that's ok.
  • Leadbelcher thinned a little and used as a highlight. This will restore shine, but be careful to leave the recessed areas alone.
  • Ironbreaker for edge highlighting. This can also be thinned substantially and applied after any varnish step to restore the metallic shine of those areas, which is something I normally do.

I rarely do any further highlighting beyond this point, but on the odd occasion I might use Stormhost Silver or Runefang Steel if I really want a bright edge.

The handles of special weapons, and maybe chainswords in future, is very simple:

  • Doombull Brown over the handle.
  • Tuskgor Fur to highlight some areas.
  • Carroburg Crimson over the entire area.

Chainswords have an engine cover that I'm going to start doing differently, following usage on the Death Company Assault Intercessors:

  • Screaming Bell base.
  • Reikland Fleshshade Gloss. The gloss doesn't apply as strongly, which I find useful on occasion.
  • Hashut Copper as highlight after any varnish has been applied.
  • Fulgurite Copper as a final edge highlight.

Varnish

I do varnish my models, using the old Purity Seal from Citadel. Metallic steps I complete after this, to restore their appearance, as noted in places above. Sadly Purity Seal is no longer available, and I think a more satin finish is used on the replacement, but I'll find that out when the spray can runs out.

Next Time...

Next time I'll give a rundown of various details: purity seals, gemstones, eye lenses, etc. Steps given here will cover most of the model, but details end up taking just as long - and are equally as important.

-- silly painter.


Sunday, May 9, 2021

Tau Pathfinder (Showcase)


Finding a path...to becoming cannon fodder.

As a quick experiment I decided to use some paints normally not used and paint up a Tau that I had lying about. I have some more too, so might use them for playing around with rarely used paints in the future as well.

The model was painted with a Corax White spray to start with. I wasn't the one who did this, so I can only assume it was Corax White (it looks very similar).

The paints in question were:

  • XV-88 on the armour areas and weapon.
  • Fuegan Orange as a recess shade.
  • Tau Light Ochre for initial highlights.
  • Bestigor Flesh for edge highlights.

The XV-88 doesn't work with the other layer paints. It isn't a good base for layered blending, and I had real trouble with it. On the weapon it's not so bad because of the smaller surfaces, but the helmet was real troublesome. The layer paints would likely work better with Averland Sunset as the base paint, but keeping XV-88 on the weapon would make the weapon appear a little more separate to the armour.

The garment was quite simple:

  • Basilicanum Grey over the entire area.
  • Druchii Violet in some recessed areas.

And that's it. The Basilicanum Grey actually has a subtle purple tint anyway, so the shade just exaggerates that and makes it look a lot less like stone.

Blue tau skin:

  • Kantor Blue over all the skin areas.
  • Sotek Green to highlight.
  • Temple Guard Blue as a final highlight.

A few other little bits & pieces for show, but I didn't go all out on this model. It's not for show, just for play, so I saw little point in giving it quite the same attention to detail as with the normal models I do.

Back to the Assault Intercessors, who won't be finished in a week, but I should have more to show by then at least.

-- silly painter.


Monday, May 3, 2021

Blood Angels Assault Intercessors - Part I


Assault Marine, looking for Apepper Marine.

With very limited time to paint these days, I've had some Assault Intercessors plodding along in the background for a while. I'm batch painting five of them, which is actually easier to do right now compared to a single model.

When batch painting I like to tag sub-assemblies in order to more easily track which part belongs to which model. Normally this is done with markings on various sticks the pieces are glued onto, but here it's easy to see another way: Roman numerals on the base. they will be painted over later on, after everything is finished enough for complete assembly.

The airbrushing stage I had done with one paint at a time, on different days. The steps are still the same (and I really should do a post summarising everything I do for Blood Angels) just in shorter bursts. This meant that the airbrush was well cleaned between paints, and each model actually received more overall attention because I wasn't fatigued by the end. So the airbrush quality on these is one of the best I've done so far, and I think I'll try repeat it again whenever I get to the next set of models.

The helmets have been finished and all glued in, and the armour (including backpack) fully edge highlighted. I did a little more edge highlighting than previous models, just feeling like this time I could get away with it. Here's where batch painting was strangely easier for me.

Sometimes I might have a ten minute window to paint in. That's not much, and getting paints out, setting up, and any clean up, would take just about all that time. Wet palette to the rescue. By having the main reds already on the wet palette, I can just pick up a brush and start painting. Any small mistakes are fixed up as I go, and if an edge highlight is too bright I can tone it back slightly - all the paints are right there on the palette, and it saves just so much time. The shading step was almost the same, just keeping the pot handy and directing the shade directly into recessed areas. Knowing exactly what I want to do, a wet palette, and I'm still making progress: slow progress, but progress nonetheless.

I do like the looks of these models. Different poses to the Death Company models done prior, and obviously different colours, but the same basic design that really works. Also, I quite like how the models have a hexagonal attachment component to the bases. That helped to paint the bases and then glue the model in place. Some minor touchups will need to be done later, but they should hold very securely.

Now I just have to keep on painting.

-- silly painter.


Saturday, April 24, 2021

The Sanguinor, Exemplar of the Host - Part IV (Showcase)


Battle plan? Just wing it.

Technically the model isn't finished yet, but enough is done to showcase the Sanguinor, Exemplar of the Host. The backpack exhaust glow is yet to be done, but that's nothing visible in the photo.

Taking a lot longer than expected, there are numerous little problems with this particular sculpt. Most of that is down to finecast being finecast: rounded surfaces aren't round, little holes here and here, pieces that don't quite fit together properly. The sculpt itself is a little disproportionate in places too (pauldrons are too large for the arms, the backpack itself is at least twice the depth of the model, if not more) and honestly I didn't have the best time painting it. I do appreciate going for something different however, and the Sanguinor has certainly become an iconic character.

Strangely I don't want a plastic updated version of this. Not yet. The current styles just aren't a good fit, and some kind of horrendous to assemble model on a flimsy base would result.

As far as painting goes, I'm happy with the wings. The armour icons were highlighted up to White Scar, where as the wings never had that step. It helps to separate the two - the wings aren't actually wings, but aren't quite the same as the shoulder pad adornments either.

The halo does a fair job of framing the model without taking too much attention, the gemstone colours mix it up a bit to keep it from being boring. The chalice in particular works nicely with silver-blue edged in gold, purple gemstone around the cup and red on the base.

The sword I did a small experiment on. It was first given a type of shading with metallics to show dark/light contrast in areas, all then given a very thinned coat of Aethermatic Blue. It didn't quite work out, but I'm convinced it's worth exploring further. The "power glow" highlighting wasn't quite right, and the Aethermatic Blue was thinned a little too much, but with a bit more practice it holds some promise. I won't do the "power glow" with this method, but I'll balance somewhere between here and what was done for Mephiston.

The base could use something else, but I'm not sure what and so I'll just leave it. It's not bad, just uninteresting.

Fineliner pen on the scrolls was incredibly useful. Can't recommend that enough. I use a 0.03mm tip, and don't really want anything larger personally. Not for scrolls and purity seals at any rate. Just be sure to let it dry for about two days before covering it with a varnish; it must completely dry or it will just smear at the slightest brush pressure.

-- silly painter.


Sunday, April 11, 2021

The Sanguinor, Exemplar of the Host - Part III


An excellent jump, or very, very stiff scrolls.

Before I get started on this post proper, a couple notes regarding the coming weeks and likely months. I've encountered some difficulty in time scheduling of sorts, and will have much less time to paint. This is undesirable, but I do want to continue and find a way to keep up the pace. I'm rather committed to writing something every week as motivation, but normally I would have finished this entire model by now. Only very little has been done.

Not to worry though. I see this as simply another opportunity to improve my painting skills. Traditionally I would spend a long time painting by being very careful with each stroke of the brush, or contemplating the next colour to use, how it would all match together. This means I can paint a standard Blood Angel in a few days - the contemplation is done, the method is known. Next I need to work on finding a way to actually put paint to model quicker: cut down on any time spent just staring at the work and instead just "do". This should allow me to be far more efficient in using the painting time I will have, and keep up the painting pace.

Anyway. A little progress. I've decided to glue the backpack on. Painting was rubbing off when trying to handle the main body, and just enough was painted to not get in the way later on. Everything is being done as normal (and I really should do a summary of all that in one place soon), which means the parchment isn't far from being done.

The wing icons are so far Celestra Grey, Apothecary White Contrast, and some finely placed Guilliman Blue. There are a couple steps left, probably Ulthuan Grey and some White Scar as edge highlighting.

I still need to add a little more shading in a few key areas of the golden armour, a few dots of highlight, and need to repair the halo before getting to more metallics.

Guess I'll see how much I can get done by this time next week.

-- silly painter.


Monday, April 5, 2021

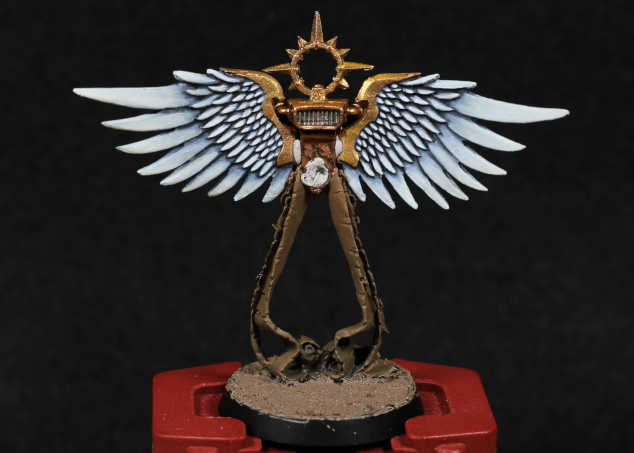
The Sanguinor, Exemplar of the Host - Part II


Spread your wings and fly.

Another shorter, not much progress post. This is more of self-reflection on how a lot of time spent on something can give diminishing returns, and might not be required in the end at all.

The wings for the Sanguinor are actually ideal for Contrast paints. An appropriate base coat, a coverage of some Contrast, perhaps a directed shade or separate contrast, and then a highlight. The only part that would take any real amount of time in that approach would be the final highlight - quick, effective, additional highlights if really demands a little more.

Of course, that's not what I did. Mostly because I don't have suitable Contrast paints.

Instead, I used the traditional base, layer, wash, layer layer layer approach. It was incredibly tedious and took a week to get done. I'm still not finished - I might add some pure white highlights later on down the line, if the wings look darker than they should.

The most time consuming part was painting each individual "feather" one at a time. The smaller ones are ok, but getting the blending right on the larger ones takes multiple very thin layers of each paint. Recipe in the end:

  • The Fang as a base layer over all feathers.
  • Nuln Oil liberally covering the entire area next.
  • The Fang to neaten up from the previous step.
  • Russ Grey over most of each feather next. Only really the base of each feather, and the immediate "outline" of each was left from the base coat.
  • Fenrisian Grey next, same approach but leaving a little of the Russ Grey showing. For the smaller feathers this was barely anything at all.
  • Ulthuan Grey follows, and this step really took a long time. Being very bright, very desaturated, it needs applying in multiple thin coats - four or five for the larger feathers, only a couple for the smaller ones.

If the above ends up not being quite bright enough, then White Scar will be added later on. I don't intend to fully blend that into the larger feathers, instead applying it in thin lines to make them look more organic.

I'm happy with the colours. Nuln Oil over a white just never quite sits right - it ends up being too grey, and is far too unnatural for feathers. A hint of blue, or blue-grey is far more suitable, and the "Space Wolf" paints works nicely enough for this purpose. Just took far too long, and if I had to do this more often I would definitely look into more Contrast paints instead.

-- silly painter.