Sunday, October 23, 2022

Azrakh the Annihilator - Part II


Shiny Shoulder Skull

After some experimentation I've managed to come up with an approach that I think works well for my spin on the model. The sheer amount of trim means the NMM is going to take an extraordinarily long time to complete, but as it turns out the majority of the model is red, yellow tinted trim, and grey/silver areas. It's actually a more limited palette than I might have used coming up with my own scheme, which might help nudge progress along every now and then.

I don't intend to get it done in one go. Just work on little pieces here and there over time while getting other models done. The initial experiment is rather obviously on the shoulder pad, and from there I'll just work my way around the model.

The red I had planned before, but the mix of a brown to create shadows simply wasn't working and so I switched that out with black instead. The final mix is thus:

  • Khorne Red base coat.
  • Agrax Earthshade around all the recesses. This will create a fairly thick line around the edges which is just what is wanted.
  • Khorne Red / Abaddon Black 1:1 and glazed into the shadows. Actually the mix can be worked with some more - 2:1 to start with, move to 1:1, 1:2, etc. Glazing or mixing paint on the palette is rarely so precise.
  • Abaddon Black in the recesses, applied as a thin line around all the details to give extra definition.
  • Khorne Red / Evil Sunz Scarlet 1:1 and glazed into highlights.
  • Evil Sunz Scarlet glazed further into highlights.
  • Evil Sunz Scarlet / Wild Rider Red 1:1 glazed very thinly onto extreme highlights just to give even more contrast.

There is a lot of back & forth between all those steps, and a lot of glazing involved to try and get smooth blends. Even now I might go back with Khorne Red in some areas to soften the transitions a little bit more. This approach is not for competitions, and definitely not for tabletop standard. For me, it's essentially for relaxation - I don't have to worry about all the steps to get the model done, it's just something small, limited palette so I'm not swapping paints out very often, and I can just take my time.

The brass trim I've shamelessly taken from Juan Hidalgo, specifically here:

https://www.youtube.com/watch?v=NJiYKAZPswo

I've not repeated all the steps, and I'm leaning towards giving it a thin glaze of yellow for saturation, but otherwise I just followed the formula. In short:

  • Baneblade Brown as a base coat.
  • Ushabti Bone to sketch in higlights.
  • Zamesi Desert / Ushabti Bone 1:1 to soften the transitions some.
  • Baneblade Brown again, glazed to soften transitions more.
  • Gorthor Brown glazed into shaded areas.
  • Gorthor Brown / Abaddon Black / Lupercal Green in a 1:1:1 mix and glazed into deeper shadows.
  • Zamesi Desert / Ushabti Bone 1:1 to highlight the edges.
  • Ushabti Bone to highlight the brighter edges.
  • Ushabti Bone / White Scar 1:1 for the brightest edges.
  • White Scar for final point hightlights.

There is again an lot of mixing on the palette, and it helps to apply in very thin glazes. It takes time. Zoomed in with a camera it also looks horrible, but I suspect that's the lighting at work on the sensor - it looks far better in reality.

I intend to glaze Iyanden Yellow on the central icon to see how it goes. If I don't like it, then it can be fairly safely ignored and I can carry on without it for the rest of the trim. It's going to take months probably to finish, but it will look amazing when done.

No post next week, as I'll be travelling. And after that there's more travel, so posts will very likely become sporadic over the next two or three months.

-- silly painter.

P.S - Iyanden Yellow on the skull looked wrong, but Lamenters Yellow very thinly applied over the brighter highlights works well enough.


Saturday, October 15, 2022

Operative Umbral-Six - Part II (Showcase)


You can't see me, I'm hiding.

I'm calling the model done, despite there being nothing added to the base, and despite it being a little more bland on the assassin then I'd normally be happy with. The motivation here wasn't Umbral-Six, but instead the statue they've setup camp inside of.

I was originally going to try some OSL from below, but decided against it because the statue looked too nice to be so easily ruined. Instead I concentrated highlighting from that direction in general, leaving much of the rear darker (happily also meaning I didn't have to spend as much time painting that). I could have spent more time pushing or dulling highlights, but again motivation was in the way and I'm happy enough with a tabletop standard here.

I unfortunately didn't keep much in the way of notes about which paints were used. That's just part & parcel of considerable disruptions right now - I take what opportunities to paint that I can, and anything that's taking time away from that I kind of just don't do. This is a bit of a shame, but also not terribly important in this case: I don't really have any inclination to replicate the model, and so no need to replicate how I painted it.

There is perhaps one exception: the gun casing. That started out with Stegadon Scale Green, and I thought to build it up as a very dark aqua of some kind. Mixing a little dark blue (Night Lords Blue) for shadows, and some Celestra Grey (just happened to be on the palette) for highlights, I later realised the casing looked far too blue. I was painting the assassin separately from the statue, and putting it together resulted in the gun clashing far too much with everything else. The contrast against the gold was inharmonious, and it was very confused against the green tones of the statue. It was simply wrong. In thinking of how to fix this, I remembered the old glaze paints - Waywatcher Green in particular. The glazes were great for shifting colours, and while the Contrast range can do the same thing, I didn't have an appropriate colour there. Two thin coats of the glaze shifted the casing colour into green nicely however, and made it much more coherent with the verdigris. The assassin no longer quite so confusing to the eye.

With this model done, I would normally consider the tally to be 11, however I've just bought Jain Zar and so the tally is back down to 10. The free Warhammer+ model recently is already factored into this, but I might take a double just be certain I haven't forgotten something, so I'll make the tally 9!

-- silly painter.


Sunday, October 9, 2022

Azrakh the Annihilator - Part I


Giving someone the finger...with a chainsaw.

After some time away (and a nasty cold still ongoing) I'm finally back to some painting. I decided that I didn't have enough models on the go and started working on Azrakh the Annihilator, simply because it doesn't have much in the way of sub-assemblies, and it's something different. I doubt I'll finish this model very quickly, but it might be just a case of doing a little as I get motivation.

I decided not to use the airbrush here. The trim makes up half the armour anyway, so the airbrush would be of limited value in applying highlights, and the more precise nature of a normal brush would allow me a level of control that I like to use on more special characters. Even so, I perhaps should've done that one base coat of Khorne Red with an airbrush - it took about four thin layers to get a smooth finish, and took far too much time!

I've decided to go with the box art on this model, itself which is based on the original MG artwork. There are particular reasons for this: I want to try my hand at NMM again, and the box art provides an excellent reference point - I say reference, but I fully intend to just copy it. This raises a discussion point that I've seen before: is it ok to simply copy the box art? Yes. I'm not portraying this as my own original work, it's not being entered into any competitions, and it's solely for my own enjoyment. I'm not particularly interested in custom colours and all the colour theory effort behind that either - the model is based on (2D) artwork, and the whole appeal for purchasing this model is to bring that artwork into a 3D representation. The colour planning has been done, the mood of the model has been set, and examples are provided. I want to learn more NMM, and while determining where bright points go is part of that, there is also the topic of which paints to use, experience in blending properly for the effect, and even how to take photos to show it off. I'm still the one applying the paint at the end of the day, so copying the box art is, in this case, entirely ok - all the style hard work as been done and far better than I could do, so I'm going to use that work to more quickly paint up the model. Again, so long as I don't misrepresent it anywhere, it's all fine.

On such topics as which paints to use, the basic red on the armour I intend to shade with a brown, and possibly mix one of the browns with Khorne Red to glaze into shadowed areas. I normally highlight with Wazdakka Red initially, but not yet sure where I'll go from there. I don't want it to be the same red tones as Flesh Tearers, and instead might try to shift it more towards a saturated red rather than the pink that Khorne Red is actually closer to. Reds can be complicated.

Juan Hidalgo has a nice tutorial on NMM brass that I like the look of, and might well try that out on the trim. It's a little more involved than what I was originally hoping, and I might shift it slightly more to the yellow spectrum, but I could possibly also cut a few steps seeing as there aren't large surfaces for multiple gradients; armour trim will need value contrast, but might need fewer precise blends.

As a final note, it can be seen that the model is not stuck to a base for easy handling. This is because some of the areas are hard to reach with a brush, so it will be on some pins for a good long painting time, or at least until the legs are entirely done.

-- silly painter.


Saturday, September 17, 2022

Operative Umbral-Six - Part I


Headless assassin inside a head.

As an initial disclaimer, I obtained some heavy inspiration from this video: https://www.youtube.com/watch?v=6QXvE2-dfRc

Of course, the final rendition looks quite different, and the approach has been modified greatly - I used it for inspiration, a base to build from, rather than simply copying and really wanted my own take model. I also spent a while looking at verdigris, seeing how it flows and builds up over time. Most modern statues where it's apparent are absolutely covered in it, to the point where none of the underlying copper colour is visible at all. I imagined that the statue here was more carefully looked after, perhaps regularly polished until war broke out and it was cared for a little less, before finally suffering some damage from the fighting. The assassin perched there poignant for the vengeance the Imperium visits upon those who desecrate such sacrilege against imagery of the Sisters, while fires burn in the streets below. The damage though, is perhaps relatively recent - exposing metal that hasn't yet had a chance to oxidise into verdigris.

All this backstory does play a role in painting. It informs which colours to use, how heavy to apply them, perhaps lighting angles, and so forth. Here, the assassin should be dark, and without many (if any) reflective points. The weathering on the statue will be less severe than other renditions of this model. Lighting is more intended to come from below rather than overhead, informing where to place highlights.

Before even priming the model, I decided to remove the Vindicare from the stand. Painting him/her separately would be much easier in theory, though in hindsight I probably could've just left the front of the statue off. No matter. If I ever want to use the model in a game (almost zero chance of that in all honesty) then removal will be useful - and there's always the excuse of just wanting to see if I could. So I cut the model clear, drilled some very careful holes for the smallest of my magnets, and then green-stuffed back over some the damage I caused when cutting. I could have done a better job at repairs, but motivation wasn't exactly at a high point - and a little damage seems to fit anyway. I did also have to slightly trim a few points to make the Vindicare fit better with the statue in place, but that's well hidden. The magnets aren't the strongest, but do keep everything place well enough for display purposes. Naturally the rifle has a hole drilled in the barrel.

Priming everything was done using one from Vallejo instead of the usual Citadel spray can. There's no sense in letting a bottle of primer go to waste, and using it through the airbrush means not having to leave models outside in dubious weather. It's acceptable on plastic, but doesn't bond very well on resin or metal. The Citadel spray primer is still superior in my opinion, assuming good weather.

The statue:

  • Leadbelcher base coat. This was intended to build up a slightly glossy undercoat, and give a lighter tone to the finish.
  • Balthasar Gold. Another base, but only needing a single coat. Completely even coverage is not required.
  • Runelord Brass (the old layer paint version) applied as what can only be described as a "wet drybrush". It was built up a little more heavily in highlighted areas.
  • Canoptek Alloy, applied similarly to the previous step and kept mostly as a highlight. The focus was on the lower left (with reference to the photo).
  • Coelia Greenshade applied over almost all of the statue. This was more of a glaze than a shade - while some areas were indeed given a shade, it was thinly glazed over flat surfaces too, acting as a subtle green filter.
  • Aethermatic Blue. I don't have Nihilakh Oxide and didn't want to but a whole bottle for this one model, so used a contrast paint instead. Aethermatic Blue is far more translucent and might take multiple layers to build up, but for my usage this was more preferable: I didn't want the intensity of Nihilakh Oxide to begin with, going for a more subtle expression of verdigris only beginning to appear.

There's some structural bracing to be painted up still, and I'll likely give that an oxidised and slightly rusted iron appearance. I had some practice of that with the base on Horus, and I'd like to repeat it here. I also intend to try give some warm highlights indicating flames from a street below, but now I'm not so certain about that. It would look much better if exaggerated, but doing so would need really give a light/dark contrast, which would make much of the statue verdigris hidden - basically, I'd need to start from scratch. I might simply darken some places with a filter of some kind later on instead - I like how the statue looks far too much and don't want to ruin it.

-- silly painter.


Sunday, September 11, 2022

Legion Scimitar Jetbikes - Part II


Some angels have wings. This one has a jetbike.

Managed over the course of a week to get some of the major colours blocked in on the jetbikes. This was mostly an exercise in airbrushing up to now, with the next steps switching to a normal brush to clean up a few details.

The red doesn't much explanation at this point, but regardless:

  • 50/50 Dryad Bark / Mephiston Red base layer.
  • Mephiston Red midtone.
  • Evil Sunz Scarlet for the highlight.

The metals were nothing special either, but were actually done before the reds:

  • Leadbelcher base layer.
  • Deathshroud clear into shadowed areas.
  • Iron Hands to "highlight" (it didn't really make much difference to me).
  • Castellax Bronze lightly applied across the top engine cover.

The last step just gives some variation to the metal areas, acting as a very slight colour filter that adds some visual interest. After the matt varnish step I'll likely push it a little further from the silver tones with metallic glazing. I actually find the metallic paints quite effective at glazing, but it will need to be done later to restore that metal sheen.

The riders are being done at the same time, but the temporary handles attached for painting don't make them easy to add for photos just yet. I'm hoping to have them ready in time for the next update.

Painting the metal areas separately from the red panels and using an airbrush presented an interesting challenge: how to mask off pieces of the model, and which order to do them in? I ended up painting the metal areas first, reasoning it was easier to fix them up than try to re-paint red gradients and transitions. In hindsight, this was the correct choice. Masking off areas however, that took a bit more thought. First of all, let the metallics sit for at least 24 hours to ensure they're fully dry and cured, giving them maximum adherence to the model. Don't really want the masking medium to strip the paint off. To mask areas off, I ended up using very cheap branch blu-tac. It's not as flexible or sticky as branded, but that actually made it fit for purpose in this case: the cheap variant was pliable enough to cut to shape and press over areas, but also peeled off very easily later on. As an added benefit, I can re-use it for masking other models in the future as well.

I've decided to properly glue all the flying stands in, but not glue to the clear bases yet. The stand will always be used anyway, and I find it useful when holding the model for painting.

Next steps are to fix a few small areas that weren't masked properly, or accidentally masked off entirely, before adding edge highlights to the red panels and then sealing it all with a thin gloss varnish. The matt varnish step later seems to be dulling the edge highlights, so I'll likely make them a little bit stronger this time and see how it goes. I'm also toying with the idea of adding a black strip across the front of the jetbikes, similar to the Thunderhawk Gunship, but black trim and gold filigree are a contender as well. That's a decision for another day.

There are likely to be sporadic posts over the next weeks, and possibly rest of the year. I'll still be painting, but trying to give weekly updates will be giving way to the necessity of a more flexible timetable.

-- silly painter.


Tuesday, September 6, 2022

Space Marine Heroes 2 - Part V


The enemy has time to bleed.

Not really deserving a full post, so this might be shorter but a couple more models are now "done". There are a few places on each where I'm not entirely happy, but they're not going into competitions and are well enough to give each model some presence, so I'm classifying them as done.

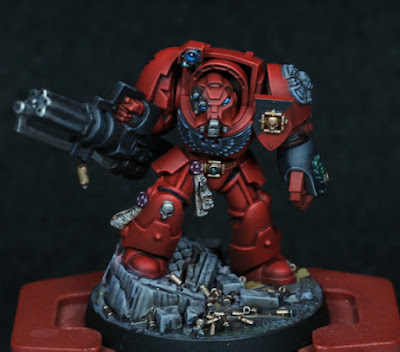
I struggled with the bases for a long while, and in the end Celestra Grey with Basilicanum Grey did most of the heavy lifting for me. Once that was done, the rest kind of just followed. There's a lot of neutral grey in there, but it's not colour I was interested in so much as a lighter value to offset the armour. I find it balances well against the Aquila on the chest, the Crux Terminatus, and the blacks elsewhere.

The assault cannon model (Brother Fuerran) has the best decal application of recent times, but it still look a lot to get it right.

Missiles.T That look like eyes. Well that's creepy.

Brother Ebellius could also have done with a little more work on the right knee pad, but I didn't want to ruin it with a poorly applied decal, or even worse freehand, so I left it alone. And now I look at the picture, there are two service studs on his head not painted - something very soon to be corrected! The chapter symbol decal was so troublesome that I ended up actually putting down a little gold freehand filigree - and it's not even decent by any stretch of the imagination, but still looks better than what it's covering up. The face also has so much character that I couldn't imagine using the helmet option.

With these two finished, the tally of models in the "1 for every 2 painted" now stands at 10.5, and hopefully will rise a bit more before the end of the year. There are still six more left in the Heroes 2 set that I have.

-- silly painter.


Sunday, September 4, 2022

Space Marine Heroes 2 - Part IV


Clawing his way through the enemy.

Continuing with the Space Marine Heroes 2 set, another Terminator is finished. I've been working on a small set of them rather than batch painting, so expect more coming soon. All are in some level of basic armour finished, and I'll just be working my way through them two or three at a time now.

There's nothing particularly new with the painting again. Same formula as normal for my Blood Angels approach. The gloss varnish step really does help with applying shades, but also makes the model difficult to predict how it will end up - the matt varnish is still only done almost at the end, but I have an understanding of how it will turn out now.

The gold was done slightly different, purely because I wanted to see how it would look. I borrowed the specific colours used on the Ultramarine Lieutenant. It works ok in some areas, bu perhaps I'll mix it up in future with the "normal" gold approach I've been using with Blood Angels. It would serve as an excellent way to mix up filigree on future models.

As a random note, Skrag Brown heavily thinned makes for a good rust colour.

Decals are once again a massive pain for me to work with. The sheet used is seemingly of lesser quality - the decal did not adhere nicely, and softener had an incredibly hard time getting rid of the silvering effect. I decided to cover some of that up with a bit of battle damage - there's already some on the sculpt anyway, so it's not entirely out of place. Just another example of why I always prefer to paint sculpted details, or freehand, given the option - but the models here are too connected to the shoulder pads and decals it is. I'm sure some of the next models will have the same problem.

The lighting claws are Hoeth Blue, Skink Blue, and Wrack White. I could then use Praxeti White if I really wanted to punch the white some more, but I'm leaving it as is for now. My drybrushing techniques have slowly been improving, with the key for myself being to wipe off most on a paper towel rather than a plastic palette. With a little more practice I could even see myself being able to paint the majority of a model with drybrushing - something to think about one day.

The left glove in black is of course something that's been done on Blood Angels Terminators for a long time, and it just adds so much to the model that I'm continuing the trend.

Now onwards to the next model!

-- silly painter.