Showing posts with label allarus. Show all posts

Tuesday, October 12, 2021

Allarus Custodians - Part IV (Showcase)

Shoulder pads that are nigh Exterminatus-proof.

 Well I managed to get them finished a little bit quicker than I originally anticipated, if later then I wanted. They were both easier and more difficult to paint than I was thinking when I started, with the difficulty ultimately coming down to subtle decisions about precisely which colours to use where, and what scheme to go with. Ultimately I'm satisfied with the gold - it's different from how I paint Blood Angels, yet still golden armour and something that would hopefully transfer onto the rest of my Custodes (one day).

I'll begin with the base. Unusually for a photo, I decided to show how I was holding the models in place one I had glued them to the base - and yes, Blu-Tac, or whatever derivative/alternate name. During previous steps I had notice that the bases bent ever so slightly when clipped into the holder and was concerned that this might crack the superglue keeping everything in place. So I had to improvise. Not the best, but didn't have much further to go and so it was...alright.

I tried the now infamous "wet-wipe" approach to a marbling effect on the bases, first trying it out on some thick cardboard. Black undercoat, cover with a pulled wet-wipe, followed by Russ Grey and Wraithbone. At this point I'd decided it wouldn't work for me with the bases directly, but enough places on the cardboard seemed good enough that I could use it directly. I also didn't want single pieces, so cut it up into squares, superglued these onto the bases to form marble tiles, and then trimmed the edges to fit. I also thinned down some blacks on the wet palette to add some more distinct lines in places. Ultimately it's good enough, but in future I may well go back to just doing everything by hand. The wet-wipe approach does serve as a good reference to work from however, which is worth considering too.

Ropes are a muted white, and I decided this was good enough. I didn't want them too bright lest they start to look reflective:

  • Base of Celestra Grey over all the ropes.
  • Basilicanum Grey Contrast over that.
  • Using a thin brush, highlight the ropes again with Celestra Grey.
  • Ulthuan Grey applied with a fine tipped brush to complete the highlights.

Pteruges had an edge highlight of Doombull Brown mixed with Evil Sunz Scarlet and stippled / striped in key places. I never wrote down what was done before that unfortunately - some browns, highlighted with rust tones, before the final look. Not terribly impressed with how they all turned out so no great loss - I'll try again next time and come up with something else.

Leather straps are borrowed from a previous model:

Thondia Brown over the leather areas.

Gorthor Brown used for some highlighting.

Gorthor Brown / Celestra Grey (1:1) mixed and used for scratches and general wear and tear lines.

Thondia Brown / Abaddon Black (1:1) thinned heavily and added to recessed areas, just because I was too lazy to dig out the Agrax Earthshade for what would be the same effect.

The top knots were quite simple in the end:

  • Mephiston Red over the entire top knot.
  • Wild Rider Red to highlight some areas.
  • Carroburg Crimson to shade the entire area.
  • Wild Rider Red to highlight important areas more, if required.
  • Flesh Tearers Red Contrast applied to generally darker areas, and then feathered out from there.

These are impressive models, no two ways about it. They each have a lot of character about them, and the armour is festooned with detail. Quite glad I'm finally able to add them to the "finished" collection, but there remain many more of their brethren to paint up yet.

-- silly painter.


Saturday, September 11, 2021

Allarus Custodians - Part III


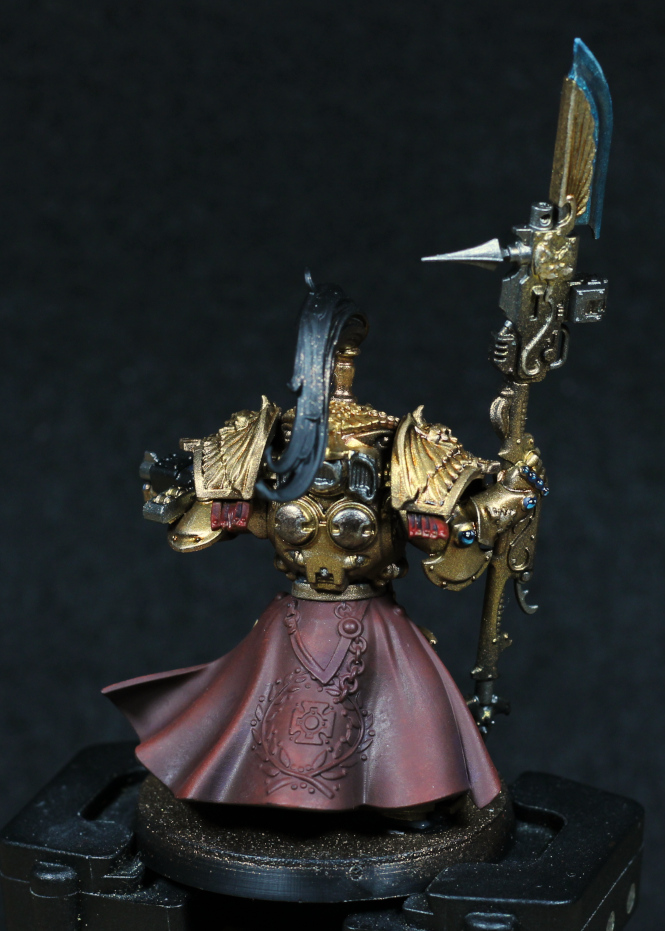
The Caped Custodian.

After a little bit of a getaway, I'm back and picking up the brushes again. So while not a whole lot of progress has been done since last time, there are enough little pieces to note down what has been done.

To start with, the armour has been highlighted on this model. It doesn't really look that way in the photo, and indeed it's subtle, but sometimes subtle stands out more. I toyed with a few things but ended up with:

  • Canoptek Alloy / Liberator Gold (1:1) mix for an initial highlight, mostly along "feathers" of the various eagle designs, and edges. Liberator Gold alone has the wrong hue and doesn't match the gold armour, so here it's mostly used to saturate the Canoptek Alloy slightly.
  • Canoptek Alloy for edge highlights, or anything that should stand out in particular.

For what I take to be either shield generators, or some kind of power reactor on the back:

  • Warplock Bronze base coat.
  • Castellax Bronze to highlight, with a fair amount of mixing with the previous colour to get the transitions just right.
  • Canoptek Alloy for edges.

Obviously I'm enjoying Canoptek Alloy quite a bit here. It's a remarkably versatile paint and can be used for bright edges where a silver simply doesn't fit.

Gemstones I have to guess at. I wrote it down at the time, but have since lost the piece of paper. So this is a guess but should be close:

  • Night Lords Blue across the gemstone.
  • Sotek Green across about half the gemstone.
  • Ahriman Blue as a sort of edge highlight.
  • Abaddon Black, or Nuln Oil to darken the opposite side. This step isn't always necessary, especially for smaller gemstones.
  • Corax White for a reflection dot.
  • 'Ardcoat gloss varnish at the end.

The blues tending more towards aqua are a bit of a running theme for these models: I used Talassar Blue, Aethermatic Blue, a little Baharroth Blue, and some Guilliman Blue (the old glaze paint) for the power field effect on the weapon. I tend to give it more colour towards edges and points, and use stripe motions or drybrushing for a weapon in motion. The model shown here is not swinging his weapon, so it's a smoother appearance.

And the cape. I played around on another model to try get a feel for how to paint soft material, and initially tried stippling, dabbing with a drybrush, and glazing, but in the end most of that was simply wasted. Cloth does not highlight with smooth transitions like hard surfaces, so drybrushing works really well. It also doesn't desaturate from reflectivity, so the choice of highlight colour really matters too. In the end I'm going with:

  • Dryad Bark / Mephiston Red (1:1) through the airbrush, all over the cape. Most of this is going to show through, so two coats to give an even finish might be needed.
  • Word Bearer's Red, drybrushed very gradually and slowly built up in desired areas. Really take some time with this step: rushing will ruin it. Dabbing motions can also be used if the paint isn't quite so dry.
  • Mix a very slight amount of Ulthuan Grey with Word Bearer's Red (and not much at all is needed - if in doubt, use less Grey) and drubrush this onto more prominent folds.
  • Agrax Earthshade stippled, dabbed, and glazed into deeper recesses.
  • Druchii Violet stippled, dabbed, and glazed across mid-tone areas to give some variation.

The capes will be matt varnished before being glued into place. In the photo above it's simply staying there, but isn't yet glued. The varnish step will help to differentiate the texture from metallic gloss that much more.

I'm not sure yet quite how to paint the top-knot. Red as a primary colour seems like it might be suitable, but too bright or saturated and it will take attention away from the rest of the model. There are still small details like the vents on the back that need finishing, the weapons, and various other items of interest. The base I will do as white marble.

In other words, still a lot to go on these models - at least two more blog posts, perhaps even three, but there is progress.

-- silly painter.


Friday, August 20, 2021

Allarus Custodians - Part II


This guy means business.

Progress on the Allarus Custodians, with some assembly having taken place. The above photo has the cape and left arm only temporarily held in place just for giving an impression of how the model is turning out, but all other components are glued in.

On the subject of glue, I used superglue for the head. This was a mistake. I should have masked out the attachment point and used plastic cement instead, because superglue can cause frosting in surrounding areas. I don't see it much, and it's probably something to do with the particular metallics used, but it gave the face a hefty amount of white stubble that I had to correct. More on the painting the face in a moment.

The armour was finished mostly as I intended before.

  • Thallax Gold / Air Caste Thinner (1:1 ratio) applied through the airbrush. Even thinned, Thallax Gold is quite an intense colour, so I tried to be a little careful about how I applied it.
  • Reikland Fleshshade (Gloss) added to recessed areas, and glazed into darker or shadowed areas. The gloss shades can be used as a glaze on metallic paints - they're thinner than normal shades, and are quite well suited to the surface created by metallics.
  • Cryptek Armourshade (Gloss) added to deeper recessed, or used to outline details. I considered using Nuln Oil, but instead went for something quite dark without being black just to keep a slightly warmer tone overall.

One of the bonuses from the gloss shades is that they act similar to a varnish. The Thallax Gold was rubbing off rather easily when handling the model, but with the shades applied that seems to have fixed the problem. I was experimenting with varnishes on minor areas, using Stormshield in thin coats to see how much it would dull the look. That's an acceptable, if time consuming, alternative, but no need if the shades protect it enough.

The armour is not yet finished. I intend to keep painting enough until full assembly, and then do edge and spot highlights. It might take a little while before I get to that stage: the cloaks I'm not sure of and will have to experiment on a test model first.

The face I decided to do in a darker skin tone. There's no particular reason other than I haven't done that before and saw no reason not to try, but I'm very pleased with how it turned out and how much character the face now has. Never having done dark skin tones before, I used mostly what was on the palette:

  • Eyes first, with Corax White and Abaddon Black. I find it much easier to paint the eyes before the skin tones, rather than trying to no get white outside the the lines later on.
  • Rhinox Hide applied across all the face (except the eyes of course!).
  • Barak-Nar Burgundy mixed with a little Rhinox Hide, added to the areas I wanted shaded. A little back and forth with the mixing here, just to blend it in, or pull it back if it was a little too purple for my liking.
  • Mephiston Red mixed with Rhinox Hide, added along the lips. Using Mephiston Red is difficult - it's a very pure red - so some other colour in future might be a little easier to get the right tone with.
  • Rhinox Hide mixed with Abaddon Black (being the black on the palette) and glazed over the top to give the impression of a shaved head. This took a little bit to get the tone just right, but I think it worked out well enough.
  • Cadian Fleshtone mixed with Rhinox Hide and used to highlight the nose, cheeks, ears, chin, upper lip, temples, and brows. Glaze consistency and multiple coats worked best rather than trying to go bright all in one go. I could push the contrast a little more, but with decent lighting it's enough that I don't want to mess with it more.

I may have glued the head with a little too much turn to it, but I he is looking where he's pointing (or starting to point) so it's not so bad.

As a final little hidden tip: the cowling was glued in place with PVA glue before the head was done. This allowed priming and airbrushing to be done on it, and for it to be easily popped off and glued properly once the head was then more easily put in place.

 -- silly painter.


Sunday, August 15, 2021

Allarus Custodians - Part I


Shiny armour to blind the enemy with.

Having multiple projects on the go at once will probably mean it will take some time to get any particular one finished, but it's also an opportunity to play with a lot of different colours. Also, the Allarus Custodians look really nice.

I decided to go for a golden armour, and generally stick to the reference colours, but with my own approach on getting there. Knowing I want golden armour gives me a chance to try out various airbrush paints, but it took a little thought on what I would try; I didn't want to simply repeat the formula I used on various Blood Angels, instead looking for a way to make an older looking armour, something of a burnished, earthen gold.

First step is, as usual, a black primer. Following that, although there's still at least one more airbrush step to go:

  • Balthasar Gold (Air). This is an excellent starting colour, and a bit of care was taken to get good coverage. As a darker brown tone it serves well to keep it in the recessed areas.
  • Valdor Gold (Air). An interesting colour. It's almost like a very heavily de-saturated version of the previous step. I'm still considering if it might be useful as a final highlight later - it's quite a thin paint naturally, and doesn't give the coverage over black, but is a little too de-saturated to use as a midtone. I intended it to serve as a lighter colour for helping highlight a later step (not yet done).
  • Agrax Earthshade. Using an airbrush here because I wanted to put some colour back into shaded areas. This ends up almost a beaten brass in appearance, which is something to remember for future reference. It's this step that makes the photo above look a little strange with the highlighting, but a later step is intended to correct that.
  • Nuln Oil (Gloss). By adding some black to deeper recessed areas, or used more for outlining, I'm hoping the later step won't entirely obscure those areas and keep definition and depth. Although I generally don't like gloss in recesses, in this case the paint simply flowed much easier without staining raised surfaces. Some areas may need to outlined again later anyway.

The missing step is a coat of Thallax Gold. This will shift the colour back into more yellow gold, for which reason I intend to thin it slightly before applying through the airbrush.

Paintbrush highlights are almost certainly going to be done with Liberator Gold, and maybe a few edge highlights with Stormhost Silver.

These are really fun models.

-- silly painter.