Showing posts with label fleshtearers. Show all posts

Sunday, August 8, 2021

Flesh Tearer Reiver - Part III (Showcase)


Walking on black...stone.

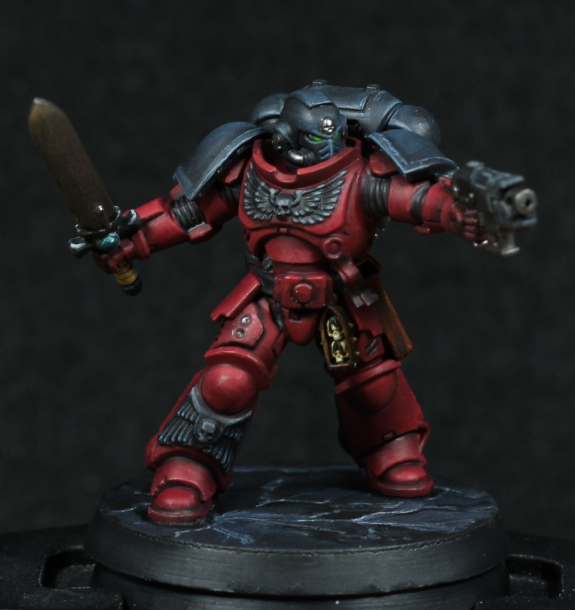
Done enough on the Reiver for now. The model isn't fully complete, but it was always intended only as an airbrush test to begin with. Just wanted to see how much edge highlighting would show on through. The rest was just playing around for the sake of it.

The helmet eye lenses are done as a glow effect. No white dots to get in the way. I still have Waywatcher Green from the old glaze paints, and used that to put some glow around the "eye sockets", with white and Hexwraith Flame for the lenses themselves. A bit of thinned black around the edges helps with more depth, and while purely by chance of being inspired to try it, I really like that subtle addition.

The NMM on the blade came together ok. It looks far better in the photo than in real life. Need a lot more practice with this technique, as it's something I do want to learn - not for normal models, but if I ever do a diorama where light sources are important, then I want reflections and shine to be based of the light sources in the scene. So I'll keep at it with test models I think.

I could not be bothered with the base. Absolutely nothing was inspiring to me, so in the end I just left it a clean black.

The spray varnish really took away any shine, and there was a little frosting from the humidity in the air. I'm tempted to used a paintbrush and put some Stormshield back over some areas, but I'm unlikely to go that far. At least that varnish really merges the decals onto the model.

-- silly painter.


Tuesday, August 3, 2021

Flesh Tearer Reiver - Part II


Stabby McStabsalot

Still slow going for now, though the pace should pick up again in another week or two. I've managed a little bit more on the Reiver, and have decided that as a test model I'll give NMM another go. I'll mostly focus on the knife for the effect, but the gun will have a little bit added as well.

Although starting to take shape, I can definitely say that sub-assemblies, even just for initial base coat and highlights, are the way to go with an airbrush. I have some plans around that in a couple weeks.

The pouches here are done with a new paint: Thondia Brown. It probably wouldn't be far off from a layer paint really, but gives a nice basic leather colour to work from. I glazed a little Bloodletter over the top, mixed some flesh tones on the wet palette for edge highlights, and added some Agrax Earthshade at the end for a bit more depth. It needs something else perhaps, but that's for experimentation some other time.

On this model I also tried out Vallejo Decal Softener. I wanted to see how much better it might be at moulding decals to the underlying surface. It does a pretty good job actually, even on the circle applied to the left pauldron. The latter was purposefully unprepared (no strategic cuts to help it fold over) and while I had to work at it with a brush, it came out surprisingly well. I fully intend to keep using it in future.

It'll still be a while before I finish this model - probably another week and a half, if I'm lucky.

-- silly painter.


Sunday, July 25, 2021

Flesh Tearer Reiver - Part I


Seen my knife? Let me give you a closer look.

Playing around with a freebie model makes for good experimentation, so I decided to see how well airbrushing in different stages would be on a Reiver. Normally I'll base, shade, and highlight with an airbrush before then going in with a normal brush. This time, I wondered how well pre-edge highlights would show through.

The basic idea is to base the model with an airbrush first, then edge highlight with a normal brush, then perform a normal highlight with the airbrush. I find the edge highlights can be a bit strong sometimes, and wanted to soften them slightly. I don't have to worry as much about transitions, and cleaning up a base coat is easier when there aren't carefully blended gradients to be concerned with.

First step was Khorne Red. Flesh Tearers colours are more towards the blue end of a red spectrum, which this base colour provides.

Cadian Fleshtone provides edge highlights next. The stronger the highlight, the more will show through after the next step. This is rather similar to how the Contrast range is used.

Wazdakka Red was then mixed with some Aircaste Thinner to highlight with. I thinned it a little too much however, and ultimately had to use a brush later to add more to a few areas. Something to keep in mind when mixing layer paints for use in an airbrush.

Did it work? To a degree, yes. It's a little more muted in places than I would have liked, but shows through well enough in others for me to be convinced of the usefulness in further exploration. I may try this on my normal Blood Angels formula as well, but that will have to work differently. Wild Rider Red will almost certainly be as muted, if not more. I could use that to advantage: there's no reason I can't apply a second edge highlight later to bring out selected edges, leaving others to be defined without the Tron appearance.

-- silly painter.


Friday, February 12, 2021

Flesh Tearers Lieutenant - Part II (Showcase)


Rip. And. Tear.

With a little motivation, managed to finish the model rather quickly (for me). I skipped on a lot of the metallic highlights, mostly because I wanted them to be a more muted, a bit darker, in fitting with a Flesh Tearers disposition.

There is a little battle damage, most visible in the photo on the right kneepad, but mostly it's on the left side. I figured this was likely to see more blade scoring owing to the left hand carrying a power sword more capable of parrying and blocking blows.

The power sword itself was a simple drybrushing of Hellion Green, Skink Blue, and Etherium Blue. Power weapons are about the one thing I'm half-capable of drybrushing, and I still like the effect better than this smooth blended sheen may others use. I find the less precision of a drybrush more appealing - the weapon isn't a light-saber after all.

On the sword there's a small gem, or something. That was gradient of grey, with some contrast on top and a little white dot as a highlight point. By adjusting the usual placement of the darker edge and the white highlight point, the gem looks opaque rather than translucent. It's a small thing, but good to play with.

There was some concern that the purity seal would steal all the attention, with it being a single off-white point surrounded by darker colours, but skull icon on the helmet mostly makes up for that, so overall I'm happy enough with the end result.

I really should look into embedding a small video, or at least photos of multiple angles for the showcase posts. And maybe tweak the lighting setup for less harsh reflections.

-- silly painter.


Wednesday, February 10, 2021

Flesh Tearers Lieutenant - Part I


Possibly not fruit flesh that he likes to tear.

Just for something slightly different, because I already have Tolmeron painted in a similar pose for Blood Angels, I went with a Flesh Tearer for one of the Dark Imperium Primaris Lieutenants. I get to play with some different reds, and he still fits in with the rest of the army as a kind of bonus.

There was no airbrushing on this model. I wanted to practice highlighting armour again with a normal brush (and reminding myself why I always use an airbrush to save time), and also the weather hasn't been conducive to opening windows for better ventilation.

Following on from a black primer, the red armour is fairly straight forward:

  • Khorne Red on all the red areas. Two or three thin coats to make sure it's even and smooth.
  • Nuln Oil applied directly into the recessed areas.
  • Cadian Fleshtone to highlight edges. This step is done now to give a little extra brightness to the next step along the edges. It's not visible much in the end though.
  • Wazdakka Red, with a generous amount of Lahmian Medium, glazed and layered to blend highlights and smoothly as possible. This step always takes a very long time.
  • Khorne Red, also with generous amounts of Lahmian Medium (or water) to glaze over any transitions that aren't quite as smooth as I'd like.

If I really wanted to make any edges pop a bit more, I would mix Cadian Fleshtone with Wazdakka Red. I wouldn't use the former straight, just personal preference. For this model I think it would be too much however, so I'm leaving the final edge highlight step out.

Black armour is actually very similar to Horus, with one slight change because Corvus Black is much easier to highlight from:

  • Corvus Black over all black armour.
  • Dark Reaper with Lahmian Medium to glaze highlights as appropriate.
  • Russ Grey for edge highlights.
  • Corvus Black thinned down to glaze over any transitions that need to be smoothed out more.
  • Abaddon Black thinned down to help outline armour areas, or add a bit more depth to shadowed areas.

The bolt pistol casing was essentially the same, but with Eshin Grey and Dawnstone as the highlight colours. This was done just to add a little variation to the black everywhere.

The base hasn't really worked out as I wanted, which was a black marbling effect. I guess I wasn't paying attention to what I was doing. In any case, I doubt I'll work on it much more - can't really think of what else to do on the base, and I don't want to get bogged down on the model.

Obviously a few details yet to go, and I'll have to freehand the chapter icon. That'll be fun.

-- silly painter.