Sunday, August 30, 2020

Assault Intercessor Death Company - Part I

I see a Blood Angel...

...and I want it painted black.

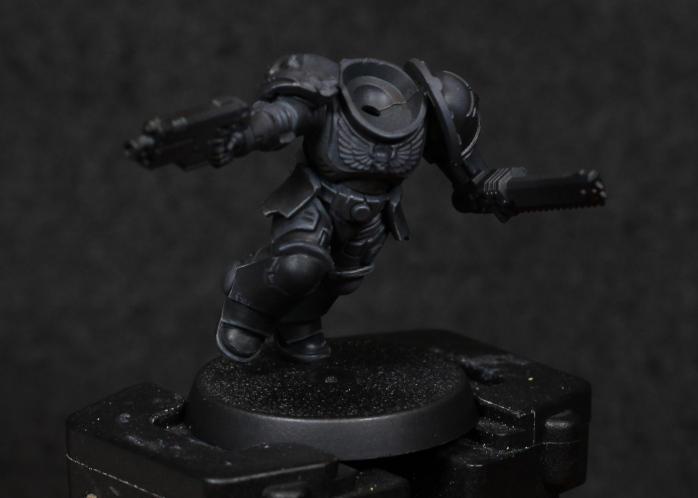
The recently released "start painting" kit of the Assault Intercessors provided an excellent opportunity to do a bit of kit bashing on limited numbers of models, and to practice some more on Death Company. The limited number is important if I'm to keep plastic mountain from growing much further.

The models came with Ultramarine insignias that needed to be chopped off, fortunately only the shoulder pads and therefore easily hidden behind the replacement spare Blood Angels variants. So converting to Blood Angels, and readying for Death Company, wasn't actually all that difficult.

Although I'm only showing the one at the moment, priming the models was done using black, naturally, for "battle ready" there's not a whole lot more that needs doing. I wanted to do more of course, so the airbrush came next:

  • Corvus Black over the entire model. This isn't quite as pure a black as Abaddon Black, so it leaves some room to maneuver when it comes to highlighting and shading.
  • Dawnstone for highlighting. I normally would choose Eshin Grey, but that's not available in the Air range from Citadel, so I used Dawnstone. It is much more saturated than I liked, but this can be fixed later. In future I might mix normal Eshin Grey with some thinner and use that directly in the airbrush.
  • Abaddon Black for shading, but owing to it being slightly thin (at least with my usage) it also served to tone down the highlights as well.

The models still come out a little lighter than I like at this point, so some brush work was still required; I prefer Death Company to have a deep black armour, to represent their descent into madness.

Normally I would use thinned Abaddon Black as a glaze to darken areas, however I also tried Black Templar from the Contrast range. This was a bit hit & miss, and ultimately I might stick to Lahmian Medium with the former black. If I can tweak the airbrush stage, then this wouldn't require as much effort either.

Thinned Dawnstone to edge highlight in places, and Nuln Oil to really make the recesses black, and that's about it.  I don't edge highlight as much these days, but it's needed to define armour plating when everything is painted black.

I'll paint the head and helmets next, just to assemble that stage before starting on filling in some red crosses and getting started on blocking in other colours.

-- silly painter.


Saturday, August 29, 2020

Blood Angel Inceptors - Part III


Oily Marine #1

Oily Marine #2

Sergeant Oil

 The three Inceptors from the Dark Imperium set are now finished...sort of. The spray varnish step was a miscalculation; the were was far too much moisture in the air, and it was far too cold to be doing this step. The models were completely frosted up, and so I turned to the one thing to try and fix that: olive oil. As a result, the models are a little more shiny than I wanted, but it's still better than they were.

So while I'm a little disappointed in not waiting for better weather, at least I've learned something in the process, and I was never too invested into the Inceptors anyway. They just don't feel Blood Angels to me. If I was going to mess up on any models, it's probably better to be these ones.

-- silly painter.


Sunday, August 23, 2020

Blood Angel Inceptors - Part II

The "mike drop" stance.

There's really nothing new being done painting wise to these models, so this post is pretty much just a work in progress showing the armour being completed. The only real item of note is covering as much of the metal areas with black first - this makes applying the metallics much easier, even if it takes a bit of time. Othewise the red will show through the metallics, which isn't really wanted in this case.


Chest bump!

Corvus Black is still the choice at this point, although I may experiment with Abaddon Black as the metallic undercoat in future owing to how thin Corvus Black naturally is.


Platform clogs, now available for battle.

Losing a little motivation with these guys on account of how much they still don't feel like Blood Angels to me. Despite the Blood Angels love of mobility, they are an assault based force, and Inceptors look far too bulky to fulfill that role comfortably. So I don't see myself buying any more of them in a hurry.

 -- silly painter.


Monday, August 17, 2020

Blood Angel Inceptors - Part I


I believe I can fly....

Next up on the Dark Imperium Primaris models are the Inceptors. Close support unit. That drops from orbit. And effectively has heavy bolters. For close support. Ok.

It can be guessed that I'm not particularly a fan of the Inceptors as a concept, and even less so for Blood Angels. They simply don't fit the feel of a Blood Angel. A little less bulky, remove the shovel shoes, give them close quarter combat weapons, and then they might be ok.

The helmet is the most visibly striking point of interest, being yellow. Method for this is similar to what was done for the Imperial Fist of long ago:

  • Averland Sunset, with the airbrush.
  • Flash Gitz Yellow, initial highlight with the airbrush.
  • Phallanx Yellow as finial airbrush highlight.
  • Casandora Yellow in recessed areas, just to help outline the shape of the helmet.
  • Fuegan Orange in the deeper recessed areas.
  • Dorn Yellow as edge highlight, typically about the bridge of the "nose" area, and the brow.

Eye lenses are the usual method for Blood Angels. I decided to keep them as a green appearance because it ties all the models together, regardless of general helmet colour.

I've put black rings on the jump pack (or whatever it is) just to add a bit more interest. Gun casings will be black as usual, which should help balance it out a bit more, but I won't know if it works until the model is complete. At least I'm able to reach the fully assembled stage quickly, which might make the next steps a bit faster (still need to apply finishing shades and highlights to the red armour).

-- silly painter.


Sunday, August 2, 2020

Adeptus Titanicus - Imperial Knight - Part V

Stampy is all fired up.

Mr Snuggles says something is about to have a very bad day.

Stompy and his big cannon.

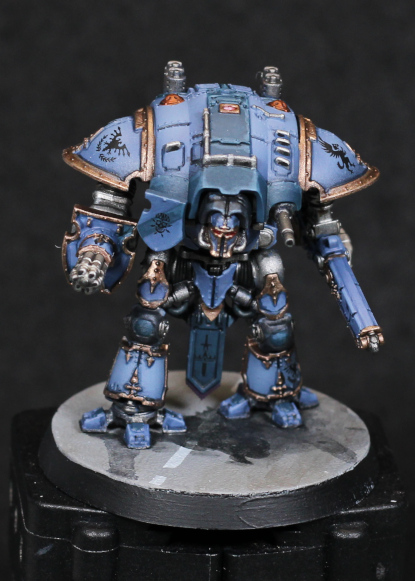
The Imperial Knights, Titanicus scale, are now done. Not too much beyond what was mentioned before, mainly just the banners and, for lack of a better term, rondel shields. The banners are painted in the same manner as the secondary trim colours, except with thinned Black Templar to make them slightly darker.

The decals turned out well. I'm improving with their application; copious amounts of solvent to soften them, and a cotton bud to press them into the underlying shape makes all the difference. There's no real purpose behind the applied decals, I was mostly just playing around.

Photos are a little blurry due to the normal photography area being used for other purposes.

The Purity Seal does dull the metallics quite a lot, but I don't really mind that too much. The colours are still there, the models are protected, and I probably put more effort into them than I originally intended as well. I've learned enough I think that future Titanicus models will be as easy to paint, and may come out slightly better. Whenever I get around to getting them done.

-- silly painter.


Monday, July 27, 2020

Adeptus Titanicus - Imperial Knight - Part IV

Stompy
Although my painting speed has slowed down recently for reasons, I'm still progressing on the Knights. Owing to taking so long, bits of dust have started to appear on the models, which can be seen in the photos because I forgot to brush it off.

Stampy
No change to the basic approach, so this won't be a lengthy post. The only real different is deciding to paint the banners with a base of Stegadon Scale Green, after which I intend to highlight with Thunderhawk Blue (as with the trim colours), but then darken it back down with thinned Black Templar.

Mr Snuggles
Still to come are finishing touches, decals, and a coat of Purity Seal. That last step will dull the metallics, but will protect the models.

-- silly painter.

Saturday, July 4, 2020

Adeptus Titanicus - Imperial Knight - Part III

The Knights go marching one by one.

Some progress on the Knights, although none are entirely finished quite yet. I decided that that main reference model was far enough along that I could starts the others, and hopefully then finish all three at about the same time.

Before going into detail particulars, I've tried to use upper carapace patterning to give simple differences to each, and I may try to further this on the "shoulders" and other larger armour plate areas. They're obviously part of the same House, but differences in markings help reinforce that they're ultimately a collection of individuals rather than a more cohesive military unit.

The bases took me some time to figure out, and in the end I'm still not entirely happy with them, but didn't want to delay further. It makes painting them somewhat easier at this stage if they're glued to a base. In the end I went with concrete road that they're walking down. It implies an urban environment, or industrialised to some degree, is easy to paint (it's just a flat surface), and lane markings help give a sense of scale. I could (and maybe should) add rubble or impact craters at some point, but I also want to not put quite as much effort into painting these models as I do for Blood Angels; I need to paint faster, and the Titanicus models are intended for playing with one day.

Anyway, the road is simple enough to paint:
  • Celestra Grey over the entire base.
  • Administratum Grey layered over the entire base.
  • Dawnstone layered over the entire base.
  • Stormvermin Fur, watered down quite heavily, and painted along each "lane". If roads are looked at, then where cars travel there will be dirt, wear & tear, etc, where tires are constantly passing. This means the centre of the lane is relatively clean, but flanked by colour variation. Brush strokes are always in the same direction when doing this step.
  • Ulthuan Grey for the road markings. I used some specialised masking tape to stencil in the straight lines, but this is only done once previous steps are completely dry. Not all tapes are equal, but anything can be used that doesn't lift up the paint.
  • Black Templar is also being used to give some shadow on the ground. Imperial Knights are large, and will cast noticeable shadows - however this is best done after the model is fully assembled, and I'm still getting this step right. I suspect I will need to work at it a lot more.

Reactor casings, which are on the rear of the models and not seen here:
  • Warplock Bronze
  • Sycorax Bronze
  • Fulgurite Copper

The void shield generators on top:
  • Screaming Bell base.
  • Agrax Earthshade, with two coats probably needed to tone down the base colour.
  • Fulgurite Copper for highlights.
The repetition of Fulgurite Copper here is to convey a sense of those components being more archaic, barely understood technology, as opposed to the brass and bronzes of shell casings.

All cabling is being painted the same. It's not fully done at the time of typing, so this is more of what it will be: something simple as a time saving step. Hazard stripes look nice, but the Imperium likes to standardise equipment, so I'm using that as an excuse to paint all outer cabling the same.
  • Dark Reaper - this may require two coats as it's layer paint.
  • Black Templar (Contrast)

Finally, for the second and third knights I tried to paint with Nuln Oil (Gloss) instead of using Deathshroud. It does not work as effectively, and so future models will revert back to using Deathshroud. It's less precise, but gives a much darker shade to the metallics that just fits better with these models.

-- silly painter.