Wednesday, June 8, 2022

Luna Wolf - Part I


Tight-rope training.

With the upcoming Horus Heresy game not far away, the local Warhammer store is having a bit of a painting competition where the painters from two towns get to show off their stuff. I say competition - more of just a bit of fun. An excuse to get everyone interested in the new models I'm sure, but I think this is how marketing should be done. And I get to paint up one of the new guys ahead of time, see their size, get a feel of how they paint up.

To start with, yes they are nice to paint. The design lends itself quite well to simple and complex schemes, with just enough edges to help define the shapes, but large panels for those nice transitions. It's not overwhelmed with detail, and there aren't many hard to reach areas. Also, there are slight notches to allow the arms to be aligned with weapons, making gluing the arms in place and later attaching the gun a much easier process. I've been looking forward to such a simple thing, and I'm excited for these models based on that one design choice alone!

The armour design has updates just about everywhere, but still feels older than the more classic Space Marines (Mark VII armour). Games Workshop has been doing very well with the armour designs lately. I actually looked at some artwork for Horus Rising, and design cues for the backpack can be seen in cover of that book. As for the size of the model, I haven't based it yet, so no comparisons there. I expect the increase in size over other models in the Horus Heresy range can be explained by the reduced production capabilities resulting in bulkier armour (thicker armour to overcome material shortages, or loss of more advanced manufacturing facilities). Less stringent recruitment policies to replace losses might also play havoc with physiology: larger marines, but less agile perhaps.

So with this fun little competition, the aim to paint up one model in a legion of choice. Blood Angels would be the natural fit for me, but that's also a problem: I would be painting it by numbers, and that misses the opportunity to explore something new. On the suggestion from a store member, I ended up with Luna Wolves. White is a very difficult colour scheme to work with (worse than yellow!) and this also allows me to play with scratches to reveal Sons of Horus paint underneath (if there's time). The idea is that this particular character followed in Loken's footsteps and has reverted to Luna Wolves heraldry in protest over the Heresy.

How to paint white though? Whites are not equal. They are almost always shifted slightly to blue or yellow or brown, and this is enhanced with the shading used. Luna Wolves though, that seemed more of a grey. White Scars might shade with brown, Luna Wolves are definitely close to Nuln Oil. With that in mind, I picked out some paints and got to work:

  • Mechanicus Standard Grey for the base coat.
  • Dawnstone for a first pass highlight.
  • Administratum Grey for a second pass highlight, focusing more on the upper areas of the model, but still applying around the feet a little bit.
  • Deathshroud to add some shadow, and give more depth. The idea is to nudge the shadow/highlight contrast a little more.
  • White Scar (thinned in about a 1:1 mix) to just push the highlights some more, and really focusing on the upper areas of the model.

Putting down the airbrush, a mix of all the greys was used to then apply edge highlights. So Administratum Grey was used for the darker areas, but mixed with some White Scar for lighter areas, and even more White Scar (nearly 90%) for the very brightest edges. I didn't use quite pure White Scar, which then still leaves me some wiggle room to add reflective dots if I want to later on.

After a gloss varnish I then went in with odourless mineral spirits (artist grade) and black oil paint. I foolishly used household white spirits before, and the fumes from that turned me off entirely. I didn't smell any from the artist grade - I'm sure there were, but they didn't seem to be problematic. I was still in a well ventilated room, of course. The oil wash here was used because I didn't want any staining when doing the recess shading. Staining is very visible on white, so figured the ability to completely wipe off mistakes would be worthwhile. Short version: it worked great.

The only part I'm not entirely happen with is fairly difficult to avoid when dealing with white: that speckled noise pattern so characteristic of using an airbrush. I used multiple greys to soften the transitions in an effort to reduce this problem, but some of it has still shown through. It does give a kind of gritty feel, and that suits Luna Wolves, so I'm ok with it for now. 

-- silly painter.


Space Marine Heroes 2 - Part II


If that's the hammer, I'd like to see the nail.

This post is fairly short and is just being used to keep track of another attempt at the yellow of Imperial Fists. There has only been the airbrushing so far, with no edge highlighting or recess shading done yet. Why an Imperial Fist? Yellow is a difficult colour that needs practice, and the model just seemed to really fit for them. Doesn't have to be anything more than that.

This time around I tried to undercoat with a red base (actually the Mephiston Red / Dryad Bark mix I use to base Blood Angels with) and then given a zenithal highlight of (thinned) White Scar. Over this I applied Averland Sunset. The intention was to try give some depth to the yellow, and see how much of the undercoats would show through. Did it work? Yes, but not to the degree I wanted. Thinning the yellow more wouldn't have given good coverage, and any less would have given too much. I'm not convinced this approach works with yellow, so I'll avoid the undercoat next time - or try again with a much brighter zenithal.

One point to remember is that Averland Sunset worked brilliantly for fire based OSL, particularly over the red. It's not a bright yellow, somewhat more mustard instead, and would perfectly suit the glow of a fire.

Moving on with Flash Gitz Yellow for an initial highlight, then finishing with Phalanx Yellow to bring back that near-white pizzazz that is iconic of the Imperial Fists. At this stage some of the depth was lost, so a shade of Angron Red (the best of the clear range of Citadel air paints, in my opinion) was sprayed from underneath to add that back. In future I should probably do that step before the final highlight, but it doesn't matter much.

Next there needs to be some edge highlighting and recess shading. The edge highlighting will be Dorn Yellow, which will hopefully convince the eye of the yellows being brighter overall, without actually being brighter anywhere except the edges. For recess shading I'm considering Seraphim Sepia, however that is more of an earthen red that's better suited to e.g Lamenters. An orange shade is likely a better contrast to help outline the model.

The rest of the Terminators are all highlighted and shaded, with most fully assembled. A couple of heads remain to be done yet. A thin layer of gloss varnish still works wonders and made the shading step much easier, and also helps protect the airbrushing. I'll see how these turn out before deciding if it's going to be a permanent addition to my painting steps.

-- silly painter.


Friday, May 20, 2022

Space Marine Heroes 2 - Part I


Barrels of fun.

Before the compressor fell apart, I did manage to start on the remaining models from the Space Marine Heroes 2 set. I have a couple of duplicates, so one of them will at a later stage be painted up probably as an Imperial Fist, while the other duplicate had some minor conversion work to equip him with a heavy flamer. The conversion is not the best, but it pads out the squad and does give the heavy flamer option, so I'm just going to have to roll with it.

Using the airbrush on Terminators is a different experience. I've not done much with them recently, and while I'm quite used to "normal" marines and how their armour volumes work, Terminator plate is different. I've tried to put more focus on the upper areas, and the corners around the the "arch", but I could probably give more shading in a few key spots. It's not that critical - recess shading still gives good contrast around the armour, and edge highlights can be used to make certain areas more prominent.

The actual paints used do not differ at all to my usual method, except this time I'm trying again with a gloss varnish before applying the recess shade. This makes the shade much easier to apply by helping the shade flow into the recess areas more readily, and makes cleaning up mistakes (far fewer in number to usual) more or less trivial. Faster to apply, fewer mistakes, a much quicker experience in general. The main downside is the glossy finish that ruins photos and does make it more easy for the next layers to wear off, at least until a matt varnish is applied. I can wait.

The eye lens is Ulthuan Grey covered in Talassar Blue. The two mixed also give a nice highlight colour later. I explicitly have not gone for the more traditional reflective look mostly because the lens is raised more than on other helmets, and I went with blue rather than green because I wanted contrast in brightness rather than colour to make it stand out - mixing the two is too jarring.

One of my favourite parts about this model series is that they can almost entirely be assembled prior to painting. I keep the heads/helmets separate for easier access to some small details, but enough has been done here that full assembly is possible. As I've mentioned before, this really increases my painting motivation and means I don't have to keep track of which sub-assembly belongs with with model.

I am not planning on batch painting these models, but I might do certain details all at the same time. Keeping all the colours used on the Crux Terminators on the palette, for example, will make it easier to paint each in turn: not just one layer and one colour at a time, but each to completion in turn. This is another trick to increase my painting motivation, so I'm hopeful it won't take a year to get all of these done.

-- silly painter.


Crimson Court, Ennias Curse-born - Part I


Usually just wings it.

Moving forward with the Crimson Court, I started to play around with Ennias' skin tone. It looks far better when not on camera - the glossy finish of the paints seems to really mess up photos and it just looks horrid. I'm hoping the later matt varnish stage will fix all of that. This is what happens when too much Contrast Medium is used.

Anyway, I wanted to try a different approach to skin tones and so instead of building up layers of highlights, I instead glazed layers of shades by using contrast paints. While less precise, it's also far quicker and takes advantage of the natural shapes sculpted into the model.

  • I started with Rakarth Flesh as the base colour, not wanting any of the brighter tones normally associated with contrast paint undercoats. I was wanting to glaze later colours over the top, so much of the base colour would still show through and generally influence the final look.
  • Snakebite Leather was the first contrast paint applied. This has a slight yellow hue, which seemed appropriate just for some entirely different ethnicity to which I normally paint. 
  • About 1:8 mix of Volupus Pink to Contrast Medium was next. The whole idea of this was to give that subtle red tint that often accompanies skin tones, giving them a sense of warmth. This a vampire, so not sure "warmth" applies, but it's still useful when trying to trick the viewer into thinking of flesh tones.
  • Adding a very small amount of Shyish Purple next, and glazing that across shaded areas. 
  • Finally a very small amount of Rakarth Flesh, thinned, used to highlight areas and generally tie it all together again.

One of the niceties to come out of this approach is the variation in skin tone across the body gives it a much more natural feel. It might seem strange to say that, but really looking at people's bodies and skin is not identical in tone everywhere. Subtle shades do exist, particularly when considering secondary light sources and reflections, and this approach helped give that natural appearance. It's worth exploring more because in general I like the end result, but it needs to be more precise in application.

The eye I simply put some Black Templar across. Black eyes, to show the darkness within. Is it a cop-out? Yes. It also makes the model look slightly demonic, and fits with the whole wings thing.

There's still some more to go around the face, such as the mouth and hair, but as a starting point it's ok. The clothing will almost certainly use contrast paints as the foundation, and I'll build up the colours from there. The wings I'm not sure on yet - I've been thinking about those for a while now and still don't have any inspiration.

There will be a pause in painting for a couple of weeks due to travel, and I also need to replace my airbrush compressor.

-- silly painter.


Saturday, May 14, 2022

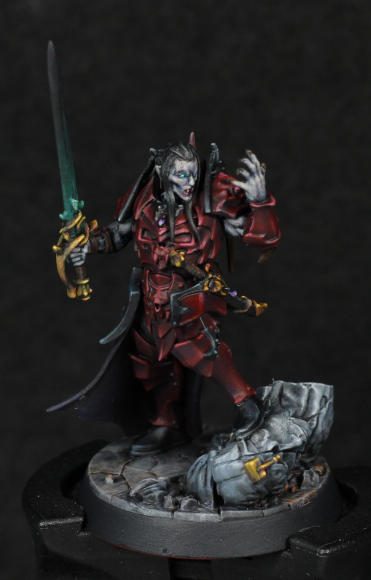
Crimson Court, Prince Duvalle - Part III (Showcase)


"Really must cut my nails."

I was going to give this model a break and instead post about another of the Crimson Court, but several circumstances resulted in me simply finishing Prince Duvalle instead. First, I was kind of inspired to just get the NMM gold done (using the exact method explored on the Lumineth painted a while ago) and after that there really wasn't much left to do. Second, my airbrush compressor fell apart. Quite literally - internal brackets snapped and it simply started to shake itself to pieces. I do have a spare compressor, but it doesn't have an attached tank so I'll use it just to finish off what I was working on before saving up for a new one.

What else helped to finish this model was not using every shade of paint, but instead just mixing up "close enough" on the palette. For the gemstones I used a single purple (Genestealer Purple) and just mixed it with a blue on the palette, some black, and some of the light grey. No need to waste time getting out four or five paints when mixing directly on the palette will do.

This bring me back to repeat an old topic: characters are great for experimentation, and there's often no need to repeat exactly what has been done before. Different shades and tones of the same colour can be mixed together without worry, and this really speeds up painting while allowing for a unique piece that increases knowledge and skill. There are times, however, where repetition is wanted, namely when painting an entire army. I have a particular step-by-step guide when painting Blood Angels, and I don't like to mix paints when doing so because I want to repeat it across the entire army. Having multiple paints and layering them in a proven formula helps paint more quickly with the desired result in that circumstance.

Back to the gold NMM, it does detract from the face. A brass would have been more appropriate I suppose, but just wanted to paint gold. It was very close to being too much, but I think it's on the acceptable side of the equation: the model still draws attention to the face purely from the sculpt, and the gold doesn't quite overpower that. It also fits the idea of a prince using weaponry that while functional also shows off status and wealth.

The base is far more interesting. The toppled statue is a essentially multiple drybrush passes of greys with a hint of blue, while the flagstones are greys, purples, red-browns, even a green wash (Athonian Camoshade to be specific, it's a great shade for more earthen tones). The mix of colours doesn't really show up too much in the end, but it makes an incredible difference when compared to just shades of grey. I could of pushed the effect a lot more, but I decided to simply be content with "next time". Aside from that, brighter flagstones might have clashed with the statue, and I really want that to be the focal point of the base. The status also has inlaid gold just to break up the monotony a little bit, and I think that worked particularly well.

On the point of drybrushing, and brushes in general, I'm actively trying to use my good brushes more often. I rarely touch them because they are the good brushes and only used in special circumstances, but the net result is that they are barely touched and are essentially going to waste. Brushes are not for display and I'd much rather they get put to good use than just sit there! I still take care of them as much as I know how, but the point remains (pun intended): don't leave good tools unused if you can paint better with them.

In finishing this particular model, disaster struck. I was using Purity Seal (good weather and compressor troubles mean leaving the airbrush varnish aside right now) outside and dropped the model directly into dirt. This made the dirt stick to the model, and the fall itself broke the sword. The sword is now at a slight angle, and I was forced to scratch some paint off in efforts to remove dirt and debris (the hair in particular suffered). I think I managed to recover everything well enough, but it was still annoying. Accidents happen.

I recently bought another model, so the current tally of permissible purchases is now standing at 8.5.

-- silly painter.


Wednesday, May 11, 2022

Crimson Court, Prince Duvalle - Part II


"Damn, my hand is all dirty now."

Some more progress on this vampire prince, adding more to the armour, starting on the sword, and of course the skin. There's also the cape, which dark as it is gets very little visual attention but still helps to border the rest of the model.

The cape itself I thought about for a long while before ultimately going back to the Sequitors for inspiration. It's painted in very dark purple tones using oil paints. The actual paint used doesn't give rise to any particular textured effect, but my own use of oil paints gives very different tones and gradients compared to the acrylics, and it's this which results in a subtly different highlight and shading finish - this difference coupled with the sculpted geometry helps to say "not metal armour". The result is still darker than I wanted, at least under normal lighting, but I'm not likely to touch it more. The cape is a secondary component to the model - it's not actually a focal point itself but instead supposed to help guide the eye to focal points, and as such it might actually be more effective in that role with a simpler paint scheme.

The skin did not turn out quite how I wanted either, and I ended up doing a fair bit of lightening and adjustments just about everywhere to get to where it is. Originally I had intended a cold, pale appearance, but it just looked like a frozen statue instead. Pale does not mean cold, it just means desaturated, and it's a mistake to learn from. I suppose the end result is, at least, unique.

  • Night Lords Blue over all the skin areas.
  • Mix a small amount of Ulthuan Grey into the previous step, and highlight where necessary. Then add more Ulthuan Grey and keep highlighting. This was done in several layers, and by the end there were very deep recesses of Night Lords Blue that created far too sharp of a contrast in tone, and so they were glazed over to harmonise everything a little more.
    • Side Note: mixing Night Lords Blue and Ulthuan gives a really nice colour, and probably would be excellent with various Horus Heresy era colours for Space Wolves.
  • Mix a small amount of Rakarth Flesh with Night Lords Blue, and glaze this over mostly upper areas. This was an attempt to bring a little more warmth into the skin tone but didn't quite work as I'd hoped.
  • Volupus Pink (Contrast) mixed with a lot of Contrast Medium to give a very light pink glaze, which was then used across most of the skin. This is a very subtle effect, but just enough to tip it over from code stone to a cold, undead flesh. Not wanting to risk ruining what was managed, I left it there.
  • The eyes are a simple Ulthuan Grey with Aethermatic Blue. I wasn't going to try for anything else when access to the left eye was difficult with a brush.

Armour trim was another area that I needed some time to decide on. Gold would have been too bright, taken too much attention away from the face. Black is a bit of a cheat, but it is rather neutral and I was getting bogged down. So black metal it was.

  • Corvus Black over all the trim.
  • Dawnstone glazed as a first stage highlight. I used an overhead lamp to figure out the appropriate areas for this.
  • Administratum Grey glazed as a second stage highlight, and edge highlights.
  • Ulthuan Grey mixed into the previous step to really brighten it up to almost white, then used for the more extreme highlight points.
  • Abbadon Black glazed into recesses and darker areas just to push the contrast a little more.

It still didn't grab my attention enough until I was looking around and spotted a model with a dark turquoise trim. This would have been much nicer than shades of grey, so I used Stegadon Scale Green and glazed that over the trim. It's barely noticeable, but does shift the colour ever so slightly away from grey and makes it that much more interesting. I probably would start from there, or perhaps Incubi Darkness, were I try this colour scheme again. It's all part of learning more about miniature painting, and I'm always pleased when I add to my pool of knowledge and experience.

The sword I went with the same approach used for Nekima. I won't repeat it all here, instead just search for that post. I'm going to borrow more from that model too for filling in the bones/tusks on the armour.

Still a couple of weeks left on this model most likely, but I've started many others in the meantime and I might post about them next. Skin tone exploration deserves a post very shortly.

-- silly painter.


Tuesday, May 3, 2022

Crimson Court, Prince Duvalle - Part I


You cannot unsee the pointy codpiece.

I've been wanting to start this particular model for quite some time, and I finally cleared enough models out of the way to start it.

To start with I had intended to go with a slightly more red tone, similar to previous fiery haired "dark" elf, but somehow this darker tone just seemed to fit the feel of the model so much more and so I just kind of went with it. More on how it was painted up in a moment.

I have a slight plan on how to go about the Crimson Court. I have an idea for all the models to use a similar armour colour, but equally every model being unique would make it all come together as a collection of individuals. Regardless, the whole leader vampire thing evokes Dracula comparisons, and the armour design used by Gary Oldman's Vlad the Impaler was somewhat iconic. That definitely inspired the look I'm going for here, and so a red main colour for armour it is. I've also been debating the magical qualities that might be present - the pose is one of summoning power, so it seems like there should be a hint of a green complementary colour somewhere - and the sword is an ideal interest point for this. I've done a black sword before, fading into green toward the hilt, and I think this would work here too. The skin I'll likely go for very pale, with either a blue or purple undertone. This would give that extra cold appearance, hinting more of this being an undead character. I'm also intending different skin tones for each of the Crimson Court, which in turn might influence the inspiration that I look to for each in turn.

The cape I'm caught on. Not purple, that would clash too much with the armour. Black seems too ordinary. I'm considering continuing with the crimson theme and go for a very dark red, but perhaps drybrushed or stippled to give it some texture. The armour trim I'm also not sure on yet, trying to decide between a golden look or black. The latter definitely works, I've painted enough to know that, but the catch is selling it as black metal. I'll need to think more that.

For highlighting reference, I pointed a desk lamp from above and took a photo. This naturally shows areas of highlight, especially after the primer is applied, and really made the process so much easier. When doing this kind of highlighting again, I'll definitely be following the same idea: take a reference photo to show where the highlights go.

In painting the armour I ended up using multiple paints, but really it could be cut down to about three. No reason that mixing the base tone with white wouldn't achieve a similar result. Still, I have the paints and it's a good opportunity to explore them and get a better feel for each.

  • Barak-Nar Burgundy as a base coat over all the armour.
  • Mephiston Red mixed with the previous colour and glazed to highlight a good portion. Mephiston Red is a very neutral red: it doesn't tend towards either the purple/pink side, or the orange/yellow end of the spectrum and so can be used to saturate without shifting the colour too much. A little was kept on the palette and glazed over areas there were becoming a little to pink as I went along.
  • Pink Horror was again mixed into the previous step and smaller highlights applied. About here I started to concentrate a little more on the upper areas which are naturally brighter, but also to help draw attention more to the chest and face.
  • Emperor's Children was the next colour to mix in and glaze. This was really only used for edge highlights, and thinned much more on the lower areas compared to the chest and shoulders.
  • Fulgrim Pink mixed in again and used for extreme edge highlights, particularly on sharp corners and those areas I really wanted to stand out. This is an "edge" paint, so the pigment count is very high. It's quite a bright paint, and should be added with care.
  • Following all of this, a little Abaddon Black was mixed with Barak-Nar Burgundy to add extra shadow and help define more of the sculpted shape of the armour. I never went to a pure black with this, instead keeping it a very dark burgundy to help push the contrast.

Over all I'm quite happy with how the armour turned out. I wasn't going for the whole NMM approach: shiny metal gives a lot of reflection and instead I wanted the shine of a hardened surface without necessarily being reflective. This gives a more menacing yet stylistic impression, fitting to the theme I'd like to convey.

There are enough other projects started right now that it might take some time to fully finish this particular model, let alone start on the rest of the Crimson Court. Updates on this model might be rare, or not, entirely depending on what motivates me at the time.

-- silly painter.