Monday, July 31, 2023

Terminator Squad - Part II


Shiny in red.

This won't be a long post, and mostly some commentary about how went a white zenithal to help highlighting. The short version is: it didn't help much.

The idea wasn't so much to have the white undercoat show through, but instead to help guide where to place shadows and highlights without having to change my process too much. In that regard it kind of worked - before varnishing to lock down the paints it did have more visible shaded areas than I have been getting, but the difference wasn't significant. I'll wait to see how they end up, but I suspect that for the next squad I'll try Averland Sunset and Blood Angels Red like with the Dreadnought. 

It is worth noting that there has been no edge highlighting done on any of the squad yet. I'm going to leave that to just before (and maybe a little bit after) the next varnish step. This will definitely help make the model more readable, and might trick the eye into seeing more shading than there really is.

I definitely think something needs to change on how I use the airbrush for painting up squads: I could just leave it and be happy enough, but I do want that little more "pop" out of volumes and I'm out of ideas that don't change the paints being used. The trick will be to keep everything looking cohesive as an army. I guess future experimentation will tell.

The bases I'm not sure will turn out as I really wanted, but as an experiment that's acceptable. I just wanted Terminators to look more comparable to the new sculpts (whenever I get those) but the height on the bases really does stick out. I'm hoping that painting it all relatively flat will reduce that effect. On a note about the bases, I was uncomfortable with the pressure on them given by the painting handles. Instead I epoxy glued a washer to a 32mm base, and just use magnets on the 40mm to hold it in place. The model is still firmly held in place and I've no need to try any other painting handles. Plus I now have an abundance of washers that I'll need to find a use for.

-- silly painter.


Thursday, July 27, 2023

Azrakh the Annihilator - Part V (Showcase)


Also known as "Chainfinger".

Finally calling this model done. I could do more. I could always do more. Some of the face can be cleaned up, some of the green glow behind the head could be brightened, the base is quite plain, etc. I've just reached the motivational limit on this model however, and I'm calling it done.

What a monster to paint up, but an impressive result in the end. And I learned a lot about NMM techniques. On that note, the photo above does not do it justice at all. Between the lighting, camera settings, jpeg compression, scaling, etc, it loses some of the brightness of the extreme highlight points which sell the NMM effect. Too bad, but the actual model does look better.

Ultimately the model is very readable. The shapes are clear, the volumes are clear, the details are easily discernible. The face I actually think is one of my better ones, even if half of that is the great sculpt it's still the look of a mentally unstable and very angry character. For the face I wanted a pale look, but with deep shadows to give that kind of drawn, aged look:

  • Bugman's Glow in two or three thin layers to give a solid base to work with.
  • Darkoath Flesh applied all over, but not too liberally. I also removed any pooling in the eyes and mouth.
  • Bugman's Glow again to start building up the more raised areas.
  • Cadian Fleshtone glazed along upper surfaces, leaving some of the previous step alone.
  • Kislev Flesh glazed more to act as a pale filter and offer yet more highlighting.
  • Flayed One Flesh for the most prominent highlights (nose, chin, forehead, cheeks). I also mixed in a very small amount of white ink for the most extreme highlights.

The eyes are white, and then Iyanden Yellow. Nothing special there. Lips are some of the flesh tones mixed with Khorne Red for a dark pink. The tattoo on the head is purposefully a little less "perfect" than in references - I figured it was done with the blood of opponents and without much care given over to artistry. The teeth are white, then black washed into the recesses and excess removed. I could definitely do more here, but just really can't be bothered.

The green glow emanating from behind the head is different to reference pictures. I didn't make the grooves in the cowling (for lack of a better term) be the source of any lights because it would be difficult to make them not look dark while still having a glow on the outer edges. This is something that to me doesn't fit nicely on the box art, even if it's very striking on the original Mark Gibbons artwork. So I just had the glow coming from deep behind the head somewhere.

  • Waywatcher Green (the old glaze paint) glazed over the head. This was actually a mistake - the paint must have gone slightly bad, or I'm using it in an unintended fashion: some areas it dries nearly white. I've had this problem with shades before as well. Mostly it ended up ok, but I'm not sure about using that paint in future.
  • Waaagh Flesh to give the initial light volumes. This is actually used up to the most outer edges of the glow, where the light naturally falls off the most.
  • Kabalite Green for some edges and general inner surfaces more affected by the light source.
  • Warpstone Glow for edges and sharply defined points.
  • Warpstone Glow / White, which was mixed and used for extreme highlight points. This is far too desaturated for the most part, so I ended up adding more white into the mix to really define the extreme highlights, and then afterwards glazing back over them with Warpstone Glow to give more of a vibrant, saturated green.

For just about every steps written above there's often not a clear application of one paint and then another. I mixed colours on the palette quite frequently to help smooth out transitions, and went back and forth between steps to fix mistakes or adjust if I felt it wasn't looking quite right.

The base I glued some brass detailing onto, and then painted it all just like with the recent MkIV Assault Squad. I toyed with the idea of adding a pile of skulls, but that would have added too much noise and taken focus away from the facial area - not something I wanted to do after putting in all that effort. I then thought about putting some cabling across the floor, but paperclip I was going to use was too heavily influenced by the magnet underneath the base. I could use putty to roll out something, but this is another item that I think is just too much effort to continue with. I did use Black Templar, thinned and feathered out, to darken the base around the feet - some of that isn't a trick of the lighting, it's actually how I painted it.

And with this model done, the tally is now at 12.5 and I can start thinking of what to focus on next.

-- silly painter.


Sunday, July 23, 2023

Blood Angels Librarian Dreadnought - Part II


The highlight of the party.

After travels and some minor health complaints, I'm finally back to painting. There isn't actually all that much to show since the last post as I've only just had a chance to get back into it, however I wanted to record some airbrushing from today.

I pulled out a few spare shoulder pads and did some small experiments in layering to see if I could get some more vibrancy out of the initial airbrushing stages. In particular I wanted to use this Dreadnought as a test piece - being a Librarian there's an excuse for the colours to slightly differ from the rest of the army. I tried white, yellows, and building up reds before a final coat of Evil Sunz Scarlet on some, and Blood Angels Red on others.

The idea struck me that perhaps I could learn from what I'm doing with Ultramarines and use a Contrast paint through the airbrush as a final filter step. The major benefit for me in this approach is being able to more easily see where the highlights will be and making sure they don't blend too much into shadowed areas - whites or yellows against a red base make it instantly visible where the highlight is. I'm hoping this will build up more tonal variation in the final result than what I'm otherwise getting with the airbrush.

Unsurprisingly white with a filter just ended up looking like pink. Not what I was going for. Using a bright yellow such as Flash Gitz Yellow was closer, but still further into the orange spectrum than I wanted. Averland Sunset is a far more muted yellow/yellow-orange and looked about right. So that's all that's really been done since the last photo.

Yellows and whites have a habit of speckling quite a lot for me. I could play with the air pressure, nozzle sizes, distance, etc, but I'm not as proficient with the airbrush as all that. I do find that changing the flow properties of the paint helps me more, i.e thinners and flow improvers mixed with the paint. I find this reduces speckling and also results in a much thinner coverage - perfect for highlighting where I can use two or three passes to build up the transition and mistakes aren't too troublesome. I used 6 parts thinner, 3 parts flow improver, and 6 parts paint, mixed well.

With the Averland Sunset stage done, it was then a simple case of cleaning out the airbrush and the some Blood Angels Red directly from the pot. This sprayed directly over the top gives the picture above.

I might have gone for too much tonal contrast, but I'm sure that will get knocked back by the time edge highlights, shading, details, and varnish is all applied. A good first try in other words. I would like to try this further, however think I might instead use the normal method on the next Dreadnought just to see how it matches up. I strongly suspect I'll be doing more of this Contrast approach on future models though, notably the resin Contemptors that are still to come.

-- silly painter.


Sunday, June 25, 2023

Azrakh the Annihilator - Part IV


All trimmed up.

I've been motivated to keep working away at Azrakh, and for a model like this I really do need to take the motivation when I can. Other projects are being stalled, but the amount I'm learning is well worth it. In some respects the model looks very similar to last week, despite the amount of work I've done on it, but when looking more closely the detail starts to stand out.

The model still looks a bit bland and the reason for this is that the red armour hasn't had much in the way of highlighting yet applied. That's coming soon enough, but the silver/steel/black metallics are being done next.

Working through the armour trim I've definitely improved quite a lot. Using the box art and original artwork helps a lot, although I've adjust very small spots as I see fit. It's helping understand some of the NMM principles and how to portray light interacting with various shapes. I'm not going for physical accuracy, but instead readability. Basically the model should look cool but also be easy to make out details, shape, and volumes. Much of this comes down to edging with bright, near white mixes, particularly next to dark, shaded locations. Contrast is key.

While playing with the paints I decided not to use White Scar for white. I have trouble with acrylic white paints - they dry quickly, go chalky, and need constant cleaning of the brush. The flow improvers dry out far too quickly on the palette, so I tried using an ink instead (specifically Daler Rowney White). It takes a little practice, but ended up working really well when mixed with other paints and using only a very small amount to dot specific points (such as rivets). It's not quite as "pure" as White Scar, but it's close enough not to matter for my purposes. The ink does dry out quickly on the palette as well, but it mixes in with water again quickly enough and remains viable for a while that way.

Originally I looked at silver NMM recipes, then steel, before realising that I wanted neither. It's closer to steel, but a dark steel and I opted to adapt the black armour NMM from Juan Hidalgo. Same paints for the most part, but applied differently - think of it as using his recipe as the basis for my approach rather than copied vertabim. I'm also still exploring approaches, but I think this will be similar to what I end up with.

  • Skavenblight Dinge across the steel area.
  • Stormvermin Fur glazed as first highlights.
  • Administratum Grey as edge highlights.
  • Incubi Darkness / Black about 1:1 and glazed into darker areas.
  • Black for the darkest areas.
  • White mixed with Administratum Grey as extreme highlight points, with pure white generally reserved for small dots.

The use of Incubi Darkness was done just to add a hint, even if a barely visible one, to tie it together with the green used in the brass shading. There's also a lot of going backwards and forwards between different steps, glazing. fixing mistakes. Originally I started from black, but that works far better as a glaze to darken areas, so I've moved to Skavenblight Dinge instead as a midtone. There might not be as much of the midtone left alone, but it's still far easier to use as a starting point.

I might give the model a short break after completing the NMM steps. There's still the armour to highlight, a couple of smaller details, and of course the head. It's going to take a long while yet before this model is done - and there's a good deal of travel again coming up.

-- silly painter.


Sunday, June 18, 2023

Blood Angels Librarian Dreadnought - Part I


Excuse me sir, I have a question.

I've finally returned to some more dreadnought work, though admittedly very little because the bulk of painting time has been NMM trim on a certain other model. Much of the time in preparing a model like this is simply cleaning, positioning, and deciding on sub-assemblies for airbrushing and general painting.

The positioning of the Librarian here is based on some fairly popular artwork in which the force weapon is pointed towards the sky, summoning some psychic power perhaps. The left arm is normally pointed slightly higher, but I've not glued either arm in place just yet, and the photo angle doesn't show the pose as dramatically as a lower angle might (something I'll try remember for a future display). The red armour plates on the torso are also not glued in place just yet, because I intend to airbrush some metallics around the legs and torso just to avoid spending hours with a brush for the same. I have yet to decide if those metallics will be covered in an oil wash or not - it's still an incredibly effective shading technique and gives a much grittier feel that worked so well on the Titanicus Knights, but it's a painting hassle to setup, apply, then cleanup brushes and workspace that I never look forward to.

The airbrushing so far hasn't had a final highlight applied. I've held back so far because the airbrush was getting clogged at the time, and I'm considering if I should experiment with some of the highlighting methods. I could use a thinned white to increase the brightness of the later layer, and even then I'm not sure if I should follow up with Evil Sunz Scarlet or Blood Angels Red (Contrast) paint through the airbrush. I could also use a yellow instead of white, but then it's a consideration of which yellow. I think I'll have to find some spare bits and experiment with several combinations first, to then decide which I like best. It's not like I don't have many, many spare shoulder pads to use for this purpose.

I guess I'll try the various methods and then choose a couple to go forwards with. This isn't the only dreadnought in the pipeline, as I've also assembled a Furioso to work on at the same time and each could use a slightly different approach to the red highlights without looking out of place in the army - simply by virtue of there not being other large walkers to compare them to.

I'm also considering if I should buy a Nemesis Dreadknight as the basis for a conversion effort. I have quite a few spare pieces from the Blood Angels Dreadnought kits, and I could really go to town on that kind of conversion. Unfortunately it would add yet another dreadnought to try get done this year - and I have enough pending that completing them all in the next six months is unlikely as it is. This is also an idea that I'd likely look to ebay for first, seeing as it's an expenditure that won't be considered trivial.

-- silly painter.


Tuesday, June 13, 2023

Azrakh the Annihilator - Part III


When NMM makes the eyes tired.

After staring at the work in progress model one too many times and deciding I wanted to try finish it before the next Warhammer+ model comes along, I've finally progressed more on this insanity. I'm still following the box art as much as I can, and it's definitely forcing me to get a feeling for NMM, but there are times where I seriously regret deciding to paint the model this way.

Then there are other times where the results are amazing and it definitely looks far better than if I'd used metallic paints. Hopefully this will be the feeling whenever I manage to finish it all.

Rather obviously I'm not done with the trim yet, and the keen eye will notice a tone difference between the shoulder pad and everything else. I've not yet added Lamenter's Yellow glaze anywhere else yet, so I'm hoping that will harmonise everything - and if not, well...I'll deal with that later. I've otherwise tried to follow the formula from before, but given the months gap between then and now, then I shouldn't be surprised if it ends up slightly different. I may have to refresh the paint on the palette soon as well, which again might introduce some more variation.

I haven't done any more of the red armour yet. Nor have I started on silver and grey NMM areas. There is still an awful lot to go on this model, and it's taking time away from other projects, but I would like to get it finished.

The only other new item of note in this short post is the use of white recently on the palette. I've started to try using a white ink, which is surprisingly useful. It flows nicely when mixed into other paints, and doesn't separate or dry out as quickly on the wet palette. I think I still prefer White Scar for point higlights, with the ink being closer to Corax White, but the ink is probably going to be better for glazing. I'll continue with the model and see where I get.

And now back to the left arm.

-- silly painter.


Wednesday, June 7, 2023

Terminator Squad - Part I


I see a white dust and I want it painted red.

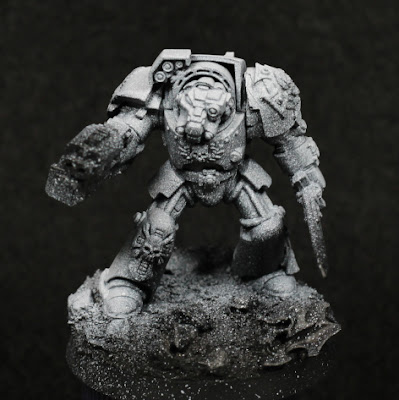
As the next round of background models I've started on more Shield of Baal models: a Blood Angels Terminator squad. These are the older models, but still look excellent on the table. As can be seen above, I've also decided to try a few things and see how it goes.

First off, I made a couple of assembly mistakes. The Sergeant has the wrong torso piece, it's on another squad member, so I'm not sure what to do about that yet. I'm thinking of going through spare bits and seeing if I add something to not-squad-leader that makes sense still. The other problem is the left pauldron - I attempted something one one (more on that in a moment) and it didn't work - meaning there's two "special" Crux-Terminatus icons. Little things, but still annoys me.

I still have some old Forgeworld resin shoulder pads, but seeing as they're not made anymore I tried to make a mould of them and copy the insignia onto plastic shoulder pads. It can be made to work, but the effort involved and the number of mistakes along the way was just too much. I could be at it for a week per should pad, and that's just a waste of time. There are limits, and I'm constantly trying to find ways to reduce my backlog faster, so I'm far more accepting of "less than perfection" these days. In this experimentation I ruined one of the plastic shoulder pads, so the Sergeant is now using one of the resin ones.

The right shoulder pad I cheated slightly with - it turns out that the Aggressor shoulder pads are an excellent fit for Terminators. Some excess trim needed to be removed, and there's a "cut" into a corner that doesn't match up, but none of that is really noticeable. I don't like decals and I had the spare shoulder pads, so it seemed appropriate.

One of the problems with older models is scale creep. The old Terminators are rather short compared to Primaris, and they would look rather small next to the newer Terminators, so I wanted to give them some extra height. I'm not willing to try bulk out the legs and give more torso - other than being a lot of effort, I'd also not do a great job of all of that. Instead I decided to raise the base just to make the models taller when standing next to others. I'm not sure how well it will turn out, but have to try. To do this I put each model onto a 32mm base, and then glued that to a 40mm base. The edges of the 32mm base where wrapped in milliput, with slate stones and skulls pushed into it to give more weight and to make it look less like a spherical mound. Some was glued on top as well just to break up the flat surfaces. Some PVA glue and sand added texture, with texture paint applied selectively where necessary. So far it appears to look alright, but again I'll need to wait for the models to be finished before I really know how it will turn out.

I'm going to try something different for painting the armour this time, which is why there looks like an excess of white highlighting. That's mostly just the angle. I used some black primer through the airbrush (no reason not to use a rattle can other than I need to use up the airbrush primer), and then highlighted with white mostly from above. I was perhaps a little too heavy with the white, and I didn't thin it enough - the spatter is most annoying. Hopefully this will fade with future steps, but the main reason for the white is to try make the red highlights a little more vibrant. I intend to use the darker red in the shadowed areas, then start covering the white with Mephiston Red and blending that into the darker locations. That should help inform where to apply Evil Sunz Scarlet, and if it works will give a much brighter finish.

In future I would like to try a yellow covered with Blood Angels Red, and perhaps compare that against white and grey covered with red as well, all using the airbrush. It's a bit late to do that across squads as it probably won't fit with the army, but I'll find models to use.

I do have some other models being assembled, but I probably won't start posting about them until initial airbrushing has been done. Hopefully not too many days until that's ready, I'm trying to use the airbrush once a day just as preparation for all of this.

-- silly painter