Wednesday, March 20, 2024

Blood Angels Librarian Dreadnought - Part VII (Showcase)


Space wizard in a robot suit.

I'm calling the Librarian Dreadnought done. As is typical, there's always more I could do, but I think it's time to move on to another piece now. I'm overall satisfied with the end result, and I think as a model it holds up well even after all this time. The character that it portrays beats any of the more modern dreadnought designs.

The red I think worked out quite well. I was a bit concerned that the varnish would tone everything back too far, but I think it's ok. The photo doesn't really do it justice - the gradients are a little smoother in reality, particularly on the right shoulder, but I'm hopeful that as I continue to refine it a little then it will become what I wanted airbrushing to achieve in the first place. I'll still paint special models by hand, but it can replace squad based work...maybe. I'll find out with the assault squad.

The force weapon I kind of just stopped with. I could go back in an do a lot more detail, but basically I just didn't feel like it. I probably would have if there wasn't a sculpted design already in place, though now I think about it I could just make that design glow.

It's about here that I was considering again about why I paint, and what I want to achieve. Ideally I'd like to move onto single miniature work one day. That's the goal. To do that however, I'd need to put aside painting up armies, as there's just no time otherwise. So instead I'm focusing on above average tabletop standard for squads, a little higher for characters, and building up an army in that style. It won't ever win a painting competition, but it sure looks nice on display and I can experiment a little more easily. All speed painting techniques, all hacks to make me paint faster, are only done without sacrificing quality.

All that said, I think I'll have to get out an extra-special model soon and really go to town with it, over time.

-- silly painter.


Thursday, March 14, 2024

Blood Angels Librarian Dreadnought - Part VI


Put your...hands? In the air!

Some progress on this Dreadnought, even if it's painstakingly slow due to being basically incredibly busy right now. Still, progress is progress and it shouldn't be that much longer before I can call it done.

The major change has been to the base, where I went with a black marble again. Actually I also left some of the airbrushed red in places to give it some colour from that, but mostly I just played around with various colours to give the characteristic veins of marble. In doing so, I believe I've come up with some new ideas on painting marble.

One of the steps that's often missed with generic baby wipe and airbrush is that marble has shades, not just lines. Shades and transitions between them can often inform where to places veins actually, and soften some of the harder lines later. Normally I just fill in some colour and then feather it out randomly to help define these shades, but then I was playing with contrast paints and actually using something like them and allowing some "coffee staining" to take effect gives an easy, random, and convincing edge to act as a guide later on. The trick is to make sure it all flows in one general direction instead of being circular. Overlapping this effect (allowing drying time between of course) can even help give some depth impression, before and after building up some the striations. I want to explore this more later, and will definitely search for an excuse to do that - possibly with the next Dreadnought.

As a minor point, the colours were Abaddon Black, Corvus Black, Eshin Grey, and Mechanicus Standard Grey, with a little white or pale yellow mixed in places if I wanted something that little bit brighter.

When the marbling was done, I still wanted to add some shadows and highlights. Space Wolves Grey glazed into areas worked rather well to add shadow and some ambient occlusion, while Apothecary White acted as a general brightening filter. Using Apothecary White in a more concentrated fashion also helped give definition to the broken sides; marble has a quality where broken edges look brighter, and this was a fast and mostly acceptable way to achieve that look. A little Wyldwood around some areas in various concentrations (glaze vs shade) gave some more earthen tones, though I might add a little more rubble and dust before I'm done.

Moving onto metallics, I played with mixing blues, purples, yellows, and browns to get a machine oil look on pistons. In the end I mostly went with Snakebite Leather. On its own it's almost like a fresh lubricant oil, perfect for those parts which receive regular maintenance. Adding a blue or purple helps dirty it some more, edging it closer to thickened grease. I'll have to remember this when it comes to Imperial Knights.

Space Wolves Grey works nicely over Grey Knights Steel as well. I played with this on the force weapon, but there's not much to show there yet. It darkens without shifting the colour away too much, and I want to experiment with that to paint metallics in a NMM style.

Next up I'll be working on the scrolls, purity seals, etc, to put "writing" on them, and then I can probably lock everything in place with a varnish. Then I'll be able to see how well the reds turn out. I did edge highlight in a few places, but much of that will be toned back with the matt varnish and will need re-applying later. I just need a couple of days without being too otherwise busy and I could get it all done, but let's see how that goes. I'm not counting on it.

-- silly painter


Sunday, February 25, 2024

Assault Intercessor with Jump Pack - Part I


Shiny armour is shiny.

As a bit of a background project (because I don't have enough of those already!) I bought a bunch of the older jump packs with the idea of converting an Assault Intercessor squad into a jump pack capable squad. This was before the newer models were released, but while I don't entirely dislike the newer jump pack design, the ankle thrusters look out of place to me. I also prefer the poses of the non-jump assault infantry, so just putting old style jump packs on them combines the best of both worlds really.

I also just realised that I haven't added all the appropriate bling to this model yet - various pouches, backup knife, holster, grenades, etc. I was apparently in a rush, so I'll need to glue them on later.

Mostly this model right now was an excuse to test a new way of painting up red armour. I don't have it fully nailed down yet, but I think it shows a lot of promise. The basic overview:

  • Dryad Bark / Mephiston Red in a 1:1 ratio, over the whole model (airbrush to make this easy). This will serve as the shadowed colour.
  • Mephiston Red (again with the airbrush) for basic midtone.
  • Averland Sunset (still with the airbrush) to sketch out highlights.
  • Blood Angels Red (Contrast) (yep, the airbrush) to cover the last layer and blend it all together.
  • Gloss varnish (airbrush still makes this easy).
  • Carroburg Crimson mixed with artist grade acrylic flow improver (not Lahmian Medium) and used as a pin wash.

There will of course be edge highlights later on, and a matt varnish followed by any edge higlight touchups, but that's the basic approach I'm trying to use now.

I've learned to properly thin paints in an airbrush, and that helps dramatically. Cleaning is quicker, fewer dry tip problems, and far more control. The Averland Sunset helps to show where the highlights will be without getting lost in smooth transitions, but I'm still getting used to upping the opacity with several layers here. The brighter it is, the more it will show through the Blood Angels Red filter.

The newer Carroburg Crimson formula works nicely as a pin wash when combined with acrylic flow improver. The older shade formula didn't seem to mix as well, and thinned out too much - just didn't seem to work as nicely. No water or dish soap was added - the flow improver has low enough surface tension as it is, and combined with the gloss varnish it was almost like working with an oil wash. The drying time is increased slightly too, so any mistakes can be fixed up quickly.

There are downsides of course. The gloss varnish obscures mistakes sometimes, and they only show up after the matt varnish is applied. I'm hoping that won't happen here, but I'm likely to do this first test model before I try move on to the next nine of the squad.

I'm both hopeful and slightly confident that this approach will work out. It's not necessarily fewer steps, but each step can be done with far more confidence. This means fewer mistakes to fix, and a greatly reduced time spent on each step. I should be able to get this basic level done much more quickly - but I'll very possibly only use this on basic squads. Special characters that I really want to stand out are still almost certainly going to use a trusty brush to really control the highlights.

I'll continue this model as I go with other projects, such as the Dreadnoughts which are next in line to be finished.

-- silly painter.


Imperialis Baneblades - Part II (Showcase)


11 barrels of bling!

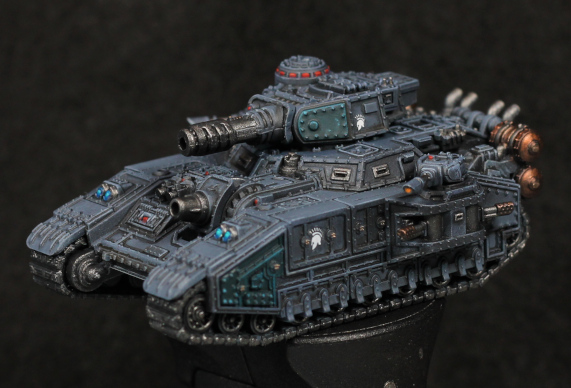
I'm calling the Baneblades here, if for no other reason than I've had enough of painting them. I messed up with them, and simply don't feel like investing the time to redo and recover them.

The main problem is the colour scheme: I don't like it at all. It doesn't work here. The models are simply too dark, which makes the Blingblade trim stick out too much, airbrushing didn't work, recess shading doesn't give enough contrast, the list goes on. The trim on the Blingblade I decided to cover up with Balthasar Gold because it was far too much of an eyesore, and I can tell why they have that trim on the Imperialis models: it outlines the shape. You can instantly see on the table what kind of tank it is, and I think it really works with the right colour scheme. In future I would probably do something like the Solar Auxilia with Contrast paints. I don't always like copying colour schemes, but I'm not sure what else I'd like to do here.

Drive me closer, I want to use flamers!

The second Baneblade I didn't paint the trim, and used Agrax Earthshade to dirty down some of the recesses, and I do like the end result much better, but it's still missing something. The shape isn't as well defined, so perhaps some more tone contrast on the edges could help with that. It's no good collecting more of the Imperial Guard tanks until I know how I want to paint them.

What did work was the barrels on the back. Warplock Bronze, and Screaming Bell over the top. I also mixed in Sycorax Bronze for additional highlights, and it ended up very close to how I wanted. I generally use this kind of look for canisters that might have a flammable liquid, or otherwise might need to deal with intense heat. It also gives much more visual interest to the models.

The viewports are basically Evil Sunz Scarlet. I tried a purple to shade them in places, and Fire Dragon Bright for highlights, but not much of anything other than the red shows up. The front headlights are Dorn Yellow covered with Talassar Blue, which gives a very bright, light, vibrant blue. Such points help to break up the plain colours and gives little hints of visual interest - it's not much, but it's critical to have.

Not much else to say. I should have started with drybrushing, then used contrast paints, and maybe a bit more drybrushing to highlight. Next time.

-- silly painter.


Sunday, February 11, 2024

Imperialis Baneblades - Part I


Blingblade.

I picked up a couple of Baneblades for Legions Imperialis because tiny tanks. They are not going to plan.

To start with I intended to follow the ideas from the Rhino experimentation. White undercoat, some edge highlighting, and then Space Wolves (Contrast) over the top. The problem really is that the design of the Baneblade doesn't have a whole lot of flat surfaces, even if the basic shape is a box. The detailing doesn't lend itself well to the highlighting I was trying to do, and there was insufficient space to give enough of a gradient. Instead I should've simply stuck with highlighting with a drybrush.

With all those guns, must have a convoy of ammunition behind it.

I've been practising my drybrushing with relatively cheap army painter brushes, and I can see the potential. The trick really is in getting the consistency of the paint just right - not flowing like a wash, but not actually dry either. It will take a lot of practice to get "right", but for a model like this it's an ideal approach.

I'm also attempting a different approach to some of the metallic areas. Instead of base coating and then washing into recesses, using a Contrast to darken and then layer over the top with a metallic. This is basically drybrushing but in a far more controlled fashion.

The other trick I've been trying here involves gloss varnish, Black Templar, and acrylic flow improver (not Lahmian Medium, which has other components that make is unsuitable here). Basically mixing the flow improver with a Contrast paint gives it a similar behaviour to oil washes over a gloss varnish, and I used it to recess shade the model. Using Black Legion would probably work better owing to its more concentrated pigment count, but the idea looks to be sound. The result rubs off quite easily too, so a matt varnish later will almost certainly be required, but mistakes can also be easily corrected. I will be trying this a lot more going forward, but it only looks to work properly with Contrast paints - I couldn't get the same effect with regular acrylics.

Unfortunately I'm not convinced with the golden armour trim look. The gold is too bright in contrast to the rest, so I've not done it on the other model yet. I'm unsure what to do here: go with the trim, or go with a far more unified armour panelling look? There are still plenty of details to fill in, so perhaps I should just do those first and see how I feel at the end. The Blingblade can be some rich aristocrat's personal command vehicle or something.

-- silly painter.


Terminator Chaplain - Part IV (Showcase)

Guidance counsel get serious.

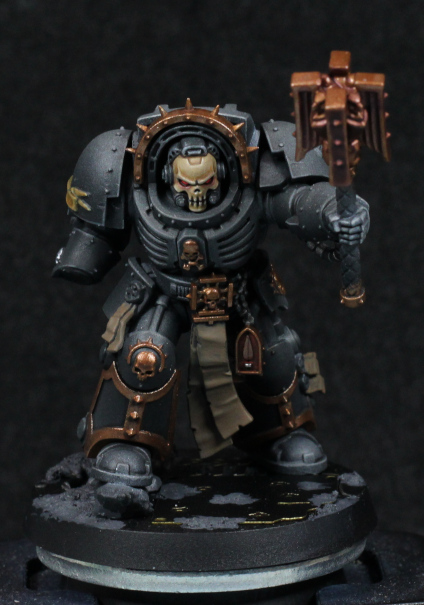
Rather than spend any recent time with posts, I decided to simply finish this model instead. In what is becoming an annoying trend for the year, yet more health problems have made it take far longer than I'd like, but I'm calling it done now.

As an experiment in using Contrast through an airbrush it kind of worked. I wouldn't use the same approach for black again, at least not directly. I would probably prefer a very slight hint of blue were I to do this again, but whether that's mixing into the Contrast step or as part of the original volume highlights I'm not sure. I also would prefer some of the edges to be more sharply defined - and that's actually difficult to do with already desaturated colours. It ends up looking like the left hand, which doesn't look black then.

The lack of red on the pauldrons was a wiser choice I think. It fits within the overall theme much nicer, and ties in with the idea of leading Death Company, or someone close to joining them such as the storyline in Death of Integrity. The trim in gold was also a saner choice compared to trying to do everything black, which would only have worked had the black armour worked better.

The base was intended to be interpreted as either in a Space Hulk, industrial, or heavily constructed urban environment. It was initially too light and needed to be heavily toned down and given a small bit of interest to balance things out. It kind of works; I could do much more to it, but that's true of just about everything I paint up.

Faith is my shield!

The shield worked well enough in the end. The subtle red is nice, though next time I'd like to airbrush that first. That wasn't an option here as I didn't really know how I wanted it until much later. Although I did ruin one of the purity seals (the paint smudged out of place), the bones worked out nicely. I want to keep that in mind for skeletons in future:
  • Wraithbone base coat.
  • Druchii Violet in the shadows, recesses, and surfaces facing away from the light source.
  • Skeleton Horde over the whole surface - not too heavily, but not exactly light either
  • Wraithbone thinned and glazed to highlight again.
I'm convinced that a mix of primer, washes, and drybrushing could replicate the look closely enough for army painting. Even a base coat of violet and then zenithal of Wraithbone, then Contrast and drybrush should be efficient enough for painting, say, a Tomb Kings army.

Finally, decals and micro-pens make putting writing on scrolls incredibly simple. If I really wanted to take it a step further I would paint over the decals, but in this case it looks good enough as it is. The count is now at 4.5.

-- silly painter


Friday, January 26, 2024

Terminator Chaplain - Part III


I'd like this guy as a school chaplain.

I wound up going with metallics for the chaplain, which so far seems to be working. The photo has them dulled down due to washes, but that will be fixed up later on. The main idea though is to be careful with the later highlighting and keep it consistent with non-metallic paint highlighting.

I'm using Balthasar Gold as the base here, just to keep it darker and in line with the gold method already used for the rest of Blood Angels that I've painted. There's also something else I've done: most of the details are gold, with very little variation in other colours. Sometimes I might paint a skull in bone colours, although for time saving practical reasons I've been doing less of that lately. I might try and paint a skull silver, but with a golden halo. None of that here: the trim and details are all the same. This isn't being lazy (although I certainly don't mind it being uncomplicated), but rather that I kind of felt it fit the model. Sometimes there's a certain elegance to simplicity. In the case of a Chaplain, I also feel that it lends an air of unyielding strength, the one in question devoted to their role and doesn't need flamboyance to show it. Sure that might be going overly analytical of a simple colour choice, but keeping in character to the model is what often informs how they're painted.

I don't have a photo of the shield, and was having a tough time deciding on the colours to use there. The background colour in particular I couldn't decide on, and then was playing with Blood Angels Red (Contrast) on a black background and thought it looked perfectly suitable. It was basically glazing the contrast paint on repeatedly until a transition from black to red started to appear. It's quite subtle, and I might need to edge some of it in Mephiston Red to bring it out a bit more, but thought it was a good experiment in yet another way to use Contrast paints. They're not normally applied over black.

The base I'm playing around with, but will probably go for something similar to the 30k assault marines in palette, with the idea that it can fit an industrial area or possibly the inside of a vessel. I don't have parts for "void war" bases or I'd use those: the armament suggests close combat in confined spaces (e.g a Space Hulk). I'll see how it goes.

Otherwise the model now feels to be well on the way, but there is one final note to make about it. With some details filled in, the black armour feels somehow "soft". That's only natural coming from the strong diffuse highlights; hardened black surfaces wouldn't have a reduced volume highlight profile, and be far more specular. I don't really want to fix this just yet, except perhaps on the feet, but at the end it might be a good idea to add very bright, defined edge highlights in places to darken the rest by comparison.

Definitely going with a white chapter symbol.

-- silly painter.